Collective Evolution – FB Post
This post is from a FB group called Collective Evolution. I’m sharing it here because it says a LOT.
***
This post is from a FB group called Collective Evolution. I’m sharing it here because it says a LOT.
***

I ran across this one in a queue of music that Google/YouTube curated for me. I must say, I have become a big fan of Inappropriate Jazz, which is advertised as “edgy angry woman singing.” I admit, I would not want to listen to the entire album in one sitting, but dispersed throughout my day, it’s a fucking pleasure. Heh…
So many people have told me what a lady should and shouldn’t do, over the years. I got tired of it, stopped listening entirely, and simply focused on being the best PERSON I could be. It wasn’t until my early 40s that the idea of being a lady came up again. I’m still not sold on it, but there are moments when I dress “as a lady” and behave myself with a modicum of politeness because it’s appropriate to the time. I suppose in those moments, I could be called a lady.
In any case, this song makes me smile.
Sometimes you think you know a musical artist, and then they throw you a curve ball. Alice Cooper was like that. He started out wanting to be the “worst band ever” and became popular. Then they did the 70s thing and went mainstream (that’s where this song comes in). And then shock rock became a thing, and he found his complete groove. I hope you enjoy. This is one of my favorite Cooper songs, and it never got air play because it’s not “scary” Coop stuff.
There are moments I like being a lady. There are times I actually settle into a comfortable grandma moment. But let’s be honest, now… I’m not that way by nature. This song sings to my soul. 🙂
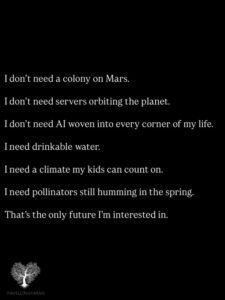 I’ve seen this one go around lately, and it has that lovely “feel good” vibe. We need all these touchy feely things, and the future will be just fine.
The problem, of course, is that a colony on mars will help us with drinkable water. Servers orbiting the planet helps us figure out climate issues (because, while I may not see the widespread planet-killing eco disaster the Left claims, we do have things we do poorly, and being able to monitor the planet better would do good things). There’s a non-zero chance that AI might solve our pollinator problem.
I have found that there is a certain part of the Left that seems to believe that if we all just lived on tofu and kale chips, and only drank recycled pee, walked to work, and everyone had a garden, things would immediately reverse and the world would be rosy, and everyone would get along. Cue singing Kumbaya. Oh, I forgot not showering. I’m not sure where that comes in, but they never seem to shower. Ugh.
Now, I have no issue with tofu and kale chips. I rather like both, quite honestly, but I want them when *I* want them, not because nothing else is allowed. I’d rather avoid recycled pee if I can, unless I manage to get shipped off to Mars, in which case bring it on! We almost had most people working from home, and while I am dead set that it should be voluntary and not required (as it was with covid), it did solve a lot of problems. Six weeks into our lovely lock downs, all the smog was gone, plants and bees and gardens and animals were all doing much better. Sort of put shut to the idea that it would take decades if not centuries to repair “all the damage we’ve done.” I do think most people should have a garden, even if all they do is grow some peas or a tomato plant, because it’s good for the soul and it reminds us where food comes from. I think too many people forget that.
The thing is, we can responsibly use modern tools like AI and satellites for many things. I use AI all the time for research, where it cuts down on my “random searching on the interwebz” time. Yes, I verify everything I’m told, because AI is not infallible because WE are not infallible, and it learns from us. But it’s still useful. It takes research from “days or weeks” to “hours or days,” which is huge for me. I use it for organization. I love satellite images, because I can see all sorts of things. I can watch recreations of historical battles done by AI using extant information over real modern maps. It’s amazing. I’m sure people thought gas and electric stoves were the end of the world, at one point. I know that many people fought against the removal of candles and the addition of gas lighting. It’s always hard to accept change when it comes.
But here’s the thing I see… Building a colony on Mars? That means we’ll have terraforming going on, which is absolutely applicable to our own planet. If you can turn Mars red soil into something we can grow in, then we can apply that to the Sahara Desert. If we can explore (in a few decades) the methane oceans of Titan, then maybe we can also create safe ways to navigate the depths of our own oceans. And so on. Progress allows us to learn new things about our own world, even as we explore others.
Then, of course, there’s the idea that was often touted by Heinlein. When humans find a new frontier, they go for it. They go for broke. They do crazy, insane things to go exploring. And there is a certain percentage of our population that are simply wired that way, and no amount of “reprogramming” is going to change them. They SHOULD be encouraged to challenge the new frontiers. The other side of that is that those who leave Earth to go elsewhere will toughen the breed. Those left behind will not advance as quickly as the ones who go out and explore. He believed that those who never face the raw, unforgiving nature of a space frontier are far more likely to embrace socialism, authoritarianism, and conformist rules. (LA Public Library)
The end of the meme says, “That’s the only future I’m interested in.” That seems to be exactly what Heinlein feared, doesn’t it? Because the future I’m interested in includes infinite possibilities. There’s room for those who want to be home bodies, and those who want to explore. For the gardeners and the hunters. For the thinkers and the doers. The burger flippers and the rocket scientists. We need them all, and more. I want to know what’s in the deepest parts of our oceans, and I want to know what’s on that watery planet at the very edge of our telescopic vision. I want to meet aliens, and I want to be at peace with folks at home.
I want all the futures. I’m interested in every single one of them. From AI to pollinators to satellites. All. No boundaries. 🙂
Talking about taxing the rich made me think about Leftist math, which made me think of New Math and the troubles I had learning it. So this is for all of us who struggled with New Math. 😉

 The big noise I hear from the Left is, trickle down economics don’t work. They cite a lot of stuff (Grok can give you a whole explanation, if you care to read it), mostly that cutting corporate tax rates doesn’t stimulate the economy because corporations then invest or spend the money on their executives, and that it “exacerbates inequality.” While I can agree with the idea that a good, effective fiscal policy should include incentives, fiscal sustainability, and broad opportunities rather than just trickle down, I don’t want to throw away the baby with the bathwater.
I look at the shenanigans going on in New York right now, and I can see that at least SOME trickle down works. It seems Mamdani was expecting the “rich folk” to stay and pay exorbitant taxes. When they left, their trickle stopped, and now Mamdani is upset. He ran on the idea of free childcare, free buses, and a bunch of other “free” stuff. The problem, of course, is that none of those things are free. They all require the work of other people, something socialists tend to forget about when they calculate how much to pay for things. Someone’s labor is worth dollars.
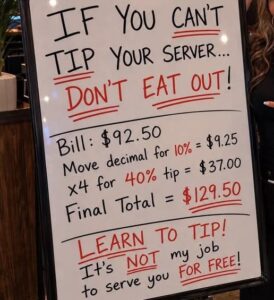
Now, please understand me… The person flipping your burgers is giving you labor, too, and that person is worth dollars. Right now, it appears that most people agree (and more importantly, the corporate overlords agree) that their worth is about $15 per hour. That appears, at least for now, to be sustainable for McDonald’s, Wendy’s, and the other burger conglomerates. This is (at least in my state, where the legal minimum wage is $7.25/hr) a decent wage for someone working in food service. Having worked at a McDonald’s in my youth, I can tell you that the training is excellent, the work is hard and exhausting, and the take home pay isn’t too bad. For a youth it’s excellent, and for a young adult it’s truly a living wage if you’re working full time.
One of the big issues I have with some capitalists is that they don’t appear to value the labor of those who are “below” them… the burger flippers, the guy who cleans the bed pans, the gal who greases the gears at the factory. Now, I’m not saying that low skill jobs should be paid the same as high skilled ones (whatever the skill may be). Making burgers is not nearly as complicated as making precision ball bearings (one of the local companies that hires young adults in my area of the world makes these, and provides training AND education to their workers, so that they can improve and better themselves while also doing a good job). Making precision ball bearings with a machine is not as complicated as making a plane engine. Making a plane engine isn’t even close to being as complex as making a rocket engine. And so on. There are tiers, and multiple factors do need to be taken into account… not the least of which is the idea of whether anyone would be anything but mildly inconvenienced by the disappearance of said job. If burgers stopped being made, people would eat at home, and probably gripe less and lose some weight. If precision ball bearings were to stop being made, planes would cease to fly in the sky, and many of our very important machines would stop working. And so on. Some jobs are worth more than others (which, I will also add, is not the same as saying the people in those jobs are worth more or less), simply due to their nature.
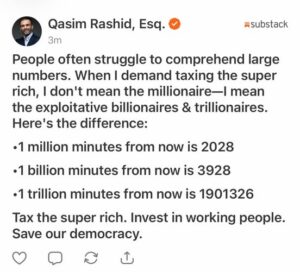
But I digress. We were talking about taxing the rich. Oh… no, taxing the ultra-rich. So here’s the thing: the rich (millionaires, for instance) are not the middle class they once were. Largely, they are not paying as much as they did. The ultra-rich (the billionaires, and our one trillionaire) are paying considerably more than their fair share of taxes in the world. Of course, that depends on what you consider fair. Some on the Left consider a 90% tax rate to be perfectly fair of a share. I do not.
In our country, the rich and the ultra-rich pay a lot. “High-income earners contribute the vast majority of U.S. federal income taxes. The top 10% of earners pay roughly 71% of all individual income taxes, while the top 1% alone accounts for approximately 38%. Overall, the top 50% of taxpayers contribute over 96% of the total income tax burden.” (NTUF) A few years ago, Elon Musk paid over $11 BILLION dollars in taxes, which is equal to 0.15% of our country’s budget. A single man. I think that’s considerably more than his fair share.
Now go look at the image above. By making the numbers look incomprehensible (and yeah, they ARE incomprehensible except for a few math geniuses), they make it scary. That makes it easier to get their ideology across. They present it in such a way that it sounds like a) the super rich are not working people, b) that taxing the super rich doesn’t affect other working people, c) that not taxing the super rich means you’re not investing in working people, and that d), all of this means our democracy will die. Because we didn’t tax the ultra-rich.
Fear is a great motivator. Part of the problem we’re seeing now is that, even when people on the Left start to figure out that they’re being duped, the fear kicks in. It’s incredibly motivating. I still get caught in some of the fear traps the Left tosses out, until I go investigate. The problem, of course, is that a single human being simply cannot investigate all of these things. Even doing a few is exhausting and draining.
In the same way Trump overwhelmed the Left’s social media machine in the first few months of his Presidency, by simply being a few steps ahead and tossing out media land mines as he moved, he was able to make certain they were always hours or days behind. By the time they caught onto something, he was already three memes ahead. Well, they’re doing that with fear. They’re chumming the waters of social media with fear bombs. Yes, I can look some up and dismiss them. But I just don’t have TIME to look them all up. And just enough of them have the potential to be real (or have portions of them that are based in reality) that you can’t just write them all off. So what’s a girl to do?
I rely on media that I trust, which is hard, because I just went through the whole “the entire media is lying to me” lesson. But I … trust but verify. When I can. And when I can’t, I move on.
So here’s the thing I keep reminding myself of. Our parents and grandparents and greats, they didn’t have access to the news we have. They lived very different lives, and in some ways, very much happier lives. The problems they had, they didn’t have to do with Iran or Iraq, or mass shootings, or kids eating Tide pods. The reason was, they didn’t KNOW about those things. They only knew what they read in the paper, and unlike the internet, the paper only has so much space. Only the most interesting and useful news goes into them. All the petty stuff? You might occasionally get a special edition on a Sunday that dealt with it, but not everyone read the Sunday paper for just that reason.
So I limit how much “news” I read. I can’t vet it all, so I only read what I can vet. I don’t stress out if I don’t know everything. I share interesting news at breakfast with the family, and they share their interesting stuff. Each of us likes different things, so we get a nice cross-section of the available news of the hour. It’s enough.
And when people ask why I’m not outraged over the fact that the ultra-rich aren’t being taxed until they decide to play Gatsby and stop working altogether? I tell them I don’t know those things, because I’m reenacting or sewing or working in my garden. M’kay, thanks.
 A (Right leaning) friend posted this image on FB yesterday. I decided to comment:
President Trump is an incredible force for good, in my opinion. I’ve watched him troll the Left while he does amazing things for our country. He’s been shot at too many times to count, and yet still gets up there without being in a bullet-proof bubble (probably to the upset of his security team). He’s not afraid to tell it how it is, in plain language that anyone can understand. He’s blunt as a brick (which is good and bad in turns, but the end result is, imo, good).
Mister Trump is something different. Mister Trump puts himself and his brand ahead of the well-being of the country. He thinks of himself first, and the United States second. He gets bored or frustrated or angry at having to follow rules he doesn’t like, and attempts to skip the line using his prestige, name, and influence. He’s always been like this, and it was not my problem when he was a private citizen. But right now, he’s doing it while in office, and he’s muddying the waters. NOW it’s my problem. And yours.
I have stated, and will continue to state, that I support President Trump. I have largely liked his policies, supported the platform he ran on, and find him to be an effective President. But there are moments when he seems to stop being Pres. Trump, and goes back to being Mr. Trump… except he can’t do that while he’s in office. It doesn’t work. It’s not a regular job, where he can go home at night and take off the mask and just be Don the dad and husband. Being President is a 24/7 job, and you NEVER get to truly step away from it. And that’s no secret; everyone knows it, going into the job. So I don’t appreciate those moments when Mr. Trump outshines or pushes aside my President.
The most recent version of this is Freedom 250 versus America 250. Freedom 250 was created by Trump and friends in 2025, to celebrate the nation’s 250th birthday. But America 250 was created in 2016 by a bipartisan group, to do the same thing. And now they’re clashing, very publicly. Technically, America 250 should be working with Trump and Freedom 250, but there are issues. A large part of those issues is that Trump touched it, and Orange Man Bad, so people want nothing to do with it. But part of it is that Trump has sort of sidled around the edge of America 250 (which was put in place before Trump’s first term, and so isn’t specifically a “fuck Trump” organization) and done things without coordinating with the group that’s supposed to be in charge.
Freedom 250 got a bunch of musicians to agree to play on the Mall in DC, who then backed out because Trump touched it. This has become a huge embarrassment for the country, in my opinion. There should have been contracts signed that precluded such things. And this is one reason why Trump’s backdoor handling of this has been less than perfect. If it had been done through the America 250 people, there would have been no option (nor an excuse, if we’re going to be honest) for people to back out of America’s birthday party.
The other side of this, is that many of us are planning a birthday party for our country while simultaneously fighting off folks who keep saying they’d rather be anywhere but here and that they hate America. It’s like having a bunch of those grumpy aunts who always show up to say bad shit at your mom’s birthday party. Who invited these folks, you want to ask. The problem is, they’re family (citizens), whether we like them or not, and so we can’t just kick them out. I don’t want Aunt Karen at my celebration, but I am going to have to put up with her and her whinging, because it’s what we do.
I need President Trump to keep doing what he’s doing. I need him to keep taking the heat and distracting the goons so that the government can get things done. It’s something he’s really good at. I need him to keep cleaning up cities, fixing national monuments, and dealing with the drug, alcohol, and mental health issues that are plaguing our cities. I need him to remember DOGE and get that cracking again. I don’t need to see reimbursement checks; I need to see him paying down our national debt. I need our men and women in uniform back home. I know he’s working on all these things and more, and I support what he’s done so far, and even how he’s done it.
But I also need Mister Trump to stop bouncing up and interfering. Every time Mr. Trump comes in, Pres. Trump has to leave, because they can’t co-exist. Until Pres. Trump is done with this job, Mr. Trump *must* take a back seat, and stay out of the way. Most of the checks and balances on our government are there for really good reasons, and if he busts them up, others will do so as well. I need him to stop giving the Dems ideas and ammo.

 The fourth week of May is always a pleasant one for me. I abandon the modern world, pack up all my 18th century clothes, and head up to the Fort at No. 4 for a full week of immersion in pre-Revolutionary War British America. My first task upon arriving is always to start a fire, unless someone’s been kind enough to do so for me. Arriving on a Friday morning, as I did, I started my own fire as soon as I was able. The picture is from Friday evening, after the light failed and I was alone and finally finding a moment of peace.
That’s essentially why I like going up to the Fort. The peace just fills the place. Even when it’s busy, as it is during this time, the evenings are quiet. There’s no television, no internet (or very little), nor even any late night chores. Once the light is gone, you’re rather limited in what you can do. While I do have access to a single electric light for emergencies, I rarely use it (it’s over bright and harsh, and I have the fire, and some candles). I do read on my phone while I’m there, but I avoid the majority of social media, the news, etc. The whole idea is to envelop myself in the essence of the 18th century. It takes about 72 hours to purge myself of my modern habits, and then my 18th century self comes out of her shell.
 During the time between Friday (May 22) and Wednesday (May 26), there’s a thing going on in our lower field called The Original Rendezvous. It attracts about 150 or so people, all depicting folks from the 1720s through the 1820s. They have contests for the most historically accurate set-up, cribbage tournaments, bragging contests, an amazing potluck, and so much more. I baked 18 loaves of bread on the Saturday afternoon, which was a ton of work but fairly amazing. I went and sold those loaves for $4 a loaf, and the Rendezvous folks came running to buy. Some remembered me from last year, and were ripping into their loaves the second they got them! Such an amazing feeling, feeding so many people and celebrating the trade that would have happened between travelers stopped at the Fort.
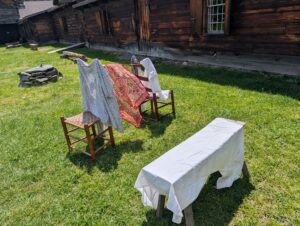
About half way through the event, I have to do laundry. This isn’t an option; I don’t have enough appropriate clothing to last a full seven days. I dress the part the entire week, even though the Fort is closed to the public on several of those days, because the Rendezvousers all stay in historically accurate clothes. So on Wednesday, I was out bright and early with soap, a bucket of hot water, and my dirty things. There was much hand scrubbing, washing, rinsing, wringing, and then hanging, but I managed to get enough things clean to make it to the end of my trip.
 Of course, now that I’m home, there’s even more laundry to do. Not only am I washing all the things I wore, but also my bed things, my covers (for draping over historically inaccurate Rubbermaid tubs, for instance), and the modern clothing I’d had with me for my dinner out with a friend, and for sleeping in. Yes, in the 18th century, people slept in their shifts. No, I generally don’t, because 18th century people also dealt with a lot of bodily fluids, smells, and other stuff that my modern feelings can’t deal with. That and the idea of a spider getting into my kit while I’m asleep just skeeves me out. LOL! So I have modern sleeping things. I also use underwear, which they did not (at least nothing like we have today), and I’m thankful for that modern underthing which makes my life so much better.
My only other modernity that I always wear is my glasses. While they did have some glasses in period, I don’t have any at the moment (soon, hopefully), and so I just wear my modern ones. Not cutting one’s fingers off while cooking, and not slicing one’s foot off while using an axe are much more important to the Fort and myself than the historically accurate blind bumbling I’d do without my glasses. Still, I plan on getting some more accurate glasses made in the next year or so. While I won’t be purchasing from Townsend, they do have a good image of them here.
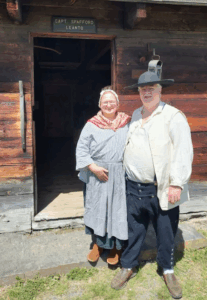 Chris also joined me at the fort, which was fun. He now has more accurate pants and a good hat, and I’m working on his vest and shirt. After that, it’ll be moccasins for his feet. Yes, I’m standing on a high step and I’m still shorter than him in the photo. I’m short. He spent his time in the joinery, working on a bench for use at the Fort. We have some slabs with raw sides, leftovers from his work with the chainsaw sawmill, and those are being flattened and smoothed, and will get four legs put into them. Rough benches, indeed, but definitely historically accurate. He seems to be enjoying working with the hand tools, and it was fun watching him interact with the school kids who came through.
I had long talks with a variety of people while I was at the Fort, all enjoyable. I’ll be going up there to teach bread baking classes again, something I really enjoy doing at the Fort. I’ll also be attending the French and Indian War this coming weekend (June 6/7), if anyone’s local and wants to come find me. I’ll be with the Pequawket Alliance outside the palisade, being a citizen of New France that weekend. After that, it’ll be a while before I’m staying overnight there again. I have a lot of work to do with library presentations and ren faires through the rest of the summer. I’m truly hoping to get some writing time in for my new 18th century cookbook, because I haven’t been able to make the time yet this year. It’s been crazy busy!
The end of my week at the Fort was on Friday the 29th. I was sad to go, but mightily glad to get back to modern showers. I can live with no electricity for most things, and it doesn’t bother me at all. There’s just something about showers, though, that make everything else better. While the Fort does have an emergency shower behind the blacksmith forge, it’s cold water only, and quite… bracing. I did use it once, when the day got up to 86*F, and it was nice to be clean but I think the neighborhood was aware of my shenanigans because I squealed when that icy cold waterfall hit my tender flesh. LOL!
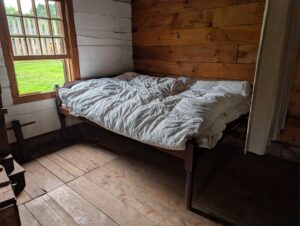 Being at the Fort let me shut down a lot of my inner squirrels. I was able to focus better, breathe deeper, and sleep well. My only issue was that the rope bed I use was badly in need of tightening. Chris and I did get it done on the Friday right before I went home, and we took in over a foot of slack in the ropes! The entire bed is much more solid, and I can’t wait until I get the chance to sleep in it again.
Even loose, the rope bed with feather ticks (two!!) on top is ridiculously comfortable. I just got tired of swaying when getting in and out (the ropes hold the bed together, so it’s important to keep it tight), and the dip in the center. Now, it’s much more pretty to look at, without the swayback feel to it.
I’ve been home long enough to have recovered from the pack and unpack of the event. I’m missing the quiet of the Fort, but quite enjoying the television and social media. Well, some of it. I think what I miss most, though, is being able to step out of my front door and see the Milky Way, and all the stars and planets hanging above me. My home has too much ambient light to see much in the sky beyond the moon and brightest of the stars. But up at the Fort? You can see SO many stars. It’s gorgeous. I had a great view of not just the moon, but also Mars, Venus, and Jupiter bright in the sky. It was absolutely impressive.