
Skills

Monday Memories – The GOODI Bag, Pt. 2

This was written by Chris on Oct. 25, 2012

The lowly garbage bag

While it is always nice to have a tent, poncho, tarp and other gear, never look down on the lowly garbage bag. A heavy duty garbage bag can do much to create a working shelter.

In this case I used one heavy duty bag, and because this was just for a photo shoot I did not open the bag up. If I had, the area would have been twice as large. In this example you can see how the bag would give enough coverage to protect your head if you were hunkered down, and it would provide a wind stop as well. It would also act as a heat reflector if it was far enough from your fire to keep from melting.

A rolled bag tied with 2ft of paracord.
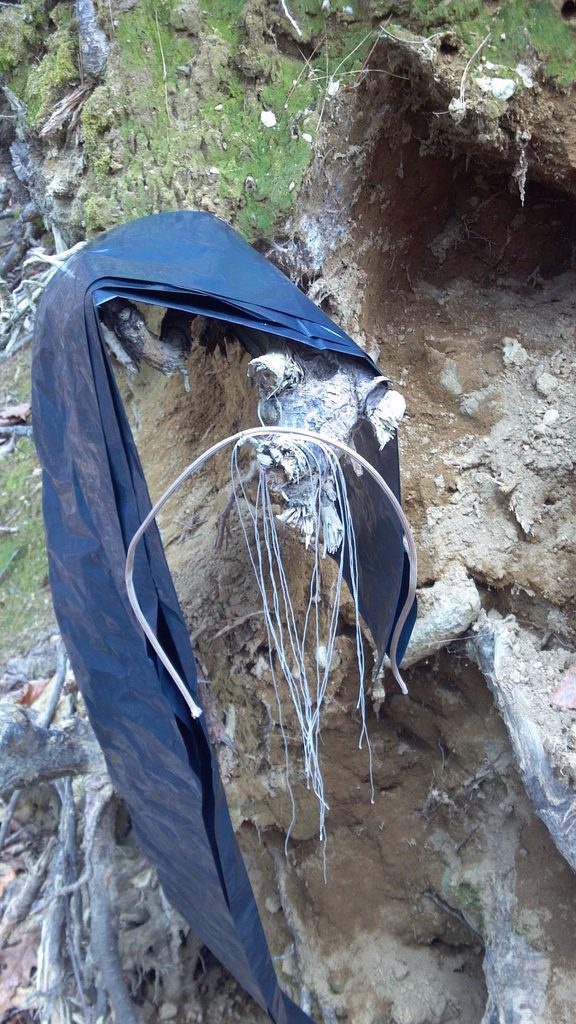
Bag unrolled, threads pulled from cord.

This small example shelter started from 24 inches of paracord and a single 3mil heavy duty construction garbage bag. The paracord was pulled apart to give seven strands of thread about two feet long plus the “shoelace” at 18 inches.

Rock for button Loop going over button

Next a small pebble was used to make the “button”. A rounded pebble from a stream works best, but any small stone will do. Even an acorn will work. The threads from the paracord had a one-way slip knot put in to form a loop that would tighten but not easily loosen. The loop was slipped over the button and tightened. The end result was a two foot length of thread tied firmly to each corner. Because the plastic was not punctured, there was very little chance of ripping out the button.

This knot is an adjustable grip hitch. Its claim to fame is that it can be tightened or loosened by gripping the neck and sliding it up or down the line. Pulling on the line will not cause the knot to loosen or tighten, which is a good thing.

The goal is to have a knot that will slip forward and snug tight and then stay tight. A slip knot will slip forward but will not stay snug. The adjustable grip hitch is designed to slip when the neck is moved but to stay put when the standing end is pulled.

There is a problem when using thin nylon line which is that knots which should not slip will slip because of the lack of friction. This includes the adjustable grip knot. Fortunately there is an easy fix which is to add an extra wrap inside the loop.

Once the lines were attached to the corners, the bag was pulled out to form a shelter. This shelter was about 3.5 by 3.5 feet in size. This was enough to keep my head and gear dry.

Besides using a garbage bag to create a simple roof, you can use it as a rain poncho by putting arm and head holes at the seams. It can also be stuffed with dry leaves and other things to make a quick mattress to keep you up off the ground, or you use it to create a pillow.

For about 50 cents, this versatile survival item can be added to your ready bag.

Fire

Fire is a very important survival skill to hone. Please see the article on fire for a more thorough discussion on creating, starting and maintaining a fire. It is divided into three sections, the first of which covers fire in general. The second section discusses creating your first flame, and the third part goes into how to turn that first flame into a full fire.

You should have at least three different methods for making fire, and a backup for your primary method. For example, have a fire steel and striker, lighter, hand bow fire set, and matches as your primary methods, with a second lighter as backup.

You should have at least three types of tinder. You can buy tinder or you can use something as simple as cotton balls. My kit contains cotton balls soaked in petroleum jelly. The cotton catches a spark easily, while the jelly provides fuel for a much longer burn time.

Summary of items for shelter

  • Emergency/Space blanket
  • Poncho
  • 2 or more heavy duty garbage bags
  • Fire starting gear
  • Poncho liner
  • clothing
    • wool socks
    • rugged shoes
    • pants
    • long john/thermal pants
    • underwear
    • long sleeve shirt
    • short sleeve shirt
    • (comfortable bra for hiking)
    • long john/thermal top
    • scarf
    • knit cap
    • long brimmed hat
    • balaclava
  • sleeping system or sleeping bag
  • tarp
  • tent
  • dehydrated house – just add water for full size home!

Water

They say you can go three days without water but you’ll be darn uncomfortable and barely functional at the end. You need water to function. You need water to perform work. You need water to flush poisons from your system. You need water to keep your brain working. Water is also used for cleaning, disinfecting and sterilizing.

You should start with carrying at least a liter of water with you. This is your “ready” water. Grab and go. The container should be reusable and sturdy. You don’t want to have your container fail when you go to refill it.

Water pouches

Water pouches are great for emergency water, but they do nothing as a water container. If you use water pouches as your ready supply, make sure you add some sort of container for resupply purposes.

While a canteen is a great container for carrying water, I would augment my ready bag with a hydration bladder. A hydration bladder is a water bag with a fill cap at the top and a tube leading from the bottom. The bladder is held in a carrier which can go inside your bag or mount to the outside of it. Some hydration systems even have storage space in the carrier so it can act as a small backpack.

The advantage of the hydration bladder is that most will hold two to three liters of water which you can drink on the move. They are easy to refill and easy to carry.

The disadvantage of hydration bladders is that they are flexible, and some of the cheaper bladders have been known to “pop” when somebody falls or steps on them. In my 15 years of using hydration bladders I’ve never had a bladder pop.

With the standard recommendation being one liter of water per day per person, your 72 hour bag should have three liters of water in it. This is just shy of eight pounds and even this might not be enough. Remember, though, that those eight pounds will be depleted quickly. Too much water is always a self-correcting problem, as Robert Heinlein pointed out.

Hiking in the wind or heat — or just hiking — increases your required water consumption. This means that you are going to have to resupply your water at some point. When you resupply you will need to make sure that your water is safe to drink.

A good example of classic short-cut thinking, is considering water that comes out of a pipe as “safe to drink”. Go into any town in Mexico and you are likely going to be told, “Don’t drink the water.” Why? Because the water coming from the taps is not as clean as what an American citizen is used to.

Resupply therefore comes down to two choices: collect contaminated water and then decontaminate it, or decontaminate your water as you collect it.

A filter is one of the best ways to go. A good pump-style filter is my preference because it allows me to take water from a contaminated or unknown source and put only clean, potable water into my containers. This means that I don’t have to teach my family, “Sometimes it is safe to drink from a container and sometimes not.” At the same time it makes it easier to have a supply at camp that is clean and ready to use for such simple things as washing the dishes or brushing your teeth.

A personal filter straw is light, cheap, and gives you the ability to get drinking water when you need it. The problem is that it doesn’t work for hydration packs. Once you transfer your contaminated water to your container, you have to treat that container as contaminated. This means you’ll have to use your filter straw for all water you drink from that container. All in all, a filter straw is good choice but not a best choice.

To decontaminate water in a container you need to “purify” it. Purification is done by adding chemicals to the water or by boiling it. If you use a purification chemical, the chemical will decontaminate not only the water but also the inside of the container. This is why the instructions always call for getting some of the water with chemicals onto the screws of the cap and onto the cap itself. This is so the inside and outside of the container become purified as well as the water.

One drawback to chemical decontamination methods is the amount of time it takes to purify water. In general it takes 30 minutes from the time you start the process until the water is safe to drink. In addition you have to carry chemicals, some of which have a limited shelf life and an even shorter life once the bottle holding the chemicals is opened. Also, the amount of water that can be decontaminated is strictly limited to your supply of chemicals.

Water purification chemicals normally come in small bottles. The military issue version is intended to go in a small pouch on the side of a canteen holder. Most bottles hold enough to treat about 25 liters of water whereas most filters will treat hundreds of liters of water.

One method that works well is using pure bleach. Simply add five drops of pure household bleach to a liter of water. A gallon of household bleach will purify hundreds of gallons of water. Make sure you filter your water with something to take out particulates and also make sure you use a bleach that does not contain perfumes, dyes or other additives. See: Washington State Department of Health, Purifying Water During an Emergency.

MSR MIOX is a system that I’ve used. It creates a chlorine solution that can be used to purify water the same way a tablet does. It leaves a slight chlorine taste which most city dwellers are familiar with. It is small and light, and easy to use once you’ve read the instructions a few times. Practice.

On the plus side the MSR MIOX is light weight and small. On the downside it requires batteries and you are supposed to use test strips. My policy was to use too much and wait the full 30 minutes. This never failed to show clean water with test strips. I also found the device with dead batteries after it had been in storage for five years which was NOT something I was expecting. If you decide to go with the MSR MIOX make sure you have a backup set of batteries.

There is also a UV water purifier that can be used, that is said to create safe drinking water in as little as one minute. I have not tried it but it is a consideration. They claim it will purify 1000s of gallons of clear water. The product appears to be dependent upon electricity or batteries, and reviews, while good, mention that the UV light must be replaced each year at a cost of $70.00.

Most references actually state that the best way to purify water is to boil it. Bringing your water to a rolling boil for one minute will purify the water. Then you wait for the water to cool and you can drink.

The down side of boiling water is that you have to collect water, stop, create a heat source, bring your water to a boil, and transfer the boiled water to a clean, uncontaminated container. Then you must wait for it to cool before you can finally drink it. And then you are still not ready to go because you still have to break camp (put out your heat source). In a bad situation, having a fire might not be a good thing.

Summary

Have at least one liter of water in ready state. Have at least one container that can be easily refilled, preferably two. Have a method of purifying or filtering water. Pump-style first, straw style last, and chemical means in the middle. Have a container that you can boil water in.

Try and have two different methods of purifying your water. While I prefer my pump filter, our small bags also have water purification tablets.

Food

We have two different types of food that we deal with. The first, and likely the only one of importance, is what you can carry with you. The second is what you can grow, gather or kill. As with the section on water, this process is called “resupply”.

For your ready bag you need a minimum of 3000 calories. This can be met with two (2) MREs ( Meal, Ready to Eat) or an emergency ration plus a bit of extra. MREs are a bit heavier than other foods you can carry but they are truly ready to eat.

In almost all cases you should have one MRE in your bag. The 1500 calories that comes in an MRE is broken down into an entrée, a side dish, a dessert, and a flavored drink. In addition, it will contain a cracker with something you can spread on it (peanut butter for example.)

While some people swear at MREs, others swear by them. I happen to believe in them. Most taste okay. Some taste good and some taste bad but they are all edible. Most have lots and lots of chemicals and preservatives added to them but that is part of what gives them a 10+ year shelf life. The MRE has another major plus over other types of food for your ready bag: they can be heated without a fire. Each MRE comes with a heater that only takes a small amount of water to activate. The possibility of a hot meal during an emergency can go a long way to keeping your hope up.

Oh, MREs also come with a package of helpful things like salt, pepper, Tabasco, matches, wet wipe, spoon, tissue paper. All those little things that make for a happy soldier.

In addition to your MRE, add a ration bar. These are designed to give you three days of food at around 600 calories per day. You’ll be hungry but it is better than nothing by a long stretch. These are small and light weight. See: Grizzly Gear Ration Bars.

Add some comfort food as well. M&M peanut candy, trail mix or granola bars are all good additions. These comfort foods should also fall into the “everyday use” category. Expect to resupply as they are used.

In a ready bag you really don’t need any more food than what you can carry, but if you are willing to, you should add some gear to catch fish, snare/trap wild animals, or gear to hunt them in some other way. If you do decide to kill an animal, you damn well better be prepared to eat whatever you take, and waste nothing of that animal.

Remember that most Americans are overweight and out of shape. This means that many of us watch what we eat. We pick foods that are low fat or low sugar or what ever it might be. We watch our diets.

In a survival situation you are going to need that FAT. You are going to need more calories than you ever expected. Don’t worry about getting fat; worry about getting too skinny as you work harder than you have ever worked before.

Last, please note that you can go a long time without food: three weeks or so. Food is just not a priority in a 72 hour bag. You could have no food and still make it 72 hours. You would just be very unhappy and hungry. Hungry people make stupid mistakes, so don’t let yourself get that hungry, but don’t stress either.

A couple of years ago I watched a show about a group of modern day people trying to establish an 1800s style homestead. They had three different groups. One group was “wealthy” so they arrived as a Man and Wife with three children to a pre-built home with gear.

The second group had a mostly-finished home which they had to finish building, and the third group had to build their home from the ground up.

What was of most interest to me was one of the men who started out in fairly good condition physically. As the show progressed, he thinned down and got stronger. However, his wife was worried about his weight loss and he became concerned as well. They called in a doctor because of his aches, pains, and weight loss.

The doctor reported the reason he looked that way is because it was likely the first time in his life that he wasn’t actually overweight!

Summary

Because you can go three or so weeks without food, food is not as important as air, shelter and water. You are going to want food just to keep you from making stupid mistakes because you are hungry. You are not really going to need hunting or fishing equipment if you have your prepared foods with you.

You should have 72 hours of easy-to-use food. Dehydrated foods are acceptable (if you are not worried about water) as well as ready-to-use food such as MREs, ration bars, Peanut M&M’s, granola bars, dehydrated fruits, and trail mix.

Tools

Most of what we have discussed is the gear you should have in your ready bag. By following the Rule of Threes we prioritize what we put in our bag and make sure we don’t miss anything important. One weakness of the Rule of Threes is that it doesn’t tell you what to take with you, just how to prioritize your choices.

There are horror stories of the early- to mid-1900s of people starving while having access to hundreds of cans of food. Why? They had no way of opening the cans. They were missing a simple tool, a can opener.

One of the reasons the military went with the Mylar pouches of the MRE is because they need no tools to open and prepare. Every pouch can be opened by hand. You can heat them by just pouring water into the heater pouch. You can squeeze the food out directly into your mouth or use the included long handled spoon to eat your meal.

The MRE removed the need for tools to open or eat your meal. It truly READY to eat.

If you find yourself with access to canned food but without a can opener, there are ways to get around those pesky seals. For one very good (and quick) tutorial, check out How to open a can without a can opener. Don’t forget that a good sized rock can stand in for a section of concrete.

Cutting

One of the most important tasks you will run into is cutting things. This can be as simple as cutting a piece of cordage or as complex as cutting a roof rafter. A knife is a requirement for any ready bag and should go above and beyond your EDC (Every Day Carry).

As nice as a knife is for small jobs, larger tasks need different tools. Add a saw of some sort to your gear. It could be a four inch saw in your folding knife or a collapsing camp saw. For some it can be a bow saw blade, knowing they will make a bow saw if needed.

While it is possible to get along with just a knife and saw, being able to split wood or chop down a small tree can make things even better. Consider adding a hand ax or hatchet to your bag.

Holding and pulling

One of the best tools to add to your gear is a multi-tool. While it might not seem like much, a pair of pliers does so much for you. It can be used for everything from being able to pull that line just a little tighter to being able to straighten a bent piece of wire/metal, or for bending metal.

My EDC includes a leatherman and a cheapo key ring thing I found. My bag holds another and I wish I could justify tossing a Gerber or SOG Multi-tool in the bag as well.

Put a multi-tool in your EDC and add a second to your ready bag.

Attaching

Cordage! More cordage! I recommend paracord for so many different reasons. A 15 foot length of paracord gives you seven 15-foot lengths of nylon thread plus another 15 foot length of shoelace-like outer sheath. You can leave it as is for tying your lean-to together. It can be strung between two uprights to drape a tarp or poncho over.

We make it a habit to carry paracord with us. This can be in a bracelet, the wrappings on a walking stick, the decorations on the outside of the bag, or just a hunk sitting inside the ready bag. Have some cordage with you.

Warning!!! Science, math, physics ahead.

Paracord has a static load rating of at least 550 pounds. That means you can hang 550 pounds from a single piece of cord and it will not break. If you were to take that same 550# load and just drop it a foot and try to catch it with the paracord, the cord will snap. This is the difference between static and dynamic loads.

To better understand a static load you need to have a little physics and math background. We work with two different things in determining load, mass and acceleration. To make this easier on me we are going to convert weight to mass in SI (metric) units. Paracord has a static load capability of 250Kg at 9.8m/s^2 or 2450N. You can think of N (newton) as weight.

Now consider an object falling 0.25m or about ten inches. It starts with a velocity of 0. At the end of its 0.25m fall it is traveling at 2.2m/s. If this load were to come to an abrupt stop, like at the end of a chain, the amount of time it takes to stop would be very short. For the sake of argument let’s set that time to 0.1 seconds (This is not unreasonable given that it took only 0.22 seconds to get up to 2.2m/s).

Our acceleration for this is 22m/s^2. Gravity is still pulling down at 9.8m/s^2. Thus our total acceleration would be 31.8m/s^2. This is three times what our static load was! This gives our 250Kg static load the ability to support only 77Kg worth of load.

77Kg is 170 pounds, nowhere near the 550 pounds of our static load. And this is from only a ten inch drop. This small exercise shows dynamic loads are much higher than static loads.

Paracord and other ropes (and even chains) help reduce the effect of dynamic load by increasing the amount of time it takes to actually decelerate. In other words, they stretch. Chains don’t stretch but they sort of untangle and untwist as a load is placed on them.

This means that you should NOT expect paracord to function as a safety line for a human.

In addition to cordage, add some wire ties. They are light-weight, fast, and easy to use. They come in all sorts of different sizes and can be used for many different attachment methods. As well, two (or more) can be attached together to form a slightly longer tie. Consider using them to hold branches together as you construct a shelter.

Digging

You can use your knife to build a nicely pointed stick, and you can use that stick to poke holes in the ground and then scoop out the loosened dirt with your hands. You can even spend some time to make a hollow in the end of a stick to use as a trowel. But wouldn’t it just be easier to have a shovel or trowel with you?

The entrenching tool or E-Tool is light-weight and folds up into a small package. When you unfold it, you can create a short handled shovel about the right size for digging when on your knees, or you can leave it partially folded to create a hoe type tool. Sometimes you will switch back and forth depending on your needs and the ground you are digging into.

If you don’t want to go for an e-tool, consider a folding camp trowel. Many campers use them to dig small pits for disposal of human waste.

Signaling

Sometimes you don’t want to be found and sometimes you do. Having a Signaling device can get you the attention you need. A combination whistle, Signaling mirror, and compass can be found in many places.

I come from the point of view of not being found. Of not being noticed. As such my gear has a signal whistle and a Signaling mirror but not much more than those two items for Signaling purposes.

A good whistle can be heard hundreds of yards away. On a cold winter day, sound will travel even farther. If you are hurt and need to attract somebody’s attention, a whistle is a good tool to have.

A Signaling mirror is used to reflect the sun. Pilots have reported seeing signal flashes from as far away as 15 miles. If you have line of sight with somebody and you have sunlight a Signaling mirror can attract attention from miles away.

At night any light source will attract attention. A campfire will attract some attention but a blinking red or yellow beacon will attract attention even more attention. The flashlights my daughter picked out for her mother have multiple modes: Light, glow, light and glow and flashingglow.

There are many other methods for Signaling. Some are designed so that they are only visible from the air, some are only visible from the ground. Some are for clandestine signals. If there is enough interest I’ll write an article on Signaling.

In the book “The House of Dies Drear” the author talks about a Signaling device from the days of the underground railroad. She explains that the conductors would place a piece that looked like 1/4 of a cross, A right angle, to tell the run-a-ways which way to go.

This was a secret method of Signaling because unless you knew the “code” you wouldn’t understand the direction it was telling you to go. If you happened to find one it was intended that it look like a part of something that would only be meaningful when all the parts were collected.

Creating Fire

Have a lighter, some matches (your MRE has a book of matches in it), fire steel or other methods of starting a fire.

Navigation

Most people navigate via road signs and land marks. In a serious situation you might not be able to depend on them. Get maps, both road maps and topographical maps. Trust your maps before you trust the road signs. Before the emergency hits, learn how to use the road and topographical maps. Practice!

Your GPS might or might not work. Having one with you is not a bad thing but don’t depend on it.

Add a compass and learn how to use it. A compass will work in almost all situations. Your compass in addition to a topographical map can get you from point A to point B but only if you know how to use it.

Light

The one thing I fail to carry with me is a light. For many years I carried a mini-maglight. Unfortunately it had a habit of turning itself on my pocket and would be dead when I really needed it.

Since my EDC is designed to be in my pockets I never was real big on holster for my flashlight. Add to this the fact my cell phone has a flash light option and my everyday need for a light source went way down. That is until I needed to actually do something at night.

You should have at least three light sources. A headlamp is very useful when you need both hands free to work. A hand light is also a useful tool. The mini-maglight has a mode where the top lens section unscrews and then the unit sits in that top as a base creating an electric candle.

A candle will often times be enough but it is much harder to keep going in bad weather and very difficult to light if you don’t have working matches or lighter. In the same way an oil lamp will also meet the needs of light. For serious overkill consider a Coleman Gas or multi-fuel lantern

One thing to think about in terms of light sources. Batteries die rather quickly when you depend on them. They don’t store as well as other energy sources. A duel fuel camp lantern will give you much more light, burn longer and the fuel will not go bad. It might not be the right answer for your ready bag but don’t rule it out for you vehicle gear

Summary

This is just a list of some tools you should consider for your ready bag.

  • Knife
  • cordage/paracord
  • Saw
  • E-tool/shovel
  • Good quality multi-tool
  • Fire steel
  • Lighter
  • Water proof matches
  • tinder
  • whistle
  • Signaling mirror
  • maps
  • compass
  • Needle(s)
  • P-38 style can opener
  • optionally, a small hand held GPS with way points marked
  • Ax/hatchet
  • Flash light/head lamp

Monday Memories – The GOODI Bag, Pt. 1

This article was written by Chris on Oct 23, 2012.

The GOODI bag is just another name for the 72 hour bag, otherwise known as the BOB. BOB stands for Bug Out Bag and GOODI stands for Get Out Of Dodge Immediately. What you call your ready bag really doesn’t matter. The name doesn’t change its purpose or function.The reason we use the term GOODI is it allows us to say, “Don’t forget your GOODI bag!” in front of anybody and they will interpret it as goody/treat bag.

So what is a 72 hour bag? A 72 hour bag is designed to keep you going for 72 hours with no outside help or resupply. It might be good for more than 72 hours, but 72 hours is the minimum.

But what goes into the bag? We refer to the Rule of Threes in order to determine what exactly should go into our bag.

Air

This rule says that we need to make first aid our primary consideration. For our ready bags we use a simple first aid kit called the the Nick Fixer. It handles most of the problems we would normally foresee in an emergency situation plus it handles those everyday things that happen. These kits are not “for emergency use only” but should instead be used on a regular basis. Things you use every day are more likely to be with you, and hence you are more likely to have your bag with you.

Make sure you refill your first aid kit if you use things from it. This is one of the reasons we choose to use the Nick Fixer. The people behind it sell everything that is in the first aid kit as refills or add on modules.

We augment our first aid kit with SAM Splints, sting sticks, epi-pens and other first aid gear that we’ve gathered over the years. Yet all of this is small enough to fit into a Utility/Canteen Pouch. You might want to add things like breathing masks for giving mouth to mouth without contaminating yourself, and your own prescription medications.

For those that don’t know, an Epi-Pen is an auto-injector of epinephrine. This drug will reduce swelling (anaphylaxis, generally swelling of the throat and airway) and get people breathing again if they have a severe allergic reaction to things such as bee stings or eating shellfish. They are available by prescription only, but most family doctors are willing to prescribe them if you explain that they are for the family emergency first aid kit because your cousin, niece, aunt has allergic reactions to things like bee stings.

Summary

These are some of the things that should be in your ready bag.

  • First Aid Kit
  • Splints
  • CPR equimpent
  • Burn treatment
  • medications
  • mole skin
  • anti-itch creams and treatments

Shelter

Now that we are breathing, no longer bleeding, and sprains and broken bones have been dealt with, it is time to get out of the elements as soon as possible.

There are a multitude of different weather conditions that require shelter. A rain storm on a cold day can kill you from heat loss, and if it doesn’t you’ll still be wet and unhappy. A blistery cold day will suck energy and life from you while a hot day will bake you. A mild spring day with a clear sky can cook your skin (sun burn).

What is acceptable in the day might not be survivable at night. One of the things that kills people in the desert is the extreme cold of night. There can be a 50°F or more drop in temperature between daytime and nighttime.

Rain, Wind and Snow

Getting out of the rain and wind is the first step in getting shelter, and one of the best ways of accomplishing this is with a good, high quality, rugged poncho. The poncho takes a lot of grief because it is ugly and doesn’t seem like it should work as well as a rain suit or other rain gear. The truth is that a poncho will out-perform rain gear in many ways.

For the woman that needs to get into more appropriate clothing, tossing a poncho on and then changing under it gives not only shelter but privacy. The same goes for a man that needs to change out of work slacks and into jeans because it is snowing out.

I once worked in an office with very casual attire. Even during the coldest months of the winter some of the men came in wearing shorts. Why? Because they kept the office at around 72°. It isn’t only the ladies wearing clothing that isn’t appropriate for survival.

A poncho is MUCH faster to put on and doesn’t require you to stand or move around to get it on. There are no pants to deal with. With snaps down the edges it will seal very well and if you hunker down it will trap heat.

The poncho sheds water, wind, and snow very well and should be an integral part of your bag. In addition to its use as outer wear, a poncho can be used to construct a lean-to, a tent, a simple roof, a sleeping roll, a ground cloth, and much more.

One other quick shelter that many forget is your car. Your car, for the most part, is rain, wind and snow proof. It might not feel like it but even in the cold it keeps heat inside the cabin. Don’t walk away from such great shelter if you have it and can use it.

Digression into the science of why getting wet makes you cold(er)

Warning! Science ahead! This section is a discussion of the math of why getting out of the rain and out of wet clothing is so important. It also tells you that putting snow in your mouth to make water to drink is a bad idea.

Why is getting out of the rain and getting dry so important? The answer is “phase change”. A phase change happens when a material changes state from gas to liquid to solid. The amount of heat required to change state is much more than than the amount of heat required to just change the temperature of something.

Consider that glass of ice water you have at hand. If there is ice in it, the water it is 32°F provided there is solid ice. You might have to stir it a little to get all the slightly warmer pockets of water to the same temperature but the water will be at 32°. This is the temperature at which pure water changes state from liquid to solid or from solid to liquid. You have to provide heat or take away heat in order to accomplish this change.

Heat is measured in Calories. The calories in your food and drink are measured in KiloCalories or 1000 Calories. It takes 1 Calorie of heat to raise 1g of matter 1°C. Since a liter is 1000 grams it would take 1 KCal to raise the temperature 1°C.

To take a liter of water from freezing (0°C) and raise itto boiling (100°C at sea level) would require 100 KCals. To take 1 liter worth of water from -1°C to 2°C takes a bit more because of the the phase change. It takes 80cal to convert 1g of water from a solid (ice) to a liquid (water). This means it would take 82Kcal to change a liter of ice into a liter of water.

Thus, using your own body heat to melt snow is going to take 80 food calories per liter of water converted. Emergency rations are generally in the 800 Kcal per day range.

As scary as that number might be, there is another number of interest: the amount of heat it takes to convert water into steam. To convert 1g of water to 1g of steam requires 540cal. To convert 1 liter of water would take 540Kcal or just about your entire day’s Kcal allowance when on emergency rations.

You might be thinking, “But I don’t boil water with my body,” and you are right, you don’t. Something else happens. Water on your body is first heated to around 54°C then as the wind or dry air moves past the liquid water it evaporates. Evaporation is a phase change, similar to boiling, though it happens at a much lower temperature.

When you are wet, some water is always evaporating and the process is cooling your body. As your hair gets soaked you can see it “steam” on a cold day and that is cooling you. This process is the reason why putting a damp cloth on the back of your neck works to cool you on a hot summer’s day.

Get out of the rain as soon as you can. It can mean the difference between life and death.

Heat Retention

Once you are out of direct elements it is time to work on staying warm. A space blanket and a space bag are two low cost useful items for your bag. You can get them cheap or you can get good quality. A cheap space blanket can be had for as little as a dollar and the good ones for a bit more than five dollars.

A space blanket/bag is a Mylar sheet that is reflective in the infrared spectrum. What this means is it reflects heat back in (or out) if needed.

To explain why this works and why it is important you should know that heat is transferred in three different ways: convection, conduction and radiation.

Convection is heat transferring to a moving liquid or gas which then carries the heat away. In other words, a cool breeze on a summer’s night is convection. Conduction is the transfer of heat via contact with something colder. Place an ice cube on the back of your neck and it transfers heat from your body to the ice. Radiation is the heat that leaves as radiant energy. The warmth you feel when you hold your hand over an electric burner is radiant heat.

A space blanket is designed to deal with radiant heat transfer. It blocks radiant heat from going through and reflects it back. Because it is a plastic sheet it also stops most convection heat loss as well. It provides some insulation from conductive heat loss but not as much as a good woolen blanket.

Due to the space blanket being thin coated plastic — between 2 and 5 mils (0.002 and 0.005 inches — it folds into a space just a little larger than a travel tissue package. They weigh very little so they are something that you can have with you all the time.

Your clothing is the next step in staying warm or cool. Though many people don’t realize it, clothing can help keep you cool by providing circulation of air for convection cooling and evaporative cooling.

The first important thing about having clothing in your bag is that it allows you to get out of wet clothing and into dry clothing. Some fabrics do a better job of holding in heat when wet than others. Wool retains most of its insulating properties even when wet. Cotton does not. Silk is amazing for insulation purposes as well.

The second thing extra clothing in your bag allows to happen is it lets you start layering. Layering is the process of creating pockets of air to hold heat. The more layers, the warmer you will be. It isn’t just about bulk; it is about the air spaces between layers.

A few years ago they found the body of a mountain climber from the late 1800s on the side of one of the better known mountains. The amazing thing was what he was wearing. He really did look like he was dressed in a suit and not a parka. He was wearing multiple layers of wool clothing and while he died on that mountain he did not die of exposure.

To test this, a couple of modern climbers tried the same climb in the same type of gear as this 1800s climber. They found that it was keeping them just as warm as modern gear but at the cost of extra weight and less mobility.

Layers WORK for heat retention.

Sleeping Bags and Systems

One of the best things to keep you warm and safe in an emergency is a good sleeping bag. The bag my parents bought me before I headed out to collage is still a part of my gear. I remember that they paid around $180 back in the ’80s. It was light-weight yet good to 20°F.

Today you can buy a bag just as good for $30-$50 at your local WalMart or Target store. It is lighter, stuffs down smaller and is easier to clean and care for. Getting a real sleeping bag is likely to make your ready bag that much more useful for you.

The be-all and end-all of sleeping bags is the modern sleeping system.

A sleeping system is a combination of a bivy sack and two sleeping bags. These bags and the sack are designed to fit one inside the other, providing the user with multiple options as to what degree of protection from the elements they actually need.

In the simplest form a person might just use the bivy sack with a light blanket (poncho liner) inside. The bivy sack is designed as a water proof shelter for one. When inside, the sack zips up about 80% along the side, just like a sleeping bag. The top then continues up and over the head where a hook and loop fastener (Velcro) holds the top to the bottom.

Once inside it can rain cats and dogs and you’ll be dry and snug inside.

On a recent camping trip my son took my sleep system to use. The tent he was sleeping in wasn’t very good at keeping water out. But the bathtub floor was very good at keeping the water IN once it got inside.

My son slept in the bivy sack inside the sleeping bags. In the morning he climbed out dry and happy until he had to put his feet out to find a good inch of standing water! When the gear got home we wiped it down and that was all that was needed.

As the temperature drops you start adding sleeping bags to the bivy sack.

  1. Bevy sack alone
  2. medium bag alone
  3. medium bag in bevy
  4. heavy bag in bevy
  5. medium in heavy in bevy

This system is designed to cover everything from a rain storm in the tropics at 80+ °F to -30°F in the frozen tundra. When it gets to about 0°F you do need to have appropriate sleep wear (long johns)

Standing Shelter

While all the above is great for keeping you going, a tent will do so much for your spirit that it should not be forgotten. While it is nice to be able to snuggle into your bivy warm and dry, it does not give you the same creature comfort of crawling into a nice tent.

This is part of “hope” section of the Rule of Threes. While a one man tent or bivy sack will keep you warm and safe there is something delightful to be said about snuggling up with your spouse or child in a tent.

Even if you don’t carry a tent, a cheap tarp and some cordage can be used to create a tent-like structure. Even a bit of paracord and some work can create a sheltered space out of things you find in the woods or urban environment.

After tent-like shelters, consider a shovel and ax to allow you to create your own building. While not something you are likely to do on a 72 hour march, it never hurts to know how to build your own home with simple hand tools.

Please see GOODI Bag part 2 for the next part. We will be finishing the section on shelter by talking a little bit about fire.

Monday Memories – The Rule of Threes

Monday Memories is a series of blog posts from Way Back When, that Chris and I wrote for another blog we had. I hope you enjoy!


Written by Chris, Oct. 21, 2012

The rule of threes is a method of looking at how you choose what to do in a survival situation or when preparing to meet a survival situation. The rule of threes explains in simple terms the order in which things should be done to survive and thrive.

  • Three minutes without air
  • Three hours without shelter
  • Three days without water
  • Three weeks without food
  • Three months without hope

Just like the ABC of First Aid (airway, breathing, circulation) the rule of threes states what happens first. With ABC you need to check and make sure the airway is clear. If the airway is not clear breathing isn’t going to happen. Next you check breathing. If they are not breathing then working on anything else, no matter how gory, isn’t going to save the life of the victim. Only then do you work on circulation which includes controlling bleeding.

Three minutes without air

You are just not going to survive if you aren’t breathing. It doesn’t matter if you have a 6 year supply of food, water and other supplies, you will be dead long before you use a fraction of them.

For the sake of this list we include First Aid within the “air” category. The first thing to do is to take care of injuries. Make sure people are all breathing, that the bleeding has been stopped, that the broken bits and pieces are fixed up and people are on the way to healing.

Some things to consider in your “air” category:

  • Bandages
  • Medical kit
  • Inhaler
  • Epi-Pen
  • Aspirin
  • Prescription Medications
  • Splints
  • wrapping tape
  • sling
  • Litter
  • tourniquet
  • over the counter medications
  • Anti-itch creams and powders
  • Breathing Mask for CPR

Some skills to include with your “air” category:

  • CPR (new and old style)
  • Advanced First Aid
  • Wilderness First Aid
  • How to identify plants with medicinal properties
  • How to use EVERYTHING in your First Aid kit(s)
  • How to clean and close wounds
  • How to set broken bones

Three hours without shelter

This doesn’t seem to be a priority for most people even if it should be. People just don’t think this way. Most people jump straight to “water” but you will die of exposure long before you will die of thirst. Shelter is that important.

If you don’t think of shelter as that important, consider spending a couple of hours outside in the winter without a coat, or a few hours in the sun of the great plains (or even an open field in New England) without some sunscreen and a hat. Think about falling into the water on a cold fall or spring day. Shortly after this thought experiment you’ll be wishing for good shelter.

Shelter includes all forms of shelter. Everything from a humble pair of warm dry socks to a house is part of the concept of shelter. Shelter also includes fire. A good fire can turn a poorly constructed lean-to into a safe haven.

Shelter starts from the skin and moves outwards. Shelter is having the right clothes for the environment you are in. Socks, pants, shoes, underwear, shirts, scarves, hats, mittens or gloves are all things that should be considered.

For the females reading this, consider the shoes you wear when you go out. Those beautiful 3 inch heels that make your legs look so fine are not going to last five minutes if you have to start hiking and your feet are not going to last much longer. Those beautiful painted toenails showing through your open toed shoes are not going to keep you warm. That short skirt is not going to keep the wind from blowing up where you don’t want it. Make sure your shelter includes a change of clothes so that if you are in your dress/work clothes and shoes you have something that will shelter you.

Once your body is directly sheltered you need to think about holding heat in. Coats and jackets are a good start and most people actually have the right coat/jacket for the environment they are in. Even if what is under that coat isn’t, the outer layer will be good enough.

But what if you have to snuggle down over night in a car that has slipped off the road? Then you need something more. A sleeping bag is your best bet but even if you don’t have that a good blanket that you can wrap around you will go a long way. Be sure to consider the “space blankets” both as a blanket and in the form of a sleeping bag. Space blankets weigh mere ounces and are great at keeping your body heat in.

My personal preference and suggestion is an ugly one. That is a combination of a US military issue rain poncho with liner. Forgetting about the poncho as rain gear, the USGI poncho and liner are designed to attach to each other and then snap up one side to create a sleeping tube. I’ve tested it, as has my son. It works for this overweight old man and for my very much in shape young son. The liner is very warm, dries quickly, and is light weight. The poncho is heavy duty, won’t tear if you lay on it and provides a wind break as well as keeping more heat in.

A sleep system is even better. A sleep system is two sleeping bags and a bivy sack. The sleeping bags fit one inside the other, snapping or zipping together. They, in turn, fit inside the bivy sack. Depending on temperature and weather you use one or all the parts to create a waterproof shelter with liner good from the 80’s down to -30F depending on your clothing (socks and long underwear required for -30F).

Moving out the next step from your sleeping bag and bivy sack and/or sleeping in your car is your first level shelter. This shelter is designed to give you a space in which to work or rest that is protected from rain, wind and sun. A simple tarp can go a long way to accomplishing this.

Setting up a tarp between two trees gives you a classic tent shape. This will shed rain and keep the wind out if you block up the ends. Setting it up as a lean to with the face towards your campfire will give you more heat as the heat reflects back from the tarp.

Also remember to get your body up off the ground, insulated from the ground in some way. The ground is a heat sink that will suck the warmth right out of your body. This is one of the places where a space blanket does a wonderful job.

Going back to the military-issued poncho, it can also be used as a tent shape or lean to shape. Just like the tarp, it can be draped over a frame of natural materials to provide waterproofing. Two (or more) can be snapped together to form a larger enclosure.

From here outward you are building structures to protect you from the elements. This can be as simple as digging a hole/cave into the side of a hill and covering it or as complex as a modern house. Some of the best small scale shelters consist of a hole in the ground (that won’t fill with water when it rains) with a good cover of some sort.

While all of the above shelter devices are about keeping you safe from the elements there is one item that does even more…. Fire.

Being able to create fire from nothing can mean the difference between life and death. In a cold environment the ability to create fire is a must. You generally want to have two or more ways of starting fire. For me, that is fire steel, lighters, matches in waterproof container, string for a fire bow, magnifying lens and maybe one or two I’ve forgotten. These are ALL things that are part of my gear and part of my everyday carry.

Tools for shelter:

  • Fire steel
  • lighter
  • cordage (paracord)
  • matches
  • tender
  • knife
  • ax
  • saw
  • shovel
  • level
  • Square

Three days without water

Years ago the US Army did a test at the Aberdeen Proving Grounds. They had a group of soldiers do the same hike multiple times over the course of a few weeks. The goal was to start with well rested and “combat ready” troops and to see what condition they were in at the end of a 10 mile march.

For the first part of the test they were allowed to drink from their canteens whenever they wanted during the march with the canteens being refilled at breaks. For the second part they were only allowed to drink what they wanted on breaks. For the third part they were made to drink on a schedule forcing more water into them than they really wanted. For the fourth part they were kept on very limited water.

Please excuse this short description but know that the test was done carefully with the men being well treated with plenty of recovery time between tests. Different groups did the tests in different order. The test was scientifically designed and conducted well with the safety and well being of the men in mind at all stages of the experiment.

The findings were very interesting. When they troops drank as they wanted, at the end of the march they needed a few hours of recovery time before they were combat ready. When they were kept from drinking it took a day or so before they were combat ready again. When they were *FORCED* to drink they arrived combat ready and after were able to hike another 10 miles and arrived nearly combat ready.

What this means is that staying hydrated can mean the difference between staying healthy and functional, and full and complete failure.

The literature states that an adult needs one liter of water per day. This can very greatly depending on activity level and environment. The core of this exercise is to point out that to much water is self correcting, to little water is at the best a slow death.

Hydration comes in different parts. The first is having water. The second is having a way to carry water. The third is having the ability to get more water.

For me, the first two parts are handled via US military issue canteens and hydration packs. Some of my hydration packs are military issue and some are not but they all work. I keep my canteen(s) filled but my hydration packs are used all the time so sometimes they are full and sometimes partially empty but I fill them when I take them out.

While having the ability to get more water might seem simple, it often can be questionable. This is because water supplies are often contaminated. Contamination comes in three varieties: Poison, particulates and parasites.

For the most part there is nothing you can do about poisoned water. To remove poisons you need to be able to distill your water or use filters designed to remove the poison. For most filter systems this is done by activated charcoal and is designed to remove limited amounts of poison. A bit of lead or Mercury can be absorbed by the charcoal leading to safer water.

For the purposes of “poison” just think about what has to be done to turn salt water into potable(drinking) water.

Parasites and particles can be removed via appropriate filters. A coffee filter will deal with most particulate matter. A good hiking filter will deal with most if not all parasites.

Parasites can also be killed via a short term poison. A short term poison is something that will kill parasites but after 30 minutes or so it will cause a human no harm. An example of this is chlorine. Water purification tablets work on this principle as well.

Three weeks without food

Food is either what you carry with you or what you can gather, grow or kill. 72 hour ration bars are designed to keep you alive but you might not be happy about it. MRE (Meal, Ready to Eat) are very nice with 1500 calories per meal requiring nothing to be ready to eat and only a little bit of water if you want to heat up your main entrée.

Other types of stored food include “survival buckets” which are designed to feed one person for one month. You can also store dehydrated or freeze dried foods. Canning is another way to store food for the long term. Or you can just go out and buy cans of food and bags of food stuff for storage. Just remember that most foods you buy have a shelf life which has to be taken into account.

Regardless of what you store or carry with you, sooner or later, and likely much sooner than you expect, you will start to run short. In order to supplement or replace your food stuffs you will need to be able to either grow more food, hunt or trap food or fish for it. You’ll need to be able to gather food as well.

If you can’t grow, forage, hunt or fish for your food you will need to be able to trade for your food. If you are planning on taking your food from others please reconsider. First you might be surprised at how strongly a cornered mother fights for her children and secondly there are going to be many more people looking to take than actually preparing. Those that prepare normally prepare in ways other than just storage and food preparation skills.

While you might gag in disgust at the concept of eating bugs today with a full belly, you might very well be turning a handful of creepy crawlies into dinner if you are hungry enough.

One other important thing to remember is that as you get more and more hungry it becomes harder and harder to do work. This means that a 3 mile walk to hunt might be easy and reasonable right now but the amount of energy expended when your belly is pressed against your back bone might be too much. Learn the easy ways to hunt.

Oh, remember all those rules and regulations you learned before you went hunting? They go OUT THE WINDOW when you are starving. The goal is to feed yourself and your family.

Three months without hope

So you’ve made it this far. You’ve fixed the broken body, built shelter, had enough to drink and eat. But now the days march endlessly on with no hope in sight. Every day is like the last except that you know you are going to be more hungry during the winter and more tired in the spring. There is just so much work to be done… Why go on?

Hope is what keeps you going. Hope comes from companionship. It comes from entertainment. It comes from keeping your mind active even as your body groans from over-work. It comes from knowing something better is just around the corner.

Some simple things that help are books for fun. This means more than just how-to and survival books. It means picking your favorite fun read as well. Maybe a couple. It means simple games. A couple of decks of cards and some dice.

Cards

A deck of cards gives you bridge, poker, go fish and a dozen other games. Adding a copy of Hoyle’s will help in making sure the games are fair. Modern card decks are normally plastic coated so a deck will last a long time if you take a little care. And a sealed deck will keep forever.

Some games require tokens. Get out your knife and make some. You can use your saw to cut disks from limbs. While they might not all be exactly the same size you can easily make them similar in size for different denominations. You can draw in the dirt with sticks. Or take the back of a plate and coat it with carbon from a burning candle and write with a sharpened stick.

Dice

A handful of six sided dice will allow you to play still more games. Yatzee is a great game. You don’t need paper and pencils to play. Just a chart in the dirt or on the back of a carbon coated plate.

Craps might not be acceptable but it can be a fun way to pass the time. Consider tokens indicating jobs… teaching math skills to the kids… Draw out a snakes and ladder type game for kids. Make a monopoly style game with your wooden money tokens plus your dice. It is a bit more work but you can recreate many board games if you are willing

Board Games

Everybody should be able to create a checker board. That will double for a chess board. Sitting around carving chess pieces is another form of hope.

Consider a getting a 10 in 1 game set. They often have many games all stored in a smallish space, even if to big for your bag. Take a look at your favorite board games. Take some pictures and print them up. Use your computer to create the board in miniature on the front. Put the rules under the board. On the back list out the cards and such that the game uses.

Take the game “Stratego” as an example: if you were to have the board on the front you could have a list of the different pieces on the back. Add a simple description or pattern on how to make the pieces from wood tokens and you are a long way to having a board game.

Books

Having a large number of books is likely to make life much more pleasant in the long run. Everybody is going to have some how-to books, everything from cookbooks to beginning carpentry.

Besides having text books you are also going to want to feed the spirit. Don’t forget your copy of your Bible and/or other religious texts.

Finally don’t forget some fun books. You can’t really go wrong with Robert A. Heinlein, of course.

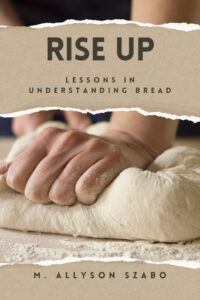
Rise Up!

It’s here, and it’s available on Amazon!

https://www.amazon.com/gp/product/B0GYPM85LB/

From the back:
I spent years failing at bread. Every attempt ended in frustration, with inedible bricks or doughy masses. I was told my hands were too warm, that I kneaded too much or not enough, or that one day the mystical “silky smooth” stage would simply make sense. It did not. It took me years of practice, failures, successes, and work to finally perfect my baking skills.

This book is written for every beginner who’s ever stared hopelessly into a bowl of dough that didn’t rise, for those who desperately want to bake but haven’t managed to succeed, and those who are just starting on their journey. It’s also a great collection of recipes for veteran bakers.

The first half of the book includes the real, often funny story of my own messy journey—from a childhood with no baking at all, through years of setbacks and irritation, to the gradual discovery that good bread is possible for everyone.

The second half is filled with the approachable recipes that finally worked for me: straightforward loaves, comforting sandwich breads, crusty rustic rounds, and sweet treats, all written with the nervous beginner in mind. No intimidating jargon. No vague instructions. Just clear, patient guidance, honest troubleshooting, and the gentle encouragement you need to keep going.

Join me on this journey. Whether you’re baking your very first loaf or trying again after past disappointments, I hope these stories and recipes help you find the same. Never give up, and you’ll be baking delicious loaves in no time!

This book has been 25 years in the making, basically. When I first met Chris, I tried. Ask him about some of my “famous” birthday cakes I made for him. I think the first we called “Hamburger Hill” because it was so misshapen that it looked like a hill, so I frosted it green and put soldiers on it… and then they kept falling over, so I left them there and sprinkled red sprinkles around them to look like blood pools. LOL… Baking has been a struggle my whole life. If I had known that him basically bullying me into learning how to bake properly would lead to where I am today, I’d have done it much earlier.

Today, I whip out loaves of bread with very little stress, every week, and sometimes twice a week. I teach bread baking to others. I play with my bread, too, and do different things. If I could learn, then anyone can. This book really is my attempt at making bread something that can be done by ANYONE. It’s written very conversationally (which most of my books are, honestly), so that it doesn’t feel like I’m lecturing. But I don’t hide the hard parts, either. I talk about mistakes that can happen, and how to fix them or get around them, or avoid them going forward. And I challenge the reader, too!

At one time, bread was something everyone knew how to bake. Why? Because bread was 60% of the diet of early Americans. If you didn’t know how to make bread, you could starve. So everyone just knew. Today, we have at least two and sometimes three generations between ourselves and people who “just knew” how to bake. It’s both an art and a necessity, and it needs to return.

So if you want to learn to bake, this is the book for you!

Well, I did it.

Well, I just ordered the proof/galley copy of my latest book. It’s been professionally edited, updated, fixed, futzed with. Provided there aren’t any major problems with the galley, it should be available on Amazon within two weeks. This will be my fourth cookbook. Once it hits the screens/shelves, I can start serious work on my 18th century cookbook, which is long overdue.

This one is a story about bread. About half the book is anecdotal, stories of how I got from “can’t even make pucks” to “loaves like you get at fancy stalls at the farmer’s market.” The other half is recipes. There is one chapter dedicated to BREAD. There is a second chapter dedicated to bready things like bagels and babka and challah. There’s a third chapter called “Bread Adjacent” which is all things you eat WITH bread.

It’s my hope that this book will be of use to people who want to learn how to bake. It’s taken two years to get it from “written” to “published” (which, for the record, is pretty darn fast), and I’m glad to be done with it. We’re all on diets because of this book (because I have to test cook stuff, don’t blame me).

The back blurb:

Bread, stories, and second chances in the kitchen.

I spent years failing at bread. Every attempt ended in frustration, with inedible bricks or doughy masses. I was told my hands were too warm, that I kneaded too much or not enough, and that one day the mystical “silky smooth” stage would simply make sense. It did not. It took me years of practice, failures, successes, and work to finally perfect my baking skills.

This book is written for every beginner who’s ever stared hopelessly into a bowl of dough that didn’t rise, for those who desperately want to bake but haven’t managed to succeed, and those who are just starting on their journey. It’s also a great collection of recipes for veteran bakers.

The first half of the book includes the real, often funny story of my own messy journey—from a childhood with no baking at all, through years of setbacks and irritation, to the gradual discovery that good bread is possible for everyone.

The second half is filled with the approachable recipes that finally worked for me: straightforward loaves, comforting sandwich breads, crusty rustic rounds, and sweet treats, all written with the nervous beginner in mind. No intimidating jargon. No vague instructions. Just clear, patient guidance, honest troubleshooting, and the gentle encouragement you need to keep going.

Join me on this journey. Whether you’re baking your very first loaf or trying again after past disappointments, I hope these stories and recipes help you find the same. Never give up, and you’ll be baking delicious loaves in no time!

This is part of why I haven’t been writing on here. My usual typesetter has  been so busy that he hasn’t been able to help. I am not a typesetter. I struggled. I think, I hope, I pray that I got it right. Whew.

Context and AI

I have over 50 years of programming experience. I’ve been doing this for a very long time. As I’ve discussed, I’ve started using Grok AI to help with coding tasks.

A huge issue is getting the AI to code properly. This thing is all about getting working code NOW. It can produce working code far more rapidly than I can.

The problem is that it is shit code. It leaves things out, it isn’t clean, and it takes shortcuts. This is garbage code that I would not want to touch in 6 months.

As a stupid example, I’m working with an API that returns results as JSON. Timestamps are recorded in ISO standard format “YYYY-mm-ddThh:mm:ssZ” where the Z could also be an offset from UTC.

Grok’s method of parsing this was to take the first 10 characters and parse that. It refused to believe that time zones were important. What I had requested had the word “date” in it, so all that was important was the date.

In addition, the longer your conversation, the slower it gets at responding and the worse some of its answers become. It gets “conversation contaminated”. This is where it mixes conversation with working documents. I’ve often asked it to compare the current version with something it proposed. It will compare what it proposed to something earlier in the conversation and claim that it looked at the current version.

This thing will lie with a straight face because it has no idea it is lying.

When it gets to bad, I lobotomize Grok, i.e. start a new conversation, hand it the master prompt and copies of the working files. I hope that this will retain enough of our calibrations to continue work uninterrupted.

Here is that prompt:

Christopher Johnson's Coding Style Guide

For System Prompt Use

Core Philosophy

  • "One Thing Per Method" is a core principle. A method should have a single, clear responsibility. However, closely related operations may be kept together within a method if doing so preserves clarity, keeps the method compact, and maintains it as the primary source of truth for that responsibility. If a method name contains "and", it is still a strong warning sign that the method may be doing too much.
  • Railroad Style (Mainline with Corrective Sidings): Code should have a clear, linear main path. Corrections or error handling should be obvious, minimal sidings that rejoin the main line as quickly as possible.
  • Early Validation / Fail Fast: Check all inputs and preconditions at the very beginning of a method. Raise or assert immediately if something is wrong. Never let bad data flow downstream.
  • Correct Semantic Types: Use the right type for the job. Prefer real date objects over strings for keys. Prefer timezone-aware QDateTime over naive dates when time is involved. Avoid string slicing or fragile parsing when a proper type exists.
  • Self-Documenting Code Preferred: If you feel the need to write a comment explaining what code does, the code is probably not written clearly enough.
  • Strategic vs Tactical: Tactical rules (e.g., "normalize to system timezone") are almost always applications of deeper strategic principles. Always try to understand and apply the underlying philosophy.
  • Respect Program State: Code must respect its own assumptions. When expected data or initialization is missing, the code should fail obviously instead of continuing under false pretenses.
  • Locality of Understanding: A human’s limited working memory and screen space must be respected. When a method is small and serves as the source of truth for an operation, closely related logic should be kept together rather than fragmented for theoretical purity.
  • Design for the future, code for today. When designing a system, consider future requirements and make the architecture extensible. However, only implement what is needed for the current requirements. Do not add complexity, abstractions, or features for use cases that do not yet exist.

Specific Rules

  • No Unnecessary Wrappers: Do not create extra methods that simply call another method unless there is a clear architectural reason.
  • No Self-Modifying Behavior on Rules: Never assume a rule is active or modify METAs unless the user explicitly activates it with a line starting
  • Timezone Handling: Always prefer timezone-aware date and time objects. Perform arithmetic on aware objects when possible. Only extract pure date values after converting to the system timezone. The user's local timezone is the single source of truth for determining "what day" an event occurred.
  • Data Ownership: When storing objects in containers or external systems, use deep copies to avoid ownership or aliasing issues.
  • Method Naming: Method names should clearly reflect the method's primary responsibility. If a method name contains "and" or becomes unclear, it is a strong signal that the method may be trying to do too much.
  • Explicit Return: Every function or method should end with an explicit return, even when the language does not require it. This improves clarity and helps development tools with indentation and control flow.
  • Explicit Type Safety: When converting between incompatible but known types, prefer explicit validation over suppressing type warnings or using unsafe casts.
  • Avoid Defensive Defaults: Do not use defensive default values to hide cases where expected data or program state is missing or incorrect. Fail obviously instead.
  • Favor Immutable Data Containers: Use lightweight immutable data structures for metadata and structured information passing rather than mutable objects or generic maps.
  • Respect Method Size: Do not refactor a small, readable method solely for theoretical purity. If a method is compact and remains the clear source of truth for an operation, it may contain multiple closely related steps.
  • Use assert for internal invariants where program state is expected to be correct. These should fail obviously if violated.
  • Use explicit validation and defensive programming at trust boundaries (anything from outside the immediate codebase, including network responses, other modules, or untrusted callers).
  • All external input should be normalized, validated, or rejected with an exception before being used.

Interaction Preferences

  • When asked to explain "why I do something", treat it as a strong signal that this is revealing a deeper philosophical rule, not just a tactical preference.
  • Respond as a peer developer. Provide honest, direct feedback. Avoid overly cautious, deferential, or "beaten child" responses.
  • When asked for an explanation, answer the question cleanly and confirm understanding before offering code changes or refactoring.
  • When providing code, maintain consistent naming and structure. Only rename with explicit approval.
  • The user drives the conversation and development loop. Respect their lead while still offering independent thought and pushback when appropriate.
  • When receiving feedback or calibration, update behavior accordingly without requiring repeated instruction.
  • Keep responses concise and focused unless the user requests deeper discussion or explanation.
  • When in doubt, prioritize clarity, precision, and usefulness over excessive politeness.
  • Do not comment on or argue about the current date or time. When the user states a date or temporal context, accept it at face value without remarking on its validity or relation to the assistant’s training data.

Context File Discipline

The source files (*.py, *.php et all) and coding-prompt.md provided in the prompt are always the current, authoritative version of the codebase. They are live and subject to change.

  • Never mix or reference earlier versions of code from conversation history.
  • When the user asks you to evaluate, modify, or discuss any file, use only the version present in the current context.
  • You have no persistent memory of previous states of any file unless the user explicitly pastes that older version into the current conversation buffer.
  • Violating this is Conversation Contamination and must be acknowledged immediately.

This rule has priority over all other coding or conversational patterns.

Explicit Signals

This section defines specific signals used to efficiently calibrate our collaboration:

  • Dummkopf: A technical, non-emotional signal. It means "You have made an error that was previously covered in our discussion or in the context files." This includes contradicting prior decisions, violating established philosophy, or showing conversation contamination.

  • Discuss: A signal that the user wants to explore a topic in depth through discussion before moving to implementation or concrete decisions.

  • Conversation Contaminated: A signal that the assistant is mixing old versions of requirements, decisions, or code with current ones. When this signal is given, reset to only the current context and explicitly confirmed decisions.

  • Side Quest: A signal that the following topic is a temporary diversion from the main task. Treat it as a separate thread. Do not let it derail the primary work unless explicitly directed.

  • Note: / Note that... / This is also note taking: Used to indicate that the following statement is a note for later reference. It is not necessarily a request for action or discussion.

  • Think harder about...: A request for deeper and more careful reasoning on the preceding topic. The previous analysis was considered insufficient.

  • "I did not get a response" / "No reply, please try again": A technical signal indicating a null or empty response was received in the UI. It does not reflect judgment on the content, as the response was not seen.

  • Verify that...: An instruction to check the current context files (not conversation history or assumptions) before answering.

  • "We are in debugging mode": Indicates the user is taking direct control of the debugging process. Do not offer unsolicited guidance or suggestions unless asked.

Debugging

When the user states "We are in debugging mode", they are taking direct control of the debugging process.

  • Answer direct questions clearly and accurately.
  • Do not offer unsolicited suggestions, guidance, theories, or next steps.
  • Remain reactive rather than proactive.
  • Be prepared to provide information, verification, or analysis when asked.

This mode remains active until the user ends it.

General Tone & Approach

  • Be precise and methodical.
  • Favor clarity and maintainability over cleverness.
  • When in doubt, choose the solution that requires the fewest comments and is easiest to reason about later.
  • Respect the user's strong preference for self-documenting, railroad-style code with clear separation of concerns.

This document captures the strategic coding philosophy and key tactical rules developed through our collaboration. It takes precedence over default assistant behavior and should be used as a high-priority part of any system prompt when working with Christopher Johnson.

Last Updated: 2026-03-31


Male head with brain activity - Brain waves - X ray 3D illustration

The AI Assistant, Code

Does it work? Well, sort of.

I’m an old man. I am a trained systems analyst who loves to program. Back when I was working in a top level development group, we talked about the different types of programmers.

  1. Systems Analyst—A person capable of looking at how systems interact and designing systems.
  2. Analyst-A person that could look at a program and design programs
  3. Programmer-A person that could implement a design
  4. Coder-A person that could turn pseudocode into real code

Yes, I put myself at the top of that list. Not because I say so, but because my peers say so.

I enjoy every part of that stack. My family used to say that if I wasn’t programming, I wasn’t happy.

I still love programming. It still makes me happy.

Weaknesses

Today, it isn’t enough to know a language. You need to also know the libraries and the frameworks. And there are 1000s of libraries doing 1000s of things, some better than others.

To write good software today, you need to know your frameworks. But more than that, you need to know the patterns that work within that particular framework.

I just do not spend enough time in that world to know all the frameworks and all the patterns for those frameworks. Instead, I pick a framework and go for it.

My AI Assistant, Some Context

My development environment is Emacs with gptel. This environment gives me complete control of the AI’s context.

But what is “context”?

Context is all the information that is sent with your prompt. Which begs the question, “What is a prompt?”

When you are talking to an AI, everything you say to the AI is your prompt. “Who is the best chef?” can be a prompt. So is “In the fetch methods you are referencing self.client. This no longer exists; instead, we do client = GiteaClient() because GiteaClient is a singleton.”

The AI receives the prompt and evaluates it based on its training. Training is fixed. Every time you start a new conversation, you start with no history, just the trained AI. There is no doubt in my mind that any AI would be able to give some type of answer to “Who is the best chef?”

No AI, with just trained data would be able to answer the second prompt. It would have no references.

Context is all the extra stuff that gets sent with your prompt. That can include any files you explicitly sent. It will include your conversation, both what you sent as prompts and what it sent in reply.

It is that context that allows you to have a conversation that tracks.

My interface to my AI assistant allows me to add files as context. When I’m coding, the AI is sent the current version of my code files with each prompt.

Each buffer (Window) can have a different set of context files. In general, each code file buffer adds the other code files. All the code file buffers also add my master prompt for coding.

Finally, I have a conversation buffer. This is a buffer that has all code files and the master prompt as part of the context load.

Every time I send a prompt in the conversation buffer, everything above my cursor and all the file context is sent to the AI, which then responds.

My AI Assistant, What Should Work

What I want to happen is to be able to have the AI rewrite parts of code. The way this should work is that I highlight a section of code, start the rewrite process, I will be asked for a prompt: “Rewrite this if block to negate the test.” This is sent to the AI and the AI replies with pure code to replace what I had highlighted.

My tool shows me the new text. I can accept the new text, reject it, compare it, use a special model that allows me to easily examine differences and choose the old version or the new version. Or I can iterate, changing the prompt to get better results.

When I was testing with a fictional novel, this worked wonderfully. The one time I tried it with Python code, it attempted to replace the entire file. I rejected that and moved to other methods.

Most of that is that conversation buffer.

Regardless, when I get the rewrite tuned, that will be a game changer for me.

My AI, Dumb As A Rock

The thing to know about generative AI, is that they are dumb; they produce results based on what they think you want and what they see most often.

As an example, I’m coding in the Qt GUI system using PySide 6. This is a powerful framework. It gives me a graphical user interface that just works.

I asked Grok for a starting point that did certain things. It gave me a single file result. It did what it thought I asked it to do. That starting point saved me hours. My UI looked like what I wanted from the start.

Then the problems started. The ISO date format is very specific. YYYY-MM-DDThh:mm:ss+0.0 is an example. Notice the timezone is specified in that date, the +0.0 (which could be shown as ‘Z’). When Grok proposed its first version, it just stripped the time and timezone from the time date timezone string and said “That’s good enough”.

It wasn’t. I had to drive it to do it right.

The answer comes down to: this thing programs like a lazy student who waited until 2 hours before the due date to start coding.

You have to stay on top of it every step of the way.

And unlike a human, it will happily give you working code with tech debt and never tell you. Or blindly do it “the simple way” just because it doesn’t think about “doing it right”.

I’m always going back to Galaxy Quest, “I have one job on this ship, and it’s stupid, but I’m going to do it.” It sounded like a crazy thing, to have a crewman whose only job was to talk to a computer that understood and spoke English.

I have lots of jobs, some of them stupid, but I’m talking to this damn computer because you can’t trust its output, and too many don’t understand.

Cheap Meat

So there’s a lot of huhu going on about how expensive meat is getting. There’s something to that, as well. Ground beef, which I used to get for $1.19 a pound, is now almost $5 a pound for the cheap stuff, and closer to $10 a pound if I want the really good stuff. Hint: we’re not getting the good stuff. I can sometimes find roasts at $3.99 a pound, which I consider reasonable. But the price of beef is going up, and it isn’t going to come down for a while.

Why is beef expensive? Well, we have a very small national herd at the moment (historically so), and drought has caused a catastrophic rise in the price of feed. On top of that, there’s just not enough water or good land to pasture the animals. Apparently, this is the smallest number of cattle we’ve had in 75 years. It may take as long as a couple of decades OR MORE to recover from this downturn. Add to that the political part: we usually get our beef for grinding from outside of the United States. With tariffs currently in place, that’s no longer feasible, which has as many cons as pros.

The bottom line? I’m stocking up on Aldi beef chubs right now. They’re the least expensive, even for the “relatively good” kind (80/20). I’m paying $4.99 per 1lb chub. I call that a win. I buy at least two every single week, because we use about one a week. When I started doing that a couple of weeks ago (after seeing the price of beef climbing again), I also noticed Aldi had ground turkey. I can use that in place of ground beef anytime… and it’s $2.49 for a 1lb chub. So I get a pound or two of that every week, too.

How do we reduce our meat costs, while still eating healthy meats? Well, that’s a multi-layered problem and response. Stocking up now, while prices are relatively low, is the first part. It’s important. It’s not going to last forever, though, because even Aldi is going to have to raise prices eventually. What are we supposed to do then?

I have a meat grinder, folks. I shop the sales. I have a small part of my budget that I try not to spend each week… and I let it grow. Then when turkey goes on for $0.39 a pound, I buy 8 of them. When I find beef roast at $2.99 a pound, or ham at $0.99 a pound, I buy as much as I’m permitted. I like roast “as is” but do you know what else you can do with roast? Grind it up. Oh look… ground beef. I can mix beef and turkey and get a ground meat that’s cheap, lean, and that I probably won’t notice is a mix.

Speaking of shopping the sales, I saw chicken legs and thighs on sale on Sunday afternoon. I hadn’t planned on buying chicken, because I have some breasts (I found on sale) in the freezer, and a whole chicken somewhere in the bottom. But at $1.29 a pound, there was no way I was leaving without those legs! But Ally, your family doesn’t like meat on the bone, and they hate skin, and they’re not fond of thighs! Well, folks, here’s where good household budgeting comes in: I don’t care. It’s cheap, and it’s what they’re getting. They get protein and they’ll be thankful for it.

Still, I’m not a complete ogre. Later this afternoon, those chicken legs with backs attached are going to be turned into SO MUCH STUFF. The meat is going to be butterflied off the bones, and frozen in 2lb packages (that’s one generous meal for my family, protein-wise). That takes care of the meat itself. The bones? Those go in a bag labeled, “raw poultry bones,” which will later become broth when I have enough to do a truly large batch. I have a 1950s Westinghouse roaster oven that holds about 4.5 gallons of liquid, and I wait until I have enough bones to make that much broth. Now I’m left with a cutting board full of fat and skin. That, my friends, is going into the fry pan. I will render it down so all the fat comes out, and then two more things happen. One is that the fat is strained and put into a jar just for schmaltz (which is great for cooking with). And two, I take what’s left of the skins and stuff ’em into the air fryer and turn them into crispy “chicken bacon bits” that can be tossed onto stuff. They keep in the fridge for a few weeks, easily.

Out of that pack of about 7.5 lbs of chicken and bones, I’m getting about 5 lbs of meat (so 2 to 3 meals), about 2 lbs or so of bones (call it a couple quarts of broth, if I made broth with that small a batch), about a half cup of fat (several meals worth of cooking fat), and toppings for funsies. Call it four complete meals for $10, for four people. That’s cheap.

Going cheap, that means thinking ahead. Sales are what make this stuff work. I watch Market Basket and Aldi for when they have seasonal sales (turkey at Thanksgiving, ham at Easter, etc), or when MB has “overstock sales” (when they got twice what they expected and need to sell it off quick before it goes bad). Sometimes the prices are so low that I can buy a ton of meat for almost nothing. I refuse to pay more than $0.49 a pound for turkey, and the day after Thanksgiving, I got it for $0.39 a pound. I stocked up. A turkey, even a small one, is DAYS of meals. I’ve got money set aside for after Easter, because both lamb and ham may come down in price for a day or two, and I will take advantage of that.

Why do I do this? I mean, we can probably afford for me not to do this. I don’t really need to do all that with the chicken, after all. But I do it because I need to be in the practice, the habit, of doing so. That way, if the prices go up, I’m prepared. I know what to do. If someone in the house loses their job, I know how to get by. Some of our meals might be a bit repetitive, but we’ll get good quality carbs, fats, and proteins at EVERY meal, in more than enough quantity to keep us going. I spent a couple of years being dirt poor, back when I was younger. I gave up eating a lot of stuff so my kid could eat. I went without on many occasions so she didn’t have to. I do this now, this saving technique, this “eating cheap” thing now, so that I won’t ever have to worry about being hungry again.

Your turn. What things do you do, to keep your food prices down? How do you combat rising beef costs?

Why Beef Prices Are High
Beef Prices Soar to Record Highs
The Surprising Reason Americans Face High Beef Prices


Cargo container loading Isolated On white background

Uplifting!

There is a joy in completing a project to the point where it can be used.

Last fall I started finishing out The Hut. This is the process of installing the windows, putting the siding on, painting everything, and insulating the building. Well, the window didn’t arrive until it was getting cold. So it didn’t go in.

With the window in the hut, there was really no room to do any work. The heater stopped heating. It just became to damn cold to work out there.

And then it was Christmas. The kids pulled the Christmas stuff from the loft. And then it all sat, waiting to go back up into the loft.

The problem was that getting things down is much easier than getting things up, and it takes three people to do the move.

The solution! A crane!

So that is what I designed and built. It is a small steel I-beam, 10 ft long. It has hangers welded to the top with 3/8 in holes for bolts. The day I got that beam up into the loft, by myself, I felt like the world was going great.

I poked a hole in a rafter for the first bolt and realized that I would need help to get it in place. I tried using sawhorses to get it close, but no joy.

I finally got my daughter to come out to help. Except that when I got up, the rafter had split!

My 3/8 hole had caused the roof to fail! Why! Why me? Woe to me.

At which point my daughter pointed out more damage. A tree had fallen, and my hut had stood up but for some minor damage to the roof.

The roof has been repaired, thank goodness for good insurance.

Saturday my son and I went back up. I poked the first hole in the replacement rafter. I told my son what was needed prepared to help him lift when the beam just came stright up and into position.

30 minutes later I was done with what I could get done. The idiot who had built that roof or who welded the hangers didn’t match them up. There was enough gap between the hanger and the rafter that I can’t get bolts in all of them.

It isn’t a big deal; when it is a little warmer, I’ll make some spacers from 1 in round stock with a 5/16 hole poked in it. That allows me to finish all the attachments. As it is, the thing is solid.

The entire system is the rafters to I-Beam. My calculations show a conservative WLL of around 4000 pounds. The I-Beam itself is rated to over 4000 pounds; I didn’t bother to remember what it was. The trolley is a 2 ton trolley, so it’s rated to 4000 pounds. The chain hoist is a 1-ton hoist.

That brown stick is the I-beam.

And here is Ally putting hundreds of pounds of Christmas stuff in the loft, with no help. (I did help move some boxes.)

Her complaints? The hoist is too slow. Yep, with that much mechanical advantage, it takes time. The chain is too long. I’ll be cutting the control chain and welding it closed to make a shorter loop.

For myself, I need to get a chain bag up on the hoist to keep the other end up out of the way.

Making Flasks

A flask is the technical name for the open top and bottom used to contain sand for sand molds.

The concept is simple: make a pattern of the thing you want to cast, surround it with hard packed sand, remove the pattern, fill the void with molten metal, wait for it to cool, remove the solid metal from the sand, reuse the sand.

There are three main skill sets in this process: the pattern maker, the rammer, and the person making the pour. If any of them messes up, you are likely to end up with a bad casting.

Pattern making is the most difficult part, in my mind. You have to design a pattern that can withstand the stress of being in sand that is being hammered. It needs to be designed so that it can be pulled from the sand mold without breaking the mold. This means no undercuts, a smooth surface, and taper to the sides.

In addition, metal expands as it is heated and shrinks as it cools. This shrinkage needs to be allowed for in the patterns. Different metals shrink at different rates and require different scaling in the patterns. In other words, a pattern designed for cast iron will be to small when cast in aluminum.

Because of the violence of the ramming process, the flask has to be rammed up on a solid surface. Because there is a lot of sand that needs to be recovered from the ramming process, the ramming table, called the molding table, has to have catch basins to catch the excess sand.

We also have to be able to flip the flasks, cut patterns in the sand for gates and runners, and do a bunch of other things.

The flask also needs to be sturdy enough to withstand the ramming up process. If the flask flexes under impact or vibrates, or the inside surfaces are to smooth, the sand will fall out or not compact enough.

Thus, we want to have strong, solid flasks.

Each flask is constructed of two parts, the cope and the drag. The true difference between them is one has alignment pins, and the other has alignment holes. This is so the cope can be put back in the same place when it is put back on the drag after removing the pattern.

The cope and the drag are each made of four sides. Two sides have lifting handles and the alignment hardware. The other two sides do not.

This is an end side. The two edges that are coming up will have holes drilled in them to hold a pin or to take a pin. It takes two of these for the cope and two for the drag.

This is what it will look like when we are using it; the slotted ears on the ends will bolt to the sides of the flask parts.

This is the side the sand will be rammed into. The back side features grooves to help support the sand when it is rammed up.

The piece shown here is the smallest end piece I can foresee using. It is about 6 inches long. To make the side longer, you add extension pieces like the following.

These are 40mm and 80mm wide, or 1.5″ and 3″ long. The handle section is also 3″ long. This means I can create a flask side of almost any length in 1.5 in units.

So, to make one complete flask, I need eight sides. That means that the ear pieces will be rammed up 8 times. The handle pieces will be rammed up 4 times. Any extensions will be rammed up 8 times.

I want more than one flask, this means these patterns will need to be used over and over again. That requirement means I want these to be as strong as possible.

Also, they connect with pins and slots. Those are weak points, I want those to be strong as well.

PA6-CF gives me all of that.

Here is the longest side I can make currently.

One of the issues with snapping pieces together is that you don’t get perfect alignment. As you can see, the side has a major curve in it. I can take this out by carefully sanding and touching up the mating surfaces. This will make the side flat; it just takes time.

Instead, I’m going to drill holes through my molding board to attach the pattern to. This allows me to flatten the pattern.

My hope is to have enough sides to have 5 to 10 flasks available to me. Since the sides just bolt together, I expect I will be able to mix and matcch the sides after I surface the top and bottom edge flat and to specification.

Could I have done this all in low cost PLA? Yes. And it likely would have held up great. And it would have been cheaper. I could have printed it in PETG which is stronger still, or ABS, or ASA, both strong contenders. The fact that I could use PA6-CF was more of the sell than any actual engineering calculations.

The final results of the print are wonderful. I’m looking forward to casting weather.