Month: July 2025

Friday feedback banner, a man with a phone writing reviews

Friday Feedback

DoJ is Pro 2A?

In a strange twist of events, the federal DoJ has filed multiple briefs with the Supreme Court supporting the Second Amendment-protected rights of The People. Amazing!

They have also done things at the circuit court level to close out future attacks on the Second Amendment.

It is a great time to be alive.

Sharp Yesterday Means Dull Today

My progress as a woodworker has been frustrated many times. The most common frustration? The tool is no longer sharp.

Yesterday, I was fitting the bottom to my tool tote. I’m sweating like a pig. It is dripping onto my glasses, making me even more misirable.

When I came in for a break, I told Ally that this is the first time I wished I was using my power tools. With very little effort, I could have set up the table saw and fitted the bottom in just a few minutes. Planing the ends flat and with the correct angle was painful.

Then, for grins, I pulled the blade out of the plane, did a hand touch-up, and then put the iron back in the plane. What had been a fine sawdust became end-grain shavings. Not more than 10 minutes later I had a great fit.

What Do You Mean Rip Cut Saws Rip Boards Better?

There is a scary moment when you first modify a tool to “fix” it or make it work for you. I think my first time was when I cut the shank of 3/4″ to JT-3 from 3″ to 1.5″. It worked perfectly, but cutting a piece off my new adapter? That was scary.

Modern handsaws are basically shit. Most people don’t know how to use them. Most people won’t even bother to learn how to use them. Most people would consider it too much work.

Older saws can be had for a reasonable price, but they are not ready to use.

The reason that new saws are so bad is that they are designed to do everything and to leave the best edge possible.

You can find old saws with 4 Teeth Per Inch (TPI). It was seldom that you found an old saw with more than 10 TPI, with a few being 15 TPI.

There is a good reason for that: the coarser the pitch, the faster the saw cuts.

Saw teeth have several parameters to them. The TPI, the angle of the tooth, the set, and the shape of the tooth.

When you crosscut , you want to sever the fibers. This requires a knife-like action. This is accomplished by putting a cutting edge on the saw tooth, alternating teeth. This cuts the wood fiber before removing the waste.

When you are rip cutting, you do not need that knife-like action. What you want is a chisel-like action. This is accomplished by having a 90° angle of attack that shears the fibers under the blade.

Modern saws are marketed to do both. They have a crosscut grind to the teeth, and they have a high TPI count. They do not do either type of cutting “well.” They do both adequately.

Thursday I took a new saw blade and “sharpened” it. That is to say I reshaped the shape of the each tooth to be that chisel profile. Then I tested it.

In soft pine, a full stroke was cutting somewhere between an inch and a half and two inches. Three or four times as well as it was cutting before the reshaping.

Obama Fights Back

The Obama sycophants, on command from the holy one, have stood up and screamed that the referral that Tulsi Gabbard made to the DoJ is just a distraction.

The argument is something like Trump is in the Epstein files. He doesn’t want you to know what we all know, that he is a kiddy diddler and a rapist. This referral is just to distract the MAGAots.

How do we know? Because Trump said he wasn’t in the files. He is lying.

How do we know he is lying? Because he was lying in his first term.

How do we know he was lying in his first term? The media told us so.

How did the media know he was lying? Because Trump always lies.

You can’t make this shit up.

Epstein

The world turns; now the Democrats are demanding the files be released.

There is a huge issue with the files, and every Democrat who is listed in the files will scream it to the skies.

The chain of custody has been broken because untrusted agents could have modified the content.

The files have been in the Biden DoJ for 3 or 4 years. Who had access, who could have modified the content, and who could have added or removed content? None of that can be trusted today.

For the Democrat caught with his pants down the same will be said. They will claim that the Trump Administration modified the content.

Obama Has Immunity!

Did he order these things done as part of his duties as the President of the United States?

No? Then he doesn’t have immunity.

Question of the week

Are you going to keep your Sig P320? Sell it? Buy them as they flood the market?

Concept illustrating the increase of tariffs. Three dices with 10 %, 25 % and 50 $. Focus is made on 25 %, the rest is purposely blurred

OMG! Tariffs are causing HUGE inflation!

The Trump Administration has announced numbers for tariffs collected. The number is huge, something like $77 billion. Of course the panic vendors are now screaming that this means that Americans paid $77 billion in taxes. They also claim that the tariffs are causing the price of everything to skyrocket.

Let’s take the case of a lowly woodworker making a stool. The stool is made from two pieces of 2×4 by 8 ft.

Because the woodworker wants to up his game, he decides to use a different wood; he chooses Canadian maple.

A quick check on wood prices shows that hard maple is running $6 per board foot. The amount of lumber needed is 2*4*8/12 = 5.33 bf.

Or, 2*4*96 / 144 = 5.33 bf

At a cost of $6 per board foot, this means the cost of the lumber will be $32.

The woodworker uses a $25/hour labor rate. It will take him 3 hours to build the stool using hand tools and rough-cut lumber. That is $75 in labor.

There is another cost for the finish and time for finishing. We are ignoring that part of the equation. He also adds a 20% profit for the business.

Putting it all together, we get $32 for the wood, $75 for the labor, and $21.40 for profit, for a total sale price of $128.40.

Now say that there is a 25% tariff put on importing that wood from Canada. This would be $8 that needs to be paid to the US government.

From a bit of insider knowledge, I know that the $8 can be paid by the company shipping the wood, making the 25% come out of their profit. They might split the cost 50/50, or they can pass the entire cost on to the buyer, our woodworker.

Assuming our woodworker gets the entire $8 passed on to them, let’s see what that does to the cost of our stool.

$40 for the wood, $75 for labor, and $23 for profit, giving a total price for the stool of $138. With a 25% tariff on the cost of the materials, we see a $9.60 increase in the price. That is a 7.5% increase in the price of the stool.

The truth of the matter is that many products only use pennies of tariffed materials in their goods. Hershey increased the price of their chocolate recently. While the left is screaming “Tariffs!” the fact is that cocoa costs went up. The tariffs are a small part of the increase in costs.

The more value added in the US, the more the profit margin is the less impact tariffs have on your costs.

I do know people who are having a difficult time because of the tariffs. Their product uses a gizmo they import from China. That gizmo is not made in the US because there was no profit in making that gizmo here.

Until there is a US competitor for those gizmos, she is going to have to pay the tariffs on those gizmos. She has announced a very modest increase in the price of her goods to cover her increased costs. She feels miserable for doing so.

Regardless, our economy seems to be doing much better in 2025 than it was in 2024.

Ren Faire Rundown – Week One

Behind the  “read more” are lots of photos, so if you’re not on a good connection, beware. This is also replacing FBEL for the week, because I don’t have the mental space to write about politics right now. I hope you enjoy.

This past weekend was the first of three at Maine Renaissance Faire. It’s a lot of fun, a TON of work, and you never know what the weather will be. This is my fourth year presenting at MERF (as we call it), and though three weeks is a LOT at a single site, I have been looking forward to it.

When I prepare for a faire, I need to worry about different types of things. First, I need to address my infrastructure. When I’m at MERF, I get to use the kitchen tent of the Brotherhood of the Arrow and Sword, which is my 15th century historical group. They’ve been around for a couple of decades now, and so they’ve acquired the kind of equipment that I can only dream of. They have many amazing looking tents, trestle tables, medieval lamps and tripods and clothing, things I’m still working at achieving and creating. I have better cookware than they do, though. 😀

Their kitchen tent is a massive wedge that opens on one side. In modern parlance we’d call it a Baker’s tent, though it’s much larger than any one I’ve ever seen before. It can be used with the front closed, making it a plain old wedge tent (albeit one large enough to hold six queen sized air beds with room to move around) or you can put the side up (as seen in the pictures below) to use it for vending out of. This is where I sell my cookbooks, and where my cooking demonstrations begin (they end at the fire, of course).

The other tents are the type used by various medieval military. There are some bell wedges (wedges with ends that bump out to give you a bit of extra room), some square and rectangular wall tents, and a round tent (the most usual used by the average knight, at least according to paintings). My own tent is a tiny wedge, just big enough for me and a small cot and my personal gear. It, too, opens on one side (just like its big brother, the kitchen tent), but it’s not tall enough for most people to stand under. I’m tiny (only 5’1″), so it works for me. I have to stoop a bit, but not much, and I can get dressed standing up by shoving my cot on its side. When I’m at an event with my sweetie, though, we need something larger. We’ve been staying in the “modern camping” area for the past few years, in a very modern pop up easy set up tent that accommodates our queen air bed. I wanted to be closer to my Brotherhood, though, and so my sweetie finagled a “long term borrow” of a 9×9 wall tent for our use from his sister. It is just large enough for our queen bed, our personal clothing bags, and one “gear box” each. Luckily that’s all we really need, as other items are either stored in the car (cash box, harp) or in the kitchen tent (cast iron, chairs, tables).

Read More

Medical bill paid, seal stamped on document, payment for services, tariff

Is it Fraud or is it Medical Billing?

A friend I know has no health insurance. They have great medical care. They just pay for it out of pocket.

There are three different medical care facilities that they use. Their primary care provider, urgent care, and the emergency room. They have used the emergency room for broken bones and a burst appendix. Those bills have been paid in full.

The urgent care people collect in full before you leave the building. Those bills have been paid in full.

The lowest cost is using their primary care provider.

Recently they needed to get their medications out of hock. To get their prescriptions renewed, they have to visit the doctor once a year for an evaluation. No big deal.

The appointment was made; they went. The office visit was a longer one. Time to leave.

Stopping at the front desk, they asked how much. This required a wait while the desk called back to get the billing code from the doctor. Office visit, level 4 was the code.

This took an expected visit price of around $85 and bumped it to $110. They figured out why and paid in full. The desk refuses to mark bills “paid in full” or even “paid”.

Nearly a month goes by when a medical bill shows up. It is a bill for the visit.

The bill has a new line item, “complexity,” for $50. It has another line item for “medical,” and the price of the office visit has gone from $110 to over $200. In total, the bill has gone up by around $170. This is more than the original charge.

What happened?

Well, the first thing is that the medical group refuses to tell you what you will be billed for at the point of service. They know what was done, but they don’t “know” if there is anything else.

This means that the office manager, not the doctor, can change the code if they feel that the doctor spent more time than they coded. Some one in the backroom added a complexity charge because they saw their primary care provider, who considers the entire history. (Which I thought was a good thing, not something to be punished for with a surcharge).

The “medical” was tacked on because they took a medical survey which the doctor read before entering the treatment room.

The billing office claims that the change in price of the visit was because of an honest mistake.

In short, the bill turns out to be an extra $36.70 over what was paid at the point of service.

No wonder nobody knows how expensive medical care is. The doctors office makes it impossible to know.

White paper with musical notes closeup background. Music writing concept

Tuesday Tunes

I’ve been building. I figured we had all heard Another One Bites the Dust more than a few times.

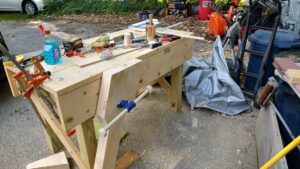
Today, I put the vise on the workbench. This is a game changer.

The jaws are 11+ inches wide. The vise can open around 15 inches. It is a parallel jaw vise, meaning that the jaw presses against the apron with the same force from top to bottom.

The shiny metal disk at the left front corner is an aluminum planing stop I turned on the South Bend. The handle for the vise is 1″ hardwood from the local hardware store, but the endcaps I turned myself. And then I found my 1″ bit was in such poor condition that I threw it away after it drilled two holes that drifted.

The board at the bottom of the image, on the ground, between the vise and the bench leg, is a wedge. It keeps the vise jaw parallel. It is the fulcrum point of the vise.

There is one of my homemade mallets on the table. Two crap saws, one good saw, and one OK saw. There is a 50″ straight edge and my clipboard with the plans attached.

The next modifications to the bench are to drill 3/4″ holes for side board support and some 3/4″ holes in the top for different hold-downs. Because this is a softwood top and it is thin, I need to add blocking under whatever boards I drill.

I also need to put the braces on the front and a stop on the chop (the moving part of the vise) to keep it from twisting.

I will soften the edges of the vise jaw at some point, but for today, it is fully functional. I’m happy.

On the other hand, I just messed up my tool tote build. Ally wants the broken one, but I’ll make it all work.

The Weekly Feast – Scotch Eggs

I adore Scotch Eggs. They’re the perfect match of sausage, egg, breading, and deliciousness. Done right, the exterior is crispy and salty, the sausage properly cooked without being greasy, and the egg yolk EVER so slightly soft. I will buy them at Ren Faires as a treat, but here’s how to make them at home!

Ingredients:

  • 6 cooked eggs
  • 1 cup ground breakfast sausage
  • whisked egg and breadcrumbs, for coating
  • salt and pepper to taste
  • frying fat

Depending on how cooked you want your yolks to be, this can be tricky. I usually aim for very soft boiled eggs, around 6 minutes in boiling water. For hard boiled, you want 8 minutes in boiling water. (Note: always put eggs into cold water in the pot, then bring the temperature up to boiling, and start your timer when the water reaches the boil.) To make them easier to peel, you can prick the bottom of the egg (the fat end) with a pin, which lets the water in and separates it from the shell. I’m told baking powder in the water also works. When your eggs are boiled, put them in a cold water ice bath for at least 20 minutes before attempting to peel them.

Remove the shells and rinse then wipe the eggs dry. Using your hands, pick up a ball of ground sausage and make it into an oval shape, flattened to an equal thickness throughout. Wrap this carefully around your egg and gently mold until the entire egg is encased in sausage. The harder boiled your eggs are, the easier this is.

Set the whisked raw egg in one bowl and the breadcrumbs in another. Dip the sausage encased egg into the whisked egg, then roll it in the breadcrumbs to coat it. Add the coated egg to a fry pan with oil and fry them until they’re golden brown. Turn them constantly so that they cook evenly. You want the sausage to be cooked through (and the egg will cook a bit further while you’re cooking the sausage).

These can be served as is, hot and crispy. Alternatively, you can split them in half and serve them with sliced tomatoes and a whisked mixture of equal parts mustard and mayonnaise.

putting glue on a piece of wooden board

Clamps and Glue

If you ask a woodworker if they have enough clamps, the answer is always “no.” You always need at least one more clamp.

I’ve become that woodworker. I don’t have enough clamps. So I make do.

My glue of choice is Titebond III. This has a working set time of 15 minutes, it is an extremely strong adhesive, it is water resistant, and it is “easy” to work with. It comes in sizes ranging from your standard Elmer’s glue bottle to 55-gallon drums.

My local hardware and lumber store only had it in the pint size. I’ll be ordering more online shortly.

What I learned today is that I have not been using enough glue in my past glue ups.

Yesterday I went through almost half that bottle with an 11×48 three-board lamination. And I didn’t use enough.

The first board didn’t get enough glue, but I think it will be fine for what it is. The problem I ran into was spreading the glue. I had quickly made a spreading stick, but it just wasn’t working. I switched to using my finger and got better results, but I almost ran out of time working the first board in the sun.

Even a thin layer of glue is more than you expect.

I also took a page from the machine shop and looked up the specifics on the glue. It requires 100 to 150 PSI to properly work.

For those keeping track, that means we need to be providing over 65,000 lbs of pressure for proper use. A good clamp will provide 2000 lbs of pressure. This means that I should have been using 30 clamps on that one glue up.

I hate mathing.

Have a fantastic day; music tomorrow and SCOTUS on Wednesday.

Making A Tool Tote

I became lazy, and it cost me a little. There are two braces that are not yet attached to the bench. I knocked one off today. Which tells me I have to do this correctly.

The bench is currently in front of the garage/shop. At the end of every day working, I pick up all the tools and move them into the shop, someplace. It is very disorganized. I then put a heavy-duty tarp over the bench and call it a night.

A few nights ago, I left a couple of tools under the tarp. The rains came. No issues. The wind got me worried. When I got out to the bench, the tarp had been partially blown off the workbench, and the tools were soaked.

I spent the next 30 minutes drying, cleaning, and oiling the tools. I seem to have saved them.

The next day was hotter; I worked to the point where I could not move. Seriously, trying to stumble into the shade wasn’t working. Luckily my lady came to my rescue with water. She then helped me move my tools the 10 feet from the workbench into the shop.

This created a need for a way to transport and store tools.

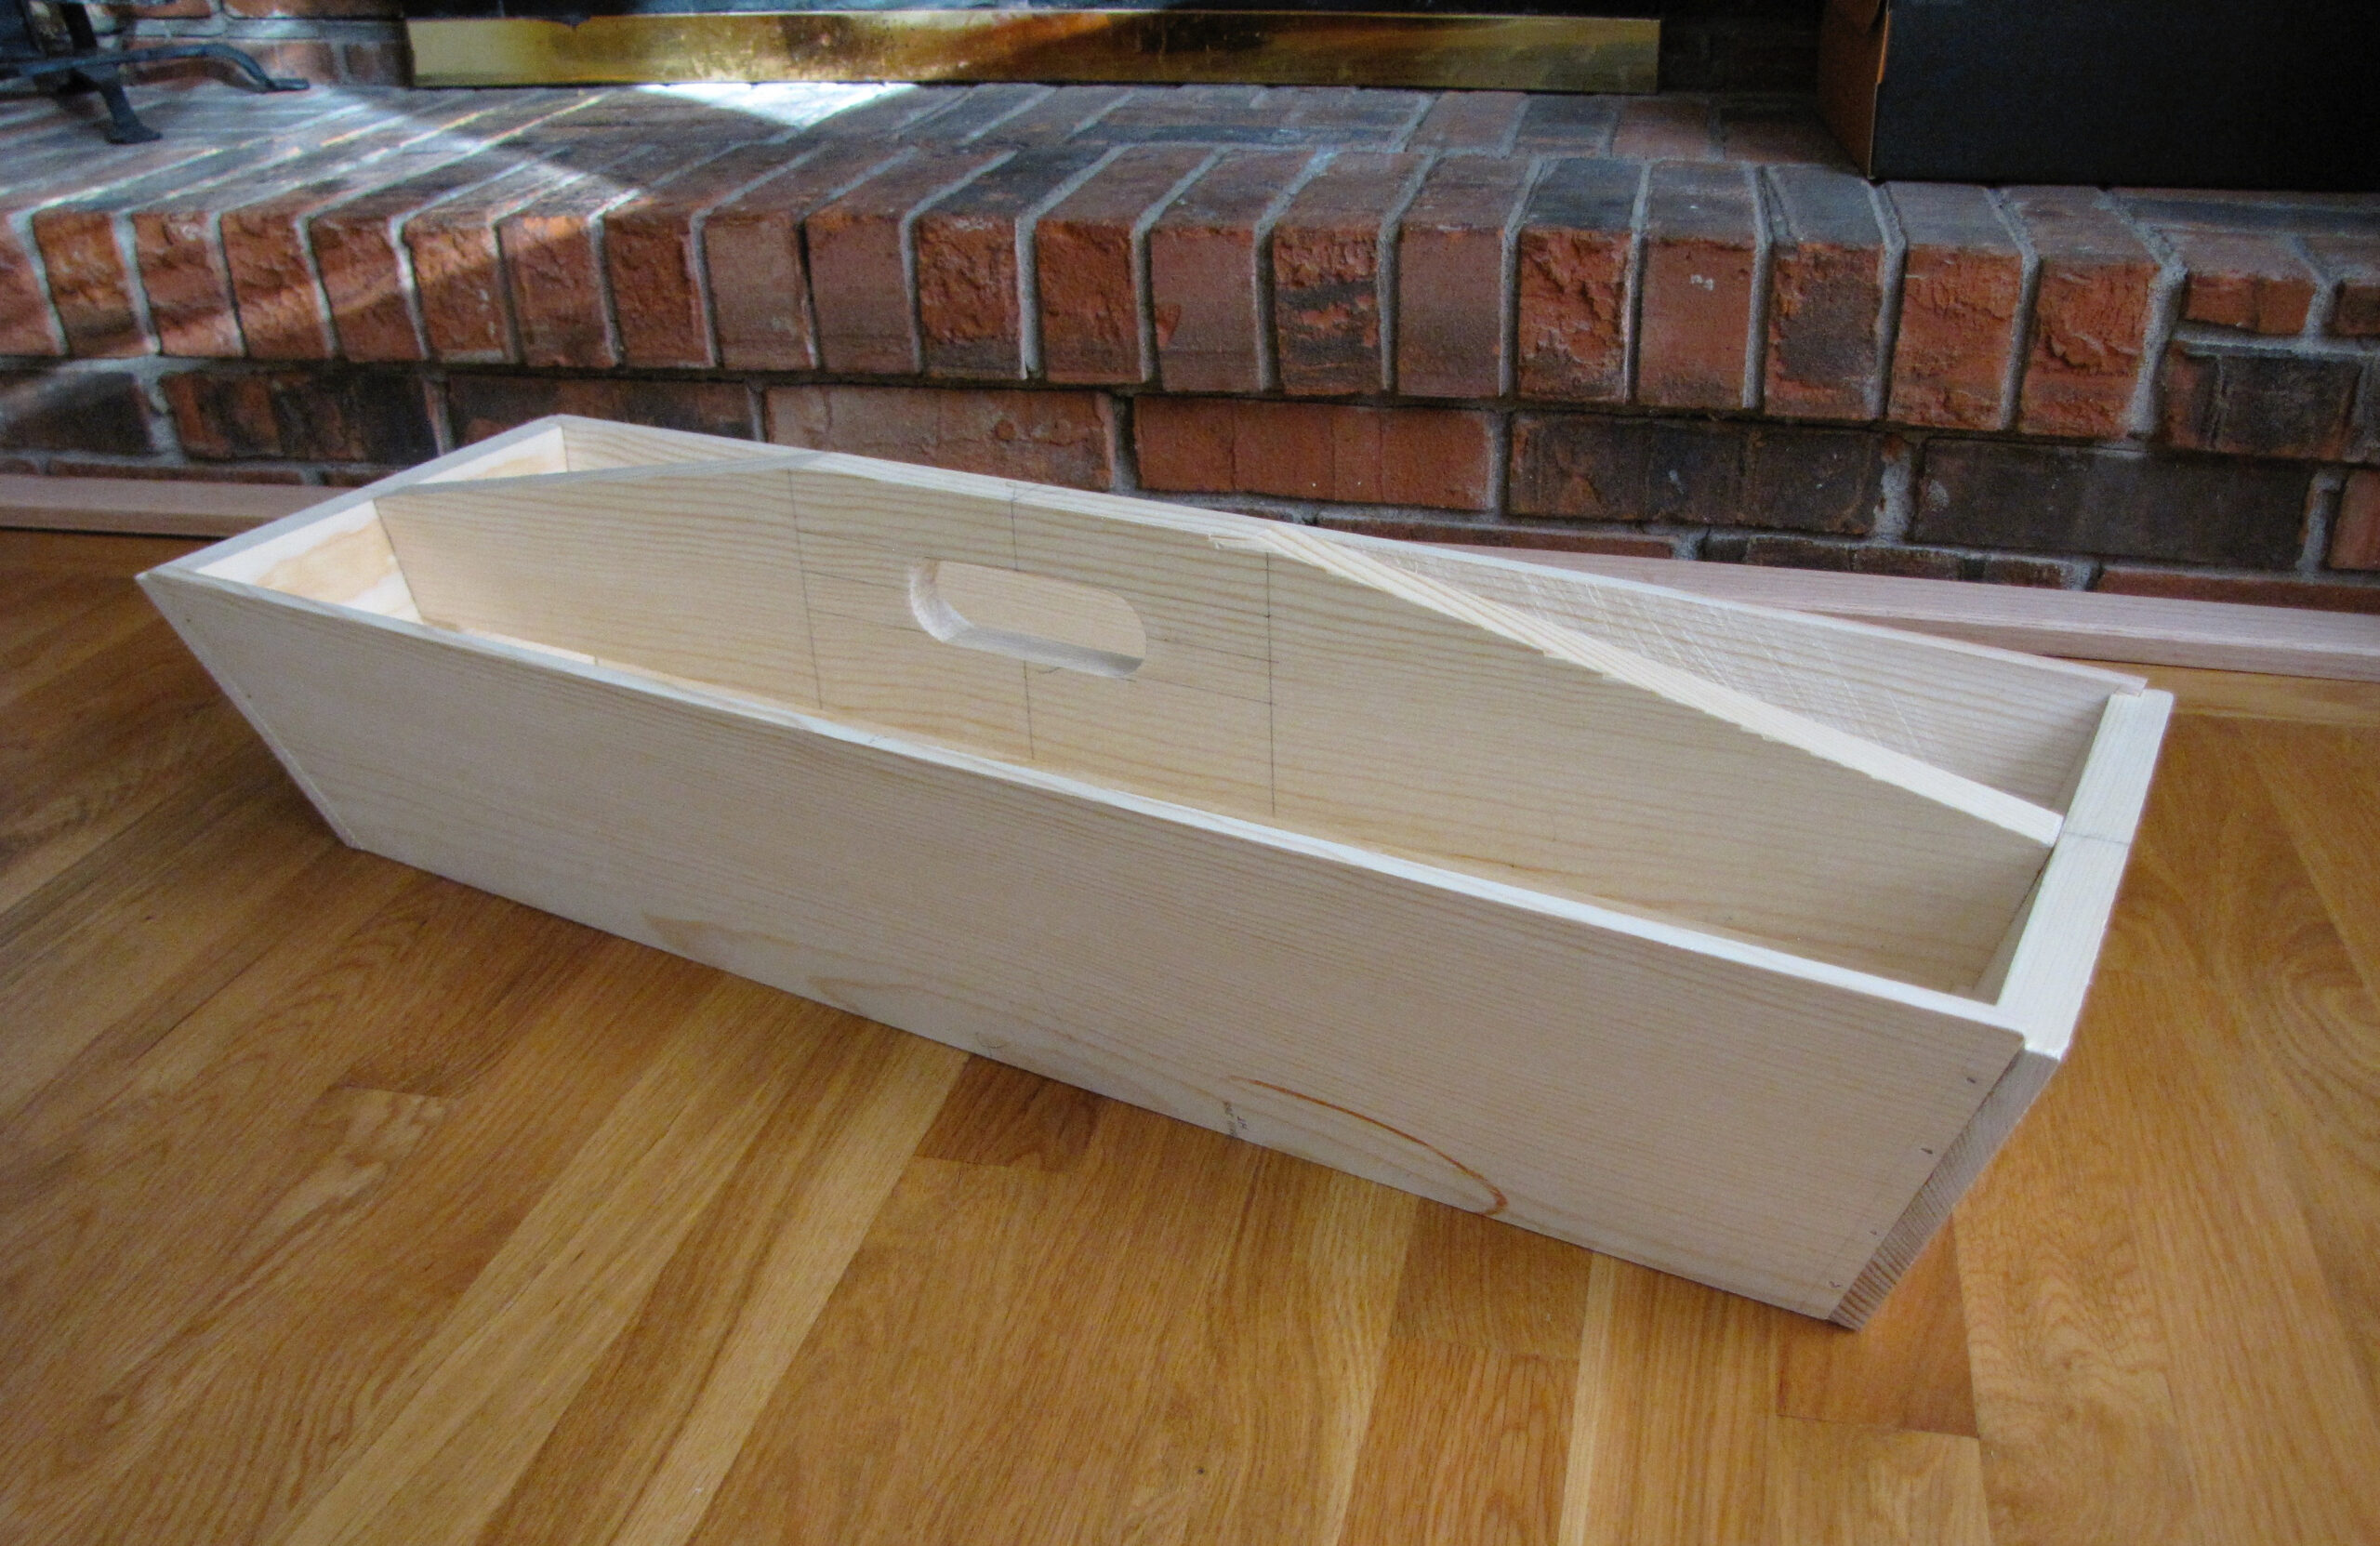
The first step is the tool tote. Mine is a simplified version of the one shown.

I could have gone to the local lumber yard and spent $75 to get some pine of some unknown quality. The plans call for true sizes of 3/4 x 5 1/2″ and 3/4 x 6″. The 5 1/2″ isn’t really an issue; that is a 1 by 6. The 6-inch board requires cutting down a 1 by 8.

The Sawmill

I intend to cut my own lumber soon. It is currently on the back burner. I have the tools; I just require the will and the time.

There are about a dozen sawmills within a 75-mile radius. The first half dozen I contacted were all big operations. One “local” mill answered the call in Maine. They have a local number; you just can’t get it easily. Another only dealt with softwood. Two were custom saw work only. They either bring their mill to your woodlot lot, or you take your wood to them and they saw it to your specifications.

I ended up going south into Morador to visit the closest mill. It was worth it.

The mill is a small, family-run operation. They have a kiln for drying wood as well as airdried wood.

I intended to get some hardwood for tools and some softwood for projects. This was some cherry and hard maple at $6 per board foot. I wanted a piece of dark walnut at $12 per board foot. Finally, I wanted some pine for projects.

Not only did he have all the lumber I wanted, he had it in the sizes I wanted and rough sawn. This means straight off the mill, no other processing.

He was generous in his measurements. There were boards that I got at 1/2 price because there was a flaw in the lumber. The flaw would not bother me, but he still gave me a great deal. The 2 bdf of black walnut was just given to me. It is two inches thick and about 10 inches per side.

This wood is absolutely beautiful.

A board foot is a volume of wood. It is 144 cubic inches, or 1/12 of a cubic foot, or 1 ft by 1 ft by 1 inch.

When I got home, I cut a 19″ piece off the narrower board and planed it smooth and flat. It was then edged which gave me a good face and a squared edge.

From there the other edge was squared. Finally the board was ripped to width, and the rough edge was smoothed and squared again.

This allowed me to face the other side and bring the piece to thickness. Starting with a 1 inch-thick piece of rough-sawn lumber, I ended up with a 3/4 S4S piece of wood.

What was under the rough surface is beautiful.

Yesterday, I surfaced the piece of dark walnut. With no oil or finish on it, just planed flat, it is one of the nicest pieces of lumber I’ve ever seen.

Knowledge is not Skill

There is a process in machining that is bringing a piece to size. This is the process of making all the faces flat and square to each other. Each of 6 faces must be properly milled to have a piece ready.

Woodworking requires the same operation, but the tools are much simpler which requires the layouts to be much better.

With this first piece, I did not notice that the edges were not parallel to each other. They were smooth and flat and square to the finished face. They were not parallel.

The process is different from machining. When you are machining, you only need one reference face to start the process.

For woodworking, you first smooth a face. This does not make the board flat; it just means that it is smooth. This is a 5-minute process for me at this point. Smooth means that within a local area, the board is flat. The size of that area depends on the tools used to smooth it.

Next, the board needs to be made flat. This is done with a straight edge. By moving a straight edge down the face, you can check for space under the straight edge, indicating where the board is low. You plane off the high spots until you have a piece of lumber that is smooth and flat.

After flattening the surface, you now need to test for twist and then remove the twist. Twist is called “winding,” and you use a pair of self-balancing straight edges at opposite ends of the board. You can sight over the closer stick and easily see if the board is twisted. If it is, you can plan out the twist.

Next, you smooth and flatten an edge, making it square to the board. The squareness of the edge to the face is measured with a try square or any other precision right-angle square. This is a skill I am still working on. The near edge is always to high.

This is where I made a mistake. I wasn’t paying enough attention and ripped the board over wide and then brought the edge back to square after the rip. I didn’t make a guide mark for parallel.

I also didn’t get the board flat enough.

Yesterday, I finished the backboard and the two sideboards. Today, I’ll be attaching them to make the first part of the assembly.

Sharper, Sharper

Friday I thought I had a sharp plane blade. It was able to remove 1/4 inch from the faces of the end boards.

Yesterday I learned that my plane was not sharp. I spent a good hour sharpening plane blades. I’ll spend still more time today.

The difference is really incredible. What was an upper body workout becomes light work. Plus the sound of the wood being peeled away is beautiful.

What I need to do today is to finish sharpening the jack plane. Currently it is only cutting on the corners. I’ve touched up the blade on the diamond wheel, but I still need to take it through the regular sharpening process to get a blade that works as I want it to.

I will also be focusing on making sure I don’t produce cupped boards.

All in all, I’m very excited to get the next few projects finished.

The tool tote, a couple of boxes. The first being a simple 6-board box for reenacting. Then a jointer box to hold my wood tools well organized and safe. Then a stool and the start of other projects.

There is so much more pride in using hand tools and fitting pieces by hand then the feeling I got when I feed wood through my jointer and planer.

Bureau of Alcohol Tobacco Firearms and Explosives Flag, ATF Flag, 3D Render

How Can You Speak If You Don’t Have a Mouth?

It doesn’t matter if you are provided a path to what you want if you can never reach that path.

We talk about 18 U.S.C. §922(g) often. This is the prohibited person section of the US Code. It is what is used to justify form 4473.

The government is allowed to create regulations that are necessary to perform the task they are required to do by law. This is how come the NFA has a registration and background check plus all the rest of the BS that goes with purchasing an NFA item.

All of those regulations are in place to make sure that you have paid your taxes. The entire NFA is based on collecting taxes. The registration is just a byproduct of collecting taxes. The background check is just a byproduct of collecting taxes.

§922(g) states who is prohibited from possessing a firearm. This is a horrible mutation from the original version of §922(g). The original version was a restriction on FFLs from selling to a prohibited person.

A prohibited person could buy a gun from somebody else or acquire it by gift. They could still lawfully posses it.

In addition, they could manufacture a firearm and possess that. §922(g) was only a restriction on the sale of interstate commerce in firearms.

When Congress passed the original §922(g) in 1968, they also included a method to get your Second Amendment protected rights back. Under 18 U.S.C. §925(c).

A person who is prohibited from possessing, shipping, transporting, or receiving firearms or ammunition may make application to the Attorney General for relief from the disabilities imposed by Federal laws with respect to the acquisition, receipt, transfer, shipment, transportation, or possession of firearms, and the Attorney General may grant such relief if it is established to his satisfaction that the circumstances regarding the disability, and the applicant’s record and reputation, are such that the applicant will not be likely to act in a manner dangerous to public safety and that the granting of the relief would not be contrary to the public interest. Any person whose application for relief from disabilities is denied by the Attorney General may file a petition with the United States district court for the district in which he resides for a judicial review of such denial. The court may in its discretion admit additional evidence where failure to do so would result in a miscarriage of justice. A licensed importer, licensed manufacturer, licensed dealer, or licensed collector conducting operations under this chapter, who makes application for relief from the disabilities incurred under this chapter, shall not be barred by such disability from further operations under his license pending final action on an application for relief filed pursuant to this section. Whenever the Attorney General grants relief to any person pursuant to this section he shall promptly publish in the Federal Register notice of such action, together with the reasons therefor.
18 U.S.C. § 925(c) (2023)

This means there is a procedure to get your rights back by asking Mommy Dearest for permission.

In 1992, Congress added a rider to the appropriations bill.

Provided further, That none of the funds appropriated herein shall be available to investigate or act upon applications for relief from Federal firearms disabilities under 18 U.S.C. § 925(c).
Treasury, Postal Service, and General Government Appropriations Act, 1993, Pub. L. No. 102-393, 106 Stat. 1729 (Oct. 6, 1992)

This has been going on for the last 33 years!

What this means is that you can apply for your rights back, but there is no money for the ATF to process those requests. So you have no mouth.

The most recent version of the rider is:

For necessary expenses of the Bureau of Alcohol, Tobacco, Firearms and Explosives, for training of State and local law enforcement agencies with or without reimbursement, including training in connection with the training and acquisition of canines for explosives and fire accelerants detection; and for provision of laboratory assistance to State and local law enforcement agencies, with or without reimbursement, $1,625,000,000, of which not to exceed $35,650 shall be for official reception and representation expenses, not to exceed $1,000,000 shall be available for the payment of attorneys’ fees as provided by section 924(d)(2) of title 18, United States Code, and not to exceed $25,000,000 shall remain available until expended: Provided, That none of the funds appropriated herein shall be available to investigate or act upon applications for
relief from Federal firearms disabilities under section 925(c) of title 18, United States Code: Provided further, That such funds shall be available to investigate and act upon applications filed by corporations for relief from Federal firearms disabilities under section 925(c) of title 18, United States Code: Provided further, That no funds made available by this or any other Act may be used to transfer the functions, missions, or activities of the Bureau of Alcohol, Tobacco, Firearms and Explosives to other agencies or Departments.
Consolidated Appropriations Act, 2024, Pub. L. No. 118-47, 138 Stat. 460, 561 (Mar. 22, 2024)

The Department of Justice just announced that they are opening a web portal for people to apply to regain their Second Amendment protected rights. Since “main justice” is doing this, it comes under their budget and not the salaries of ATF personnel.

This is another major Trump Administration end run around a violation of our rights.

Prepping – Making Laundry Detergent

Laundry detergent is not the same as regular soap. There’s reasons for this, and they’re complex, but basically we are not made of cloth. We’re made of leather. Soap cleans leather just fine, but does less of a good job of cleaning cloth. If you want your clothing to be soft, clean, and to last for a long time, regular soap is not going to work. That said, in a pinch, you can absolutely clean your clothes with any regular soap bar. It will be very harsh on your clothing, and difficult to rinse out, so be prepared to do several rinse cycles.

I prefer liquid detergent, but we’ll start with powder because it’s easier.

Ingredients for powder laundry detergent:

  • 1 bar Fels Naptha soap
  • 2 cups Borax
  • 2 cups washing soda

Start by grating up your soap. You want to grate it into very small pieces. You can do this by hand with a regular cheese grater, but it takes a long time. You can also do it in your food processor by cutting the soap into one inch cubes and then pulsing them until they’re in “smaller than pea” size pieces. I prefer to grate mine.

Mix together all the ingredients in a container that’s about 1/3 larger than your batch, and mix it well by stirring with a wooden spoon and shaking it. This is a great project for kids to help with, as you can seal the detergent into the container and then let them toss it around. You need to use a glass or hard plastic container, and not the softer “recyclable” containers you may have on hand. The lid also must seal tightly, or your detergent will clump horribly.

To use, add 2 tablespoons of powder to the drum of your washer (front loading or top loading). Do not add it to the automatic dispenser, as it will clump and block things up. For very large loads, you may need an extra tablespoon. For hand washing, dissolve 1 tablespoon of powder into a cup of hot water, then pour that into your wash water after the detergent has dissolved.

If you would like to have stinky laundry (ie you’re one of those folks who like scented detergent), simply add several drops of your favorite essential oil to the dry ingredients, and stir until it’s all incorporated.

Read More