
It isn’t perfect, but it is better than it was.
Tools To Make Tools
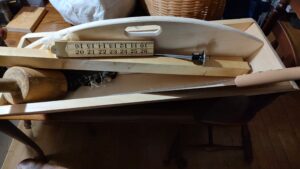
I finished my tool toot Friday. Yesterday I started work on another tool, a shooting board.
The tools I’ve made so far:
- Workbench – Functional, needs more bracing
- Winding Sticks – Used to visualize twist in a board
- Crotch board – A V notch in a flat board used to hold a board on edge for planing.
- A round-head mallet — used for hitting things
- A tooltote — to carry tools more easily
The tooltote is an exercise in barely good enough. There are so many mistakes made, and yet it still works. Not only is it functional, but I want to use it.
Once I clear space on the workbench, this will reside at the back of the workbench to organize the tools I need. The front section is large enough to hold a #4 plane, a block plane, and a #5 jack plane. The back section is a bit narrower. It currently holds my chisels. Marking and measuring tools and a rasp.
I will remove the rasp to make the tote more useful for other things, such as a marking knife, try square, and straight edge.
I need more Planes
I will start the search for a ‘fore’ plane in the near future. A ‘fore’ plane is the plane you use before all the others. This plane is used to remove lots of material rapidly. It is used in a way similar to a scrub plane.
I already have my #4 smoothing plane. I’m still tuning it. The bed isn’t flat enough yet which causes the corners to dig in a bit too much. My #5 jack plane needs some work on the iron to finish bringing it back to life. It is a joy to use. My #7 requires much work on the flats of the iron. Mostly because of rust issues.
Part of the care and feeding of these tools is to keep the soles and plates lightly oiled so they don’t stick to the wood. I’m working towards that.
This leads me to “specialty” planes. There are three specialty planes that are required for general work. The first is a router plane. This plane is used for smoothing the bottom of a hand-cut dado or other pockets in the face of a board. Think of mortising a hinge.
I found a mini version; I’m going to make a wooden version of a more normal size.
The next plane needed is something for smoothing shoulders or making rabbets. I might have found a cheap used version. If so, this will be a huge improvement in my game. In the same vein, there are rabbet planes that are designed to cut right to a shoulder.
When I’m next at the Fort at No. 4, I’m going to see if I can borrow one of the molding planes. A simple roundover or a fancier edging tool is what I’m looking for.
Cheating
If I buy a piece of 1×6 pine from the lumberyard, it will be smooth. It won’t be flat. It is likely to have twist. This means that if I’m lucky, after preparing the board I’ll have something around 5/8 thick, not 3/4.
My sawmill is providing me 4/4 rough-sawn lumber that is not smooth, but it is nearly flat and has almost no twist. Because of his quality, after preparing both faces, I will have a board 15/16 thick.
Because my target thickness is 3/4 (12/16), I have to remove nearly 1/4 of the wood. Turning wood into shavings is fun but requires time and effort.
So I cheat. I resaw my boards from 15/16 down to 13/16s. This reduces the handwork greatly.
Before I sharpened my handsaw into a rip saw I used the band saw to rip a board I used in my workbench.
Pre-drilling and countersinks
While it is unlikely that an #8 screw will split soft pine, it is always better to drill a pilot hole. The all-in-one version I’ve tried using isn’t working for me.
The nice thing about the all-in-one drill is that the drill bit is tapered, leading to a hole that is big enough to not grip the screw in one board but small enough to grip the wood on the far side, allowing the screw to pull the two pieces of wood together. The builtin counter sink acts like a depth stop and does leave a counter sink for the screw.
And it does a horrible job. I will be switching to doing this in three steps. First, drill the pilot hole, then drill the clearance hole in the outside board, and finally countersink the outside hole. If I do it this way, I know that all parts will be done correctly. Fewer stripped holes.
Screw Lengths
You’re doing it wrong! Yeah, that’s what I keep hearing in my head.
There are two types of screwed connections in normal woodworking. I.e., ignoring pocket screw construction. You can screw two pieces of wood together face-to-face, or you can screw face-to-edge.
When screwing face-to-face, it looks like the proper length should be the total thickness minus 1/4″. This gives the maximum hold without poking through the other board.
For attaching through a face into end grain, I should be using 2 1/2″ or 3″ screws. I didn’t know.
Nails
Period-correct nails are still available today. I picked up a pound of artsy-fartsy wrought iron rose-head nails to use on the 6-board box. But with what I just learned about screw length, I think I will pick up some two or three inch cut nails.
The only issue I know of when using cut nails is that you have to pre-drill to avoid cracking the boards. But you want the hole to be as small as possible to increase the grip of the nails.
Conclusion
Today I should finish the shooting board. This means I’ll be able to start my first 6-board box soon.