If you live in any of the Plant Hardiness Zones that are 1a through 6b, then you need to know how to start your seedlings indoors. This is something that can be a lot of fun, but it’s a lot of work as well. Doing it right takes effort and time. The end results are worth it, though! Of course, you could simply buy “starts” (ie seedlings) at your local farm store, but what if TEOTWAWKI has happened, and there are no more farm stores? That’s right, you need to know how to do this.
There are various methods for starting seeds, but the one I’m going to talk about today is indoor sowing. The basics of it are fairly simple: fill containers with soil, add seeds, care for them, and voila, you’re ready to plant as soon as the ground is warm enough. This can give you as much as 45 days of extra growing time for vegetables, and that gets important when you’re in New England or any of the northern states.
Common plants to start indoors include tomatoes, broccoli, cauliflower, leeks, eggplant, kale (and other large, leafy greens), sweet and hot peppers, cabbage, most flowers, and most herbs. This is obviously not an exhaustive list, but I picked the most common ones to start indoors. Tomatoes are definitely the most popular, with peppers coming in a close second. All of these plants will transplant well from indoors to your outdoor garden later in the spring and early summer.
On the other hand, there are a variety of plants that should NOT be started indoors. The reasons vary, but generally speaking it’s because they either grow quickly, have incredibly sensitive roots and will die if transplanted, or they like the cold. Common plants that go direct to the garden include beans, beets, carrots, radishes, some lettuces, peas, squash, corn, spinach, and root crops like potatoes and sweet potatoes.
The first thing you’re going to need is a list of what you want to grow. For a typical first garden, I suggest the following: bush beans, peas (either snap peas or shelling, your choice), tomatoes, cucumbers, zucchini (if your family likes them), broccoli, kale and/or cabbage, spinach, and one or more of beets, carrots, potatoes, sweet potatoes, and winter squash. It seems like a small list to me, and it may seem huge to you, but this is a very small but decent kitchen garden for a first year. Add to that your herbs, and you have the beginning of a new hobby that will engulf your life.
Of the above suggestions, the indoor starters will be tomatoes, broccoli, kale, cabbage, and we’ll go with oregano, thyme, parsley, cilantro, rosemary, basil, and sage for herbs.
Reading Seed Packages
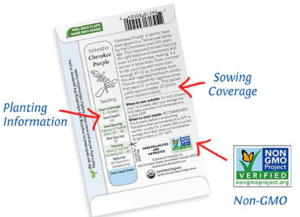 This is a skill that you will need to perfect, not only to read the ones you buy to start your garden, but to know how to label your own seeds, should you decide to save them. And you should save them. Seed packets have most of the information you need, right there on the back, which will help in planning out your garden. You can see the name of the plant, which likely also has the Latin name (which can be important with some things, but mostly is just cool info). The planting information section also tells you how deep to plant your seeds, and how far apart they should be from one another, how long they take to “emerge” (meaning when they poke a bit of green out of the soil to tell you they’re alive), and some also explain how to thin them appropriately.
Some packets will also tell you interesting facts about your chosen vegetable, as well as when they should be planted indoors in the spring, and when you should put them outside. Any special germination instructions will also be on the packet. Some seeds require a freeze and thaw cycle in order to germinate, for instance, and others need to be in a dark place. Some require “wet feet” (meaning you should water them from the bottom rather than the top, by putting their water into a container underneath them, and letting the soil suck it up), others like dryer soil. You have to take all the information on the packet into account. (More on reading seed packets here.)
Tomatoes
By far the most complicated to figure out (which is why I’m listing them separately), you’ll be adjusting how many and what kind of tomatoes to grow from now until your death. There are so many varieties out there, and they’re all so much fun to grow! Luckily, they grow pretty easily, and they’re fun to sprout. I suggest one to three cherry tomato plants, 1 slicing tomato plant per person, and 3 paste tomato plants per person. If you are getting ALL of your tomatoes from your garden, you’ll need much more, but we’re still working on our first family garden here. Start small.
Hit up your local farm store (Agway, Home Depot, whatever… just NOT Dollar Tree or bargain stores) to see what types of tomatoes are available. Cherry tomatoes are pretty easy, as plants go, so pick whatever looks good to you. I always end up getting a few, all different, so that I can eat different shapes, sizes, and colors. It makes salads so much nicer. For slicing tomatoes, the kind you want on a nice, juicy BLT, I recommend Beefsteak or Cherokee Purple. There are several other varieties, but you want one that grows easily, slices nicely, and has good flavor and color. Low days to maturity is important, but not as important as being a tomato you’ll eat. Paste tomatoes are the ones you make sauce from, and for those I suggest San Marzano, Amish Paste, or Speckled Roman. The first two are just good, old fashioned tomatoes that make good paste, and that last one has the added benefit of being really pretty as well. Look for seeds listed as “open pollinated” (meaning you can save the seeds and plant them next year, and you’ll get the same plant) and stay away from most hybrids.
As an example, San Marzano tomatoes get planted about a half inch down into the soil (the depth of the eraser on the bottom of your pencil, for reference), should be planted 18″ to 36″ apart from one another, and they take between 60 and 90 days to mature (meaning when they make tomatoes you can eat). They’re also indeterminate (meaning they grow and produce fruit all summer, as opposed to determinate, which are bushy and tend to blow all their fruit at one time), which is important. All of this is on the packet, so you can read it and plan around it.
 What you will not find on that packet is information about which plants can go next to tomatoes, and which can’t. There’s no simple fix for gaining that knowledge. You simply have to spend the time looking things up. Here’s a little list that covers the basics, but it’s just touching the tip of the iceberg. For every vegetable you decide to plant, you need to look up every other veg in your garden to see if there’s any chance of cross pollination or other problems. When I lived in the northwest, I had planted cucumbers on one side of a fence, and watermelon on the other. I had no idea they’d cross pollinate. I ended up with cucumber tasting things that looked like mini watermelons. I was lucky in that the end result was something I could eat, but that’s unusual. Usually cross pollinated stuff turns out horribly, and you definitely do not want to save seeds from anything that it happens to, either (even if you’re lucky like I was).
Some basic ones:
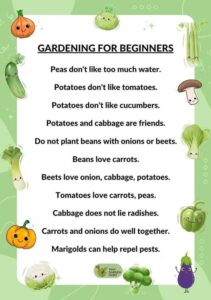
- plant nightshades (tomatoes, eggplant, peppers, potatoes) far from one another, as they can spread disease among one another
- don’t plant onions and beans next to one another as the onions mess with the beans’ ability to fix nitrogen into the soil
- corn and tomatoes need to be in different beds, as they both tend to eat up all the nutrients in the soil
- tomatoes and brassicas (brussel sprouts, cabbage, cauliflower, broccoli, etc) both eat up all the nutrients as well
- cucumbers, squash, and melons need to be planted as far from one another as possible, as they can cross pollinate and it will not end well…
- different kinds of squash also need to be kept away from each other, or they’ll cross pollinate
- peas and garlic, because garlic has a chemical it exudes that stops the peas from maturing correctly
The list goes on, and is longer than I want to get in a single posting. Here’s a list that may help.
All of this finally leads to sowing actual seeds indoors. You can buy mini greenhouses from farm stores or online, like this. They usually come with little inserts for your first year, but after that just buy a bag of seed starter soil and fill the cells. You want to put two or three seeds in each cell, at whatever depth the package tells you. You will wait to see which one or two seedlings are strongest and most likely to survive, then thin the others (that means cutting them at the soil level and eating or tossing them out). Always plant about 25% more cells than you expect to put into your garden. Most years, about 25% of your plants will die somewhere in the process, and you’ll have those extras to fill in gaps. Once in a while, you’ll have tons of left over plants, which you can sell, gift to friends, or just find room for in the garden.
You can also use any containers you have on hand, such as sour cream containers, milk jugs, old plant pots, and whatever else is around. While they’re not as easy to transplant out of, they’re free. Or, you can get a soil blocker and use that with purchased starter soil. I don’t recommend that for your first year, as there’s a learning curve to making the soil blocks, and it can be frustrating. There are also peat pots, which can only be used once, but you plant the whole pot along with the seedling, so it doesn’t disturb the roots of delicate plants (this is great for those plants that say they have delicate roots).
Keep a notebook by your seedlings, and take five minutes each day to make notes. The first couple of weeks will probably be “nothing happened,” or “I added water.” But after that, you can start mentioning which seeds come up first, how they look, how quickly they grow, when they get their first true leaves, whether they get leggy, etc.
Generally speaking, seeds planted at the proper depth will come up if you follow the package directions (for watering, light, temperature, etc.). For your first year, use all new seeds. I sometimes keep stashes of seeds from previous years, but as they get older, seeds stop germinating. Old seeds may only germinate one in ten, or even less, so you have to plant more and stay on top of watching them. It requires more work, and can be irritating to watch nothing happening for weeks at a time.
In a perfect world, you want to start seeds in a staggered way. As an example, the earliest things to go into your garden will be peas and beans, but those are “direct sow” (meaning they go right into the garden soil directly), and don’t get started indoors. The next thing that will go out will be greens, some of which may be seedlings started indoors. Marigolds, too (which are good for repelling some pests), get started inside and can go out fairly quickly. You want to start your seeds in such a way that they’re ready to go out right about the time your weather cooperates and gets warm enough to allow you to put them outdoors.
Seedlings need to have at least two “true leaves” before they are ready to be hardened (see below). The first two leaves that come up are called cotyledons, and they aren’t actually leaves. They’re just there to help the plant make real leaves. The next set of leaves will be actual ones, and once they are unfurled, you can begin the hardening process. Leaving seedlings indoors for too long after the true leaves arrive can make the seedlings leggy. This means they get too long, and tend to fall over. You can help them a bit by adding artificial light for several hours a day, very close to the plants. Add a light fan to blow across seedlings to encourage strong, springy stems, as well.
Seedlings need to be hardened before going outside. You do this by picking a nice day close to planting time, and taking your seedlings outside for an hour. Do this for a week, lengthening the time they’re out each day. When you feel they’re doing well enough, and the nights are warm enough not to kill the seedlings, you can leave them outside overnight (but cover them so animals don’t get at them). Once they’ve spent a night or three outdoors, they’ll be ready to plant in the dirt.
Next week we’ll talk at some of the direct sow plants.
Just a note, I recently found a cool FREE garden program called Seedtime, and I’m finding it *really* useful. I’m sharing it (and be aware I’m using an affiliate link, so I do “get something” out of you getting a free account, but I was going to share it before I knew that). If you need help figuring this stuff out, this is really a fantastic program! What normally would have taken me about 2 weeks to figure out, took me less than 2 hours. I’m sold on it.
Starting seeds indoors is a good way to “get started”. I use a mix of potting and garden soil in containers. Once the plants are up,they take off well. This year, I’m putting them in a upstairs area (warm, 63 F) in a windows. Onions I do from onion sets.
My tomatoes and cucumbers are popping up nicely! Now, if the peppers wake up….
I’m following Seedtime’s suggestion on when to plant stuff, mostly because I despise making the plan for when to do stuff. 🙂 Today I planted kale, cabbage, and two types of chard. I used plastic egg cartons with a hole in the bottom, which make lovely “cells” for seedlings. No cukes yet, but soon… soon… If only the foot of snow would melt from over my old garden, I could get started on fixing stuff out there.
Thank you for these gardening articles, and the link to Seedtime! That will be very helpful to me, as I have done only a limited amount of gardening.
Living in high altitude Montana, I have a pretty limited growing season, so I am trying different things each year to extend my growing season.
I’m *loving* Seedtime. Hopefully it’s helpful for you, too! 🙂