Planning out your garden beds is important, because where you put your plants matters. Some plants can’t go near one another. Others love to be close together and help one another. It’s a complex dance, and you need to learn a lot to do a good job at growing enough food to at least supplement your stores.
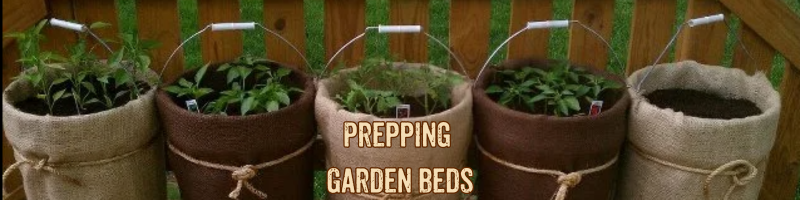
Luckily, garden beds can be made out of anything. As I mentioned last week, I have beds made out of planks (sort of the standard, and one I actually would no longer suggest), buckets, bins, and tires. Some folks will tell you that tires leach chemicals that can get into your veg, but I have not seen any real evidence of that. Most of the leachable chemicals in the rubber are gone long before tires end up in landfill (which is where you can usually find them, often for free). All items used to grow stuff in should get a good wash before use, and anything small enough to allow it should get at least a rinse every year. I find using Dr. Bronner’s soaps (peppermint or tea tree) work best because they’re biodegradable, won’t harm your plants, and are concentrated so you don’t need a lot.
In-Ground Garden
If you have a very large, square (or rectangular) sized patch, you may want to just till it up and use it as-is. It would be a miniature farm field, basically. With no sides, it takes longer to warm up in the spring, but it allows you to rearrange your garden each year (which is good, as you don’t want to plant the same thing in the same space, year after year). When making a very large garden of this sort, you will need to put down rocks, stones, or planks of wood to walk along between rows. While you can just leave the ground as it is, you will find that weeds come up very quickly and will threaten to overtake the whole garden. Also, walking on the dirt compresses it in ways that can negatively affect your plants. Walking on boards or beams, or on a brick path, will keep the garden from being compressed so much, while also keeping weeds down.
Generally, you want to make an in-ground garden into rows and/or blocks, depending on what you’re growing. Vegetables like peas, beans, and tomatoes are best planted in rows. Potatoes, squash, and corn do better in blocks. You can plan out the garden to keep companion plants together, and keep your veggie foes apart.
Requirements for an in-ground garden are a large, regular shaped space with enough sun, and the ability to till the soil in some way. While tilling can be done by hand, it’s not easy. You can rent or purchase a rototiller at most hardware stores these days, and there are expensive ones and cheap ones.
Traditional Beds
You can make traditional (ie square or rectangular) beds out of wood, metal, stone, or brick. There are quick set beds you can purchase, as well. Basically, what you want is to create a garden that uses your space wisely. I have used all sorts of things to make garden beds. Scrap wood works great if you plan on upgrading in the future (pressure treated wood will last about 5 to 7 years in the ground). Metal quick set beds are simple and can be moved around until you like your lay-out, after which you can fill them with soil. Stone and other natural items can also be used, but be aware that natural materials can and will “return to nature” whenever allowed.
Raised beds of any kind will heat up much earlier in spring than an in-ground garden. This allows you to put plants in them earlier (sometimes as much as 30 days earlier!) and therefore gives you a longer growing season. In New England, where I am, this is really important for some of the longer-germinating items.

Bin Beds
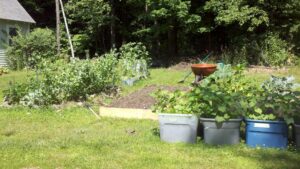
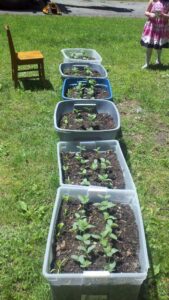
When we moved into our home, we used plastic and sterilite bins to pack things. Over the years we’ve been here, those bins have gone on to be used for storing out of season clothing, camping goods, children’s toys, seasonal decorations, and other items. When they develop small cracks that may allow water and mold in, they get relegated to being used for carrying wood, holding recycling, and storing gardening items and tools. At the point where they have larger holes in them, I use them as miniature, movable garden beds.
Some vegetables, like turnips, carrots, and onions, require loose soil that has good drainage and few stones. Using bins (or buckets, see the next section) means that you have the opportunity to fill them up with the best soil you can afford. Don’t forget to drill a few holes in the bottom of your bins (or better yet, on the sides about an inch up from the bottom, so that the bin can retain some water for dry times) to keep your plants from drowning.
Five Gallon Bucket Garden
The five gallon bucket, aka the Homer Bucket, is a great tool for gardening. Not only can it hold tools, allow you to haul water and dirt, and act as a collection spot for vegetables, it can also be used to house your vegetables. In one bucket, you can house a tomato plant, two sunflowers, four or five cucumber plants, four climbing beans, and more. Best, five gallon buckets can be moved after being filled, because a five gallon bucket full of soil is only about 50 lbs or so. This means you can move them to mow the lawn, or take advantage of sun in another part of the yard, or even into the house because of a late frost in the spring.
The white buckets that I use, I got for free from a local grocery store. They were throwing away and/or recycling the buckets their cake frosting was arriving in. I offered to take ten a week for several weeks, and now I have tons of them, neatly stacked in the backyard behind the shed. Remember that if you’re using buckets, you need to drill some holes in the bottom to allow water to drain out. Otherwise, your plants will drown with the first rain. If you have a hand drill, that works a treat, but you can even just whack a thick nail in several times. Just be careful not to make large cracks in the plastic, as it can affect the integrity of the bucket.
Tires
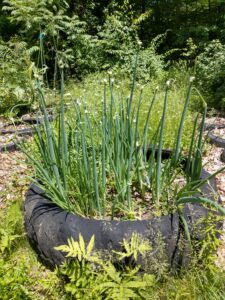
I like to use tires for perennials (plants that come back every year). My tractor tires are used for Egyptian Walking Onions (a fun little onion that has multiple uses and grows prolifically), and for my carrots and beets (which like loose soil). Regular car sized tires are used to house my herbs, some of which come back every year (sage, chives, oregano, thyme) and some of which I plant annually (parsley, rosemary, cilantro). I find that the tires allow just enough room for herbs to spread out and make seed, but not so much that they escape into the general lawn. There are exceptions, of course (one part of my lawn is oregano and Egyptian walking onions right now, and mowing makes me crave pizza).
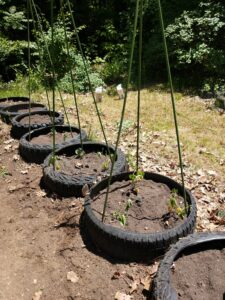
The other thing tires are good for is tall crops. I have a line of tires that I use for growing tomatoes and pole (or climbing) beans, going back and forth from year to year. Beans put nitrogen into the soil, and tomatoes leach it, so going back and forth with a yearly bit of fertilizer in the spring makes for beds that I can plant summer after summer. The tires hold the dirt in place, and you can set a tomato cage or a branch tripod to support the beans easily enough.
Filling Your Beds
You have no idea how much I wanted to say “making your beds,” but I held off. LOL!
Your raised beds need to have dirt put into them. You might think you can just fill them with stuff dug out of your lawn, but you’d be wrong. You should purchase soil to put into your raised beds, soil that is meant for growing things in. You can buy it in bags if you’re just doing a handful of buckets, or you can order a yard or five from a local garden center if you want to fill up larger beds. Obviously, ordering by the yard is cheaper in the long run, even though it’s more expensive in the moment.
Put your bed frame on the ground. Make sure it’s where you want it to go. Refer back to your garden plan, or fix your garden plan to reflect any changes you make. Once all your frames are sitting where you want them (and remember to leave space to mow between beds!!!), you can start filling them.
The bottom layer of your bed should either be weed barrier (which is cheap enough at the dollar store) or cardboard… or both. I usually put down a bit of weed barrier, then the frame, and then I layer an inch of cardboard in the bottom of the bed. It doesn’t have to be perfect, just “good enough.” Next, add in leaves, sticks, a few stones, and whatever vegetable matter you have lying around. This is the bulk, underneath your soil. Leaves and sticks and punky logs are great, because they’ll encourage good bugs and worms, and break down slowly to leave nutrients in your soil. Over that, add some dirt (any kind of dirt, really), and then the top six inches or so will be your good quality soil (check out how to make garden soil from dirt).
Once the beds are full, rake them smooth, water them (and fertilize if necessary), and then let them sit for a week. Weather and gravity will pack the soil down, and you will likely need to add more soil before planting. Be ready to do that! Also be ready to pluck any weeds that come up (and they will come up). If you want to repel weeds after that, while waiting on the right time to plant, you can cover the entire bed with cardboard, newspaper, weed barrier, or even black plastic (ie garbage bags), alone or in combination. This can also be done over winter, to keep weeds from forming up.
If you are in your second or later year, in the spring you’ll want to rake out any detritus from your beds, then amend your soil with fertilizer of some kind. If you have friends with rabbits, ask for some of the rabbit poop. It’s perfect for gardens, as it isn’t “hot” (chicken poop, for instance, will burn plants if put straight from the chicken into the garden bed). Simply break it apart and mix it in with some dirt or soil, and add to what you already have. You’ll need to top up your beds each year, as soil will wash away during rain, and will compress.
Hügelkultur
This is a fun and reasonable way to make a garden bed, especially if you’re new and have a lot of punky wood and branches and leaves to get rid of. Basically, a Hügelkultur bed is made by making huge piles of rotting wood, branches, and leaves, and then adding some soil over it. The first year or two, it will be nitrogen scarce, so you’ll want to add nitrogen rich fertilizer to the bed, but after that it’ll basically be relatively self sustaining for a number of years. Unlike other raised beds, these ones are best made in the fall. As they over-winter, they’ll settle and get better for use.
Hügelkultur beds retain water during very dry seasons, and you can plant on the slopes as well as on the tops. This means you don’t have to stoop, and you can use the different “zones” for different types of vegetables. for instance, you can plant strawberries on the very top of your beds, or tomatoes. Then in the middle of the slope, plant things like cucumbers or bush beans. At the bottom, near the ground, plant your squash and other vines.
As Hügelkultur beds get older, the wood inside them rots, encouraging worms to come and make more soil. The soil that develops is incredibly rich, and after a couple of years, you can plant just about anything you like in one. As they get older, you may want to avoid tomatoes and cucumbers, because the rich soil will encourage the plants to make lots of green leaves, but few fruits.
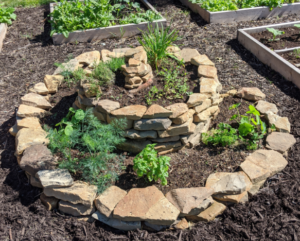
Spiral Gardens
Spiral gardens are another fun garden to build. It’s best for flowers and herbs, and it creates tiny “micro-climates” or zones for things to grow in. Very basically, you lay down your foundation (weed barrier), then create a spiral out of whatever you have on hand, that is higher in the center. I’ve made them out of both local stone, and brick. Brick is easier (and free… there’s always some on craigslist) because you can just stack it. Make the spiral no wider than allows you to reach the center, as you’ll need to be able to get to that. Layer cardboard and straw (not hay, which has seeds) in the bottom of the spiral, then add soil.
In the very center, you plant things that need long roots, like rosemary and sunflowers. Herbs that like lots of water go at the bottom, while ones that need more drainage can go higher up the spiral. The spiral shape allows you to utilize natural shade and sun, and grow a lot of herbs in a small space. They’re also very pretty. More info on spiral gardens.
Next week, I’ll talk about sprouting seeds indoors.