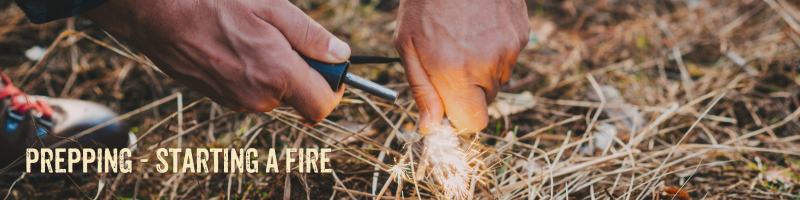
I’ve talked about having access to fire in the past, but I haven’t really gotten in depth about how to start one. I figured that was a decent place to go, this Friday, what with all the storm disaster stuff going on. This is a really complex topic, and I’m going to include some videos so that you can see as well as read about the subject. If you have more information, please feel free to add it in the comments below!
So fire is started when three elements come together: fuel, oxygen, and heat. If you have all three, you have what you need to start or continue a fire. Take one away, and if a fire has already started, it will die out. That’s the science end of it. (CalSafe)
We have lots of ways of starting fire, whether it’s for pleasure, cooking, heat, or protection. The easy methods are things like lighters, everstrike matches (metal “matchsticks” that sit in fuel), blow torches, and that sort of thing. Generally speaking, these methods “just work” when you use them. They provide enough of the three elements that you can get a fire going. But what if you don’t have one of these easy methods? What if your fuel has run out, or your flint is used up?
There are ways to start fires that are “in the middle” when it comes to difficulty level. Regular matches are in this category (because they can easily get damp, don’t stay lit very long, and have a tendency to dissolve over time). Strike-anywhere matches are less prone to problems, and usually have much longer stems, which makes them easier to hold. Unfortunately, they aren’t literally strike anywhere, but require a rough surface of some kind to get them lit. I would put the most modern style of ferro rods into this category as well.
Then there are the methods that require a certain level of skill: flint and steel, bow drills, other types of friction styles, and the more esoteric types like using magnifying glasses. To use any of these requires practice, repetition, and education. It is important to learn at least a couple of these more difficult methods in advance of emergencies, because it’s too easy to lose all the easier methods of making fire.
Flint and steel is the most recognizable way of making fire. Anyone who’s watched a cowboy movie or the Little House series has probably seen it. Steel is easy to find, and you can use a knife in an emergency, but it’s nice to have a traditional striker on hand. These will help protect your fingers as you’re learning, because it’s too easy to cut yourself up with the flint as you practice. With flint and steel, you also have to consider what you’re sparking into. What’s your fuel? Many people like to use charcloth to catch their spark, but there are also other ways to do it. For instance, if you use a knife or the sharp edge of your flint to scrape up some of the white part of birch bark, it will make a pile of what looks like very fine sawdust. Sparking into this should allow you to grow the spark into a flame, much as charcloth would. And birch bark is all over New England, and indeed most of the United States. Here’s a great video on flint and steel:
Bow drills are a fun option for making fire. They are, however, a very active method of doing so. Again, this is why we practice, so that we’re not surprised when it’s time to use these skills during emergencies. With a bow drill, you have a base plate with a notch or hole in it, a spindle for spinning and making both sawdust and heat, a cap or palm-stone, and a bow (a string or piece of leather or sinew tied to the two ends of a bent branch or stick). You also need a good, large pile of tinder material. In the video below, the gentleman uses cattail down and the bark of a local tree. You’ll have to investigate what’s local to you, and what will work in damp or wet weather.
The base plate is put on the ground, and you can kneel or stand on it. The spindle has a faceted end and a pointy end, and the faceted end goes into the notch on the base plate. The pointy end of the spindle goes into the cap or palm-stone, in a divot, which allows the spindle to spin freely. The bow string is wrapped around the spindle, and then you “saw” back and forth with the bow. This causes the spindle to spin. You do this until you’ve created enough friction that the faceted end of the spindle creates a little sawdust which gets hot enough to ignite. You then transfer that tiny ember into the tinder material, and blow gently to get it going.
Hand drills are a more difficult method that’s basically the same as the above. I really don’t recommend it, but here’s a video if you want to be a masochist:
Fire roll is yet another method of friction fire you can build. This one relies heavily on having the right material on hand. Here’s the thing, though. If you’re stuck in an emergency situation and you know 8 ways to make a fire, ONE of them is going to work. Knowing several ways means that your backups have backup, and that’s never a bad thing. So a fire roll is made by taking a couple or three cotton balls (plain ones), and unrolling them. You make a kind of long flat of them. Sprinkle them with ash from a previous fire, and then roll it up as tight as you can. It’s sort of like rolling a cigarette. Put the rolled cotton and ash between two pieces of flat wood, and start rolling it back and forth. You’ll want to do that until you smell smoke, and then you can add that ember to your tinder. Here’s a great video on it:
The fire plow is one of the oldest methods of making a fire, and it’s going to expend the most energy. However, you can fall back on it when you have nothing else. Basically, you cut a groove into a flat bit of dry wood, and you cut a sort of wooden wedge that fits into the groove. You then use pressure and speed to run the wedge along the groove until it creates hot sawdust and then creates an ember. The young man in the video below makes it look easy, but it is NOT. I want you to specifically see how, at the point he stops plowing, you can barely see the smoke coming from his pile of sawdust. I didn’t notice it. He doesn’t blow on it, because that will be enough to cause it to go out! He uses his hand to make an extremely light breeze, which allows the ember to catch and grow.
Once you have your ember, in whatever way you’ve made it, you have to transfer it into tinder. Tinder is made of tiny bits of flammable stuff, such as the cattail down mentioned before. Dryer lint can work, but only if you don’t use fabric softener. If you use the softener sheets, they will make your lint much more fireproof. Cotton balls are good, as are the insides of milkweed once it’s gone to seed. Tiny strips of the papery bits of bark can also work. You need to turn the ember (which is very tiny and likely only smoking rather than actually being “on fire”) into a flame. That flame can then be used to create a fire.
If you successfully get your ember to your tinder, and that turns into actual flame, congratulations! Go do it 20 more times and make sure you understand that method. Then go try it a dozen times in the rain. Then do it in the snow, with frozen hands. Practice, practice, practice!
Once you have a small flame, it’s time to actually build the fire. To do so, you should have a variety of sizes of wood near you. Do this before you begin the fire-making process, so that you can go from one step to the next without pausing. Pausing can cause your fire to die, and you don’t want that to happen!
When I’m starting a fire out in the field, I will gather up very small bits of tinder, such as the cattail and milkweed. That’s in one pile. The next pile has tiny strips of birch bark, as small as I can manage them. After that, there’s little pieces of twigs, or if I have them, sappy pine cones (these take off *really* fast and hot). After all that, you want to have piles of fine, medium, and larger kindling, and then small bits of wood, and larger ones. It may seem silly to you to have it all laid out in little piles, but trust me when I say it’ll make your life easier as you make the fire. It’s also a muscle memory thing. Once you get used to doing it this way, it’ll come together very quickly.
When it comes to laying out the larger parts of the fire, there are many ways to do it. I tend to put down a couple of medium sized half logs to block wind, and then I drop my small flame into the space between them. Over the top I begin laying the small tinder, then the kindling, leaning it against or bridging over the two logs. This allows you to use a blow tube or bellows to add oxygen to your fire, in a very controlled way. Once the fire is blazing, you can shove the larger logs together and they’ll burn up just fine. Or you can leave them separated (they’ll still burn eventually) and use them to help you create a good bed of coals for cooking.
Some people like to make a log cabin configuration. Others prefer teepees of wood. When it comes to this part of the fire building process, it really is up to you to practice. The wood you have on hand and the climate you’re dealing with are going to affect the methods you use. I’ll share a little visual here, of the various ways you can make your fire.
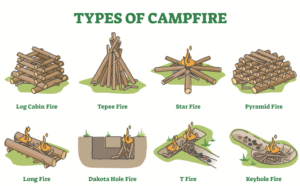
There’s one other that isn’t listed here, that I know of and have personally seen used to good effect. That’s the type where you get a good base fire going, and you make two uprights (like a V) and put logs on them. As the bottom logs burn, the top ones roll down and feed the fire. This is a good way to do an overnight fire, if you can do it safely (in other words, no flammable roots or leaves or worries about sparks blowing while your’e asleep).
In closing, keep in mind that fire is a good servant but a deadly master. When you have fire, bank it at night. Don’t go to sleep when there are flames! When possible, cover your coals in ash or with a non-flammable cover (fire blanket, metal lid, etc.). Our ancestors banked their fires and kept their coals alive for good reason: it’s much easier to start a fire from a coal or ember, than it is to start from scratch.
in grade school we used to melt ants and set dry leaves on fire with a magnifying glass…. one time a teacher came running over cause they thought we were smoking cigarettes… when we told them we were cooking ants and dry leaves they went “oh, ok.. !!! easist way I found to start a fire is not try when Im working around the house and POOF! hey look, Im on fire….
LOL… I also killed ants with magnifying glasses when I was a kid, so I get it. A side note, several people in the Carolinas also used magnifying glasses and fire starting mirrors as signal mirrors to get rescued after Helene. So they’re multi-purpose.
I need more practice with flint and steel, I admit. I’m not nearly as good at it as I should be. I also need to figure out a way to make my firestarters accept a spark… right now, you need to use tinder to get a flame going, then add that to the firestarter, and from there it’ll build up well.
I remember a time when we used to hike up a friend’s hill onto their private land. We’d go in all kinds of weather. Chris would get the kids to the top and say, “Okay, guys, time to make a five minute fire… and GO!” Then they’d have five minutes to get a fire going. If they did, they survived. If they didn’t, they were dead. It got to a point where, as we walked up the hill, they would gather bits of tinder in their pockets. Once that happened, and they were winning more than losing, he started doing things like making them dunk their hands into snow banks. 🙂 Our kids can make fires ANY time they need. LOL…
nice.. build a fire in five minutes. I can do it 10 seconds, just weld something, sparks fly and in no time no only am I on fire, so is my shop… I never had luck with bow drills or flint. I have one of those ferro rods that works good.. the quick way is a propane torch and kindling.
Oh, I love using one of the little torches for lighting fires. The problem is, they run out of fuel at the darndest times. Flint I can do, with time and effort. Bow drill and hand drill are ones I want to try. Same with the plow method. I like having several backups for my backup, because fire is one of the most basic things that helps create your shelter. It’s what keeps you warm, cooks your food, cleans your water… fire is proof we’re still human. Having been caught a few times without a lighter or matches, I’ve learned to become much more vigilant about my fire starting items.
Awww…. those poor ants.
Seriously, I did not believe you could start a fire with a magnifying glass, so I tested it out. Turns out you can. Then, being the child I was, I went on to toast ants, slugs, worms, etc… Probably not something I would encourage, it was really cruel actually. But, a learning experience.
One of the large (8×11) flat plastic Fresnel lenses will literally melt small ROCKS on a bright day. They are very light weight, and are very thin, so they will fit into a backpack easily. Even the smaller ones work well. The larger ones will still start a fire even on a -slightly- overcast day.
If you want to try the “melt the rock” trick, be sure to use a dark welding filter to watch the focal point of the lens, or you could PERMANENTLY damage your vision. I usually just grab a welding helmet with one of the darker lenses installed. That also protects you if the rock has any water in it that might cause it to go ‘bang!’
Flint and steel works very well on a chunk of DRY kerosene lamp wick that has been pre-charred on one end. The spark will get the charcoal burning, and the wick provides additional fuel. Gotta keep it dry in a tinder box though.
The inner layer of cedar tree bark is also an excellent tinder if shredded really fine. There is enough oil in the bark to provide extra energy over just plain wood, and does help keep the tinder from getting damp.
In the PNW, I used to look for old stumps that had rotted the outside away, but had concentrated the pitch into sections of wood left on the inside of the stump. If you can find some of that stuff and shred it down to shavings, it will even catch and burn right after digging it out of a wet stump.
Leaving the ‘pitch wood’ in a stick or block of wood form makes it pretty much water proof until you shred off what you need. It produces some of the blackest soot you’ve ever seen when it takes off and burns much longer than wood only tinder.
Important point!
Actually do this before you need to. Seriously, starting a fire without a match/lighter is incredibly difficult to do, especially the first time. Reading about a lot of survival skills is generally OK. Building emergency shelter is something that cannot be effectively practiced because you never know what materials will be on hand, so improvising is required. And, you can get by with half a shelter.
You cannot get by with half a fire. Either you can start it, or you are going to be cold. There is no “good enough.” Learning the ways to light one with several methods is a skill you have to perfected before you need it.
One other method is using potassium permanganate and either glycerine or sugar as the ‘fuel.’ Exothermic reaction, and ‘poof!’ instant fire…
Of course, you have to have those materials on hand.
Best to practice up with other stuff.
This is exactly it. You must practice NOW. I got frustrated yesterday, because I was using flint and steel, and I could not produce a spark to save my life. I need much more practice to be efficient at it.
The flint I was using was quite poor and flaky, but that’s the reality that I might have to face in an emergency. I need to be able to start a fire with what’s on hand, within ten minutes. That’s the ultimate goal. 🙂