For the most part I use iron sights. For the AR-15 platform, I did install red dots.
I do have a single pistol with a red dot.
I never intended to get into scoped optics, but I was sort of forced into it.
Many years ago I made my first firearm purchases. The requirement was to have multiple firearms in calibers that would be easy to resupply after the inevitable fall. To me, at the time, this meant 5.56×45, 7.62×51 NATO, 9mm parabellum, .45ACP, and 7.62×39.
The 5.56 was relatively easy; it was an AR-15 platform. Unfortunately, this was the height of the AWB, and that required some strange design choices. Regardless, it is still a beautiful safe queen.
The 9mm was a Glock, and the .45ACP was a Kimber. After shooting the Glock, the Glock was supplemented with an H&K which I could actually hit my target with.
The 7.62×39 was an AK-47 of some sort, long since traded for other stuff. I was required to take out a box of trash for the price a paid. Can you imagine my surprise when that box of trash included 3 30-round magazines and some furniture to restore that AWB abomination into something that actually looked like an AK? The things people throw away.
This left the 7.62×51 NATO. My platform of choice was a Remington 700. Fully bedded, just a beautiful rifle.
I was excited to get to the range, a difficult thing to do in Maryland. I finally got there, setup, put my beautiful rifle on its bipod, got ready to take my first shot, and noticed something.
No iron sights. Nothing. Smooth as a baby’s behind.
I still sent a few rounds “that way” because I refused to pack up and not take a shot.
Back to my LGS to laugh. I ended up getting some Nikon glass. Gorgeous. My LGS mounted the scope and bore sighted it. I then took it to the range and dialed it in.
I can remember punching primers out of shotgun shells at 100 yards.
Great then. Great now?
I took my first deer with that rifle. It was a long shot. I put the crosshairs right where his heart was, then slowly elevated the sight until the crosshair was about 6 inches above his spine and pressed the trigger.
He got about 50 yards from where he was hit. The entry wound was a little high, going through both lungs.
I had no idea of the range; it was just a guess. I had no idea of the ballistics of that round; it was just a guess. I had no idea how much elevation I was putting on; it was just a guess. I got lucky.
The simple crosshair is good, but there are better reticles today.
The glass on that old scope is likely better than any scope I can purchase for under $2k today. But the reticles make a difference.
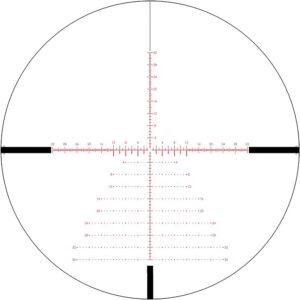
Vortex EBR-7C(MOA)
The scope I picked is very nice. 5-25 with a much more complex reticle.
It has a built in BDC. I’m sure it can be used for finding distances. It is going to take me a bit to understand everything it does, but it will eliminate much of the guesswork in allowing for distance and windage.
I’m at that stage where I don’t know what I don’t know.
Three men were abducted by aliens. A mathematician, a physicist, and an engineer.
When they woke up, they were on one side of a room, and on the other side was a beautiful blonde with a pistol beside them.
A disembodied voice says, “You are allowed to move half the remaining distance across the room each time you move. If you can make it to the other side, you can do what you will with the blonde, and you will be set free. If you don’t make it to the other side, you can either kill yourself or be taken for the probings.”
The mathematician sits and thinks for a little, calculates a bit more, then says, “It is impossible; no matter how many steps you take, there will still be more to go.”
With that, the mathematician picks up the gun and shoots himself.
The engineer and physicist sit in shock for a moment before the physicist speaks up.
“You know that mathematicians are stuck in their numbers. They have no real-world experience. I’m going to test his hypothesis.”
So he does; on the first move he makes it halfway, on the second he is 3/4s of the way, and on the next move he’s 7/8s. He’s making progress, but he realizes he will never make it all the way.
He returns to his side of the room, picks up the gun, and offs himself.
The engineer is nearly in shock. He looks at the two bodies and then gathers himself up. He starts the process of crossing the room.
After over 50 moves, he reaches out, grabs the blonde, yanks her into his arms, and says, “Good enough for all practical purposes.”
For All Practical Purposes
During the age of steam, engineers developed a working idea of how steam engines worked and how to measure them. These men were not dumb; they understood nature, and they understood Newtonian physics. They developed formulas to guide them as they designed new engines.
What were they interested in? They wanted an efficient engine that produced enough work to make it worthwhile.
What is efficiency in a steam engine? How much steam it consumes. A boiler is only capable of producing a limited amount of steam. That is based on the amount of heat put into the system along with how efficient the boiler is at transferring the heat into water to force a phase change.
The more efficient the boiler, the less fuel it took to run. Coal and wood cost money.
An inefficient steam engine consumes more steam, which requires the boiler to produce more steam, which means more fuel.
The work that an engine produces is defined as brake torque and brake horsepower. Torque is how much rotational force is being produced, while horsepower is force of distance. Steam engines produce good torque over the entire range of supported speeds.
They had methods of measuring torque and horsepower. They could also measure the pressure of the steam. They knew the size of the piston they were using. They needed an expression for determining torque and horsepower before they designed an engine, much less built it.
The formula was P.L.A.N., which is pressure times length of stroke in feet times area of the piston face times the number of power strokes per minute.
They can easily measure stroke length, piston area, and power strokes per minute; those are simple things that can be measured with a ruler and a counter over time. But how do you measure the pressure?
The pressure changes over the time of the power stroke. At the start of the stroke, the cylinder has not yet filled with steam; it is still entering, so it is lower than the source. As the cylinder begins to fill, the piston starts moving, increasing the volume while reducing the pressure. The cutoff takes place, and now no more steam is being allowed to enter, and the steam that is there just expands, decreasing the pressure even more.
At every moment of that cycle there is a different pressure in the cylinder. With advanced math, you might be able to calculate it at every step then integrate over time.
These guys stuck some sort of pressure gauge on the cylinder and somehow measured the average (mean) pressure.
This is the value they used. The Mean Effective Pressure or MEP.
This is good enough for all practical purposes.
What is the starting pressure
If you have a closed system, the pressure at every point is the same. A steam engine is not a closed system. There is always steam being vented to the outside, either directly to the atmosphere or into a condenser.
This produces a sequence of pressure drops. The pressure is then built up as new steam flows from the boiler. All of this happens very rapidly, but it does take time. To reduce the amount of pulsing that hits the boiler, we use a steam reservoir, which is part of the steam chest.
When the flow of a fluid is stopped rapidly, it causes a “hammer” effect. Opening and closing the valves, allowing steam to flow into the cylinder and then stop can do just this.
The following video explains the water hammer phenomenon.
By putting that reservoir closer to the valves, we can stop that phenomenon from hammering on the boiler.
But how do we know what the pressure is in the steam chest? We might assume it is the same as the boiler, but it takes time for the steam chest to fill. The amount of time it takes to fill and stabilize is dependent on the size and shape of the piping from the boiler to the steam chest.
We need to measure or otherwise determine what the effective pressure in the steam chest is.
So we have a basic idea of what the pressure might be.
How much does it cost
Steam travels from the steam chest into the cylinder via a steam passage. The shape, wall texture, and size of the steam passage affect the speed at which the steam enters the cylinder. In addition, we have the mass of the fluid (air/steam) that is in the passage when we start pressurizing it.
We need to measure how long it takes to reach the cylinder port and how long it takes to fill the cylinder. The smaller the passage, the more velocity you lose and the longer it takes to fill the cylinder. If it takes longer to fill the cylinder than the admission stage of the cycle then we are not getting full power from the engine.
Sometimes these passages are drilled and plugged or covered. Other times they are cast into the cylinder body. If cast, the quality of that core determines the texture/smoothness of the walls of the passage. Other times, they are drilled in a straight line to intersecting passages. Regardless of how they are made, they are a complex shape that causes turbulence and can cause other issues.
We need to know how much we lose, the cost, of getting steam from the steam chest into the cylinder.
And what happens in the cylinder
As stated before, the cylinder volume is constantly changing. The volume is decreasing when we start allowing steam into the cylinder. This lead steam acts like a cushion or spring to help start the piston back in the other direction. Remember that we are not only using energy to create power/work, we are also using energy to reverse the direction of the cylinder.
With a standard 4 stroke engine, we have four stages: Intake, where we suck a fuel air mixture into the cylinder. Compression, where the fuel air mixture is compressed for maximum efficiency. The power stroke, where the fuel has burned and the expanding gas is driving the piston. Finally, we have the exhaust stroke, where the expended gases are pushed out of the cylinder.
Only the power stroke puts energy into the system. The other three strokes are wasted. The energy to move the piston comes from other cylinders or energy stored in a flywheel.
With the steam engine, as the volume is decreasing, the expended steam is being pushed out the exhaust port. In simple engines the exhaust port is the same as the inlet port. Just before top dead center, steam is allowed back into the cylinder, pushing against the piston. This slows the piston as it reverses direction. The steam pushes the piston away from the cylinder head, causing the volume to increase.
Before we reach bottom dead center, the inlet is cut off. The steam continues to expand, continuing to push on the piston. Finally the piston reverses direction, and the used steam is exhausted to the atmosphere.
We need to integrate the pressure at the surface of the piston over the entire cycle.
Computational Fluid Dynamics (CFD)
I have studied Finite Element Methods (FEM). CFD is a different from FEM but has many similar aspects. The gist is that we create a mesh of a volume. We set the initial conditions of every surface or point. The initial condition is the pressure and a velocity vector.
We then define some formulas that describe how the fluid acts. From this we propagate the initial conditions through the mesh to a “stable” result. We can then use that result as a new set of initial conditions and iterate another time step.
With this we can see pressure waves, velocities, and just about everything we need to know about the flow of the fluid through the mesh.
The great thing is that there are good, free CFD packages out there. I’m using OpenFOAM because I am using FreeCAD as my modeling software.
With FreeCAD you can build a “body” or “part”. A part is a single item. It can be created by additive or subtractive means. It could be a rough or machined casting or something made from bar stock.
The bodies are combined into “assemblies”. An assembly is a collection of parts that are connected with joints. Joints can be fixed, sliding, rotating, and a few others.
I’ve been able to take the parts of the steam engine I’ve modeled and create assemblies, which have shown me that I misread the prints. Meaning I’ve had to go back and redo the body/part which sometimes required redoing the assembly. An iterative process.
With a body, I should be able to create a negative of that body, representing the domain of for the CFD, which is what gets meshed.
I can use the CfdOF workbench to create meshes, set initial conditions, set the properties for the fluid, refine the mesh, and a dozen other things before passing the actual analysis off to OpenFOAM.
OpenFOAM runs for a long time and then produces results that I should be able to visualize. That has not been working all that well.
From this, I should be able to calculate what MEP is at every location and step of the system.
And I’m stuck here. Not totally stuck, but more of the I know I don’t know something, I’ll have to figure it out.
But what about the rest
All of the above is just to get a cylinder that will produce the power I need or want.
From there we move into the mechanical world. Here we have to design the components to meet the requirements of the cylinder.
How big should the piston rod be? It has no rotational or angular forces applied to it, just tension and compression. This is an FEM calculation or uses simple analytical calculations.
The connecting rod gets more complex. The big end is connected to the crankpin, which moves in a circle. The small end is attached to the end of the piston rod. It moves in a linear motion. We need to evaluate the forces in play on the crosshead pin and the crankpin to make sure they are strong enough but not overkill. We need to design for reduced mass because mass changing directions takes energy.
We also have to worry about the vibrations we get from throwing the crankpin in a circle.
If you want to design a vibrating thing, just put a weight off-center on a spinning thing, and you get vibrations. We balance the wheels of our cars to remove that type of vibration. We have to balance the crank to remove as much of the vibration as possible.
But we have to know what the forces in play are at every stage of the cycle to know how to cancel them. Painful.
We need to know the size of the driveshaft. My small models use a 1/4 inch shaft. For my 1/2 HP engine, I doubt a 1/4 will be strong enough.
The shaft must ride in bearings that can withstand the reciprocating forces as well as the axial forces.
But why?
The answer is never simple, but for me I want to be able to enter a desired HP rating and torque rating and have a custom designed steam engine modeled.
I currently have an integrated spreadsheet with my 3D model. You can select or set the desired brake power you want at a given boiler pressure and a given RPM. This feeds into several formulas, which then drive the model.
Change the stroke in the spreadsheet, and everything from the cylinder through the final assembly changes to match that cylinder. It even goes so far as to define the number of screws or bolts in the cylinder flange, the size of those screws and bolts, as well as the proper torque values for those screws and bolts.
The next step is to get the steam passages correctly designed and sized. This will drive the steam chest which will drive other components.
In the end I should be able to have the system give me patterns for casting.
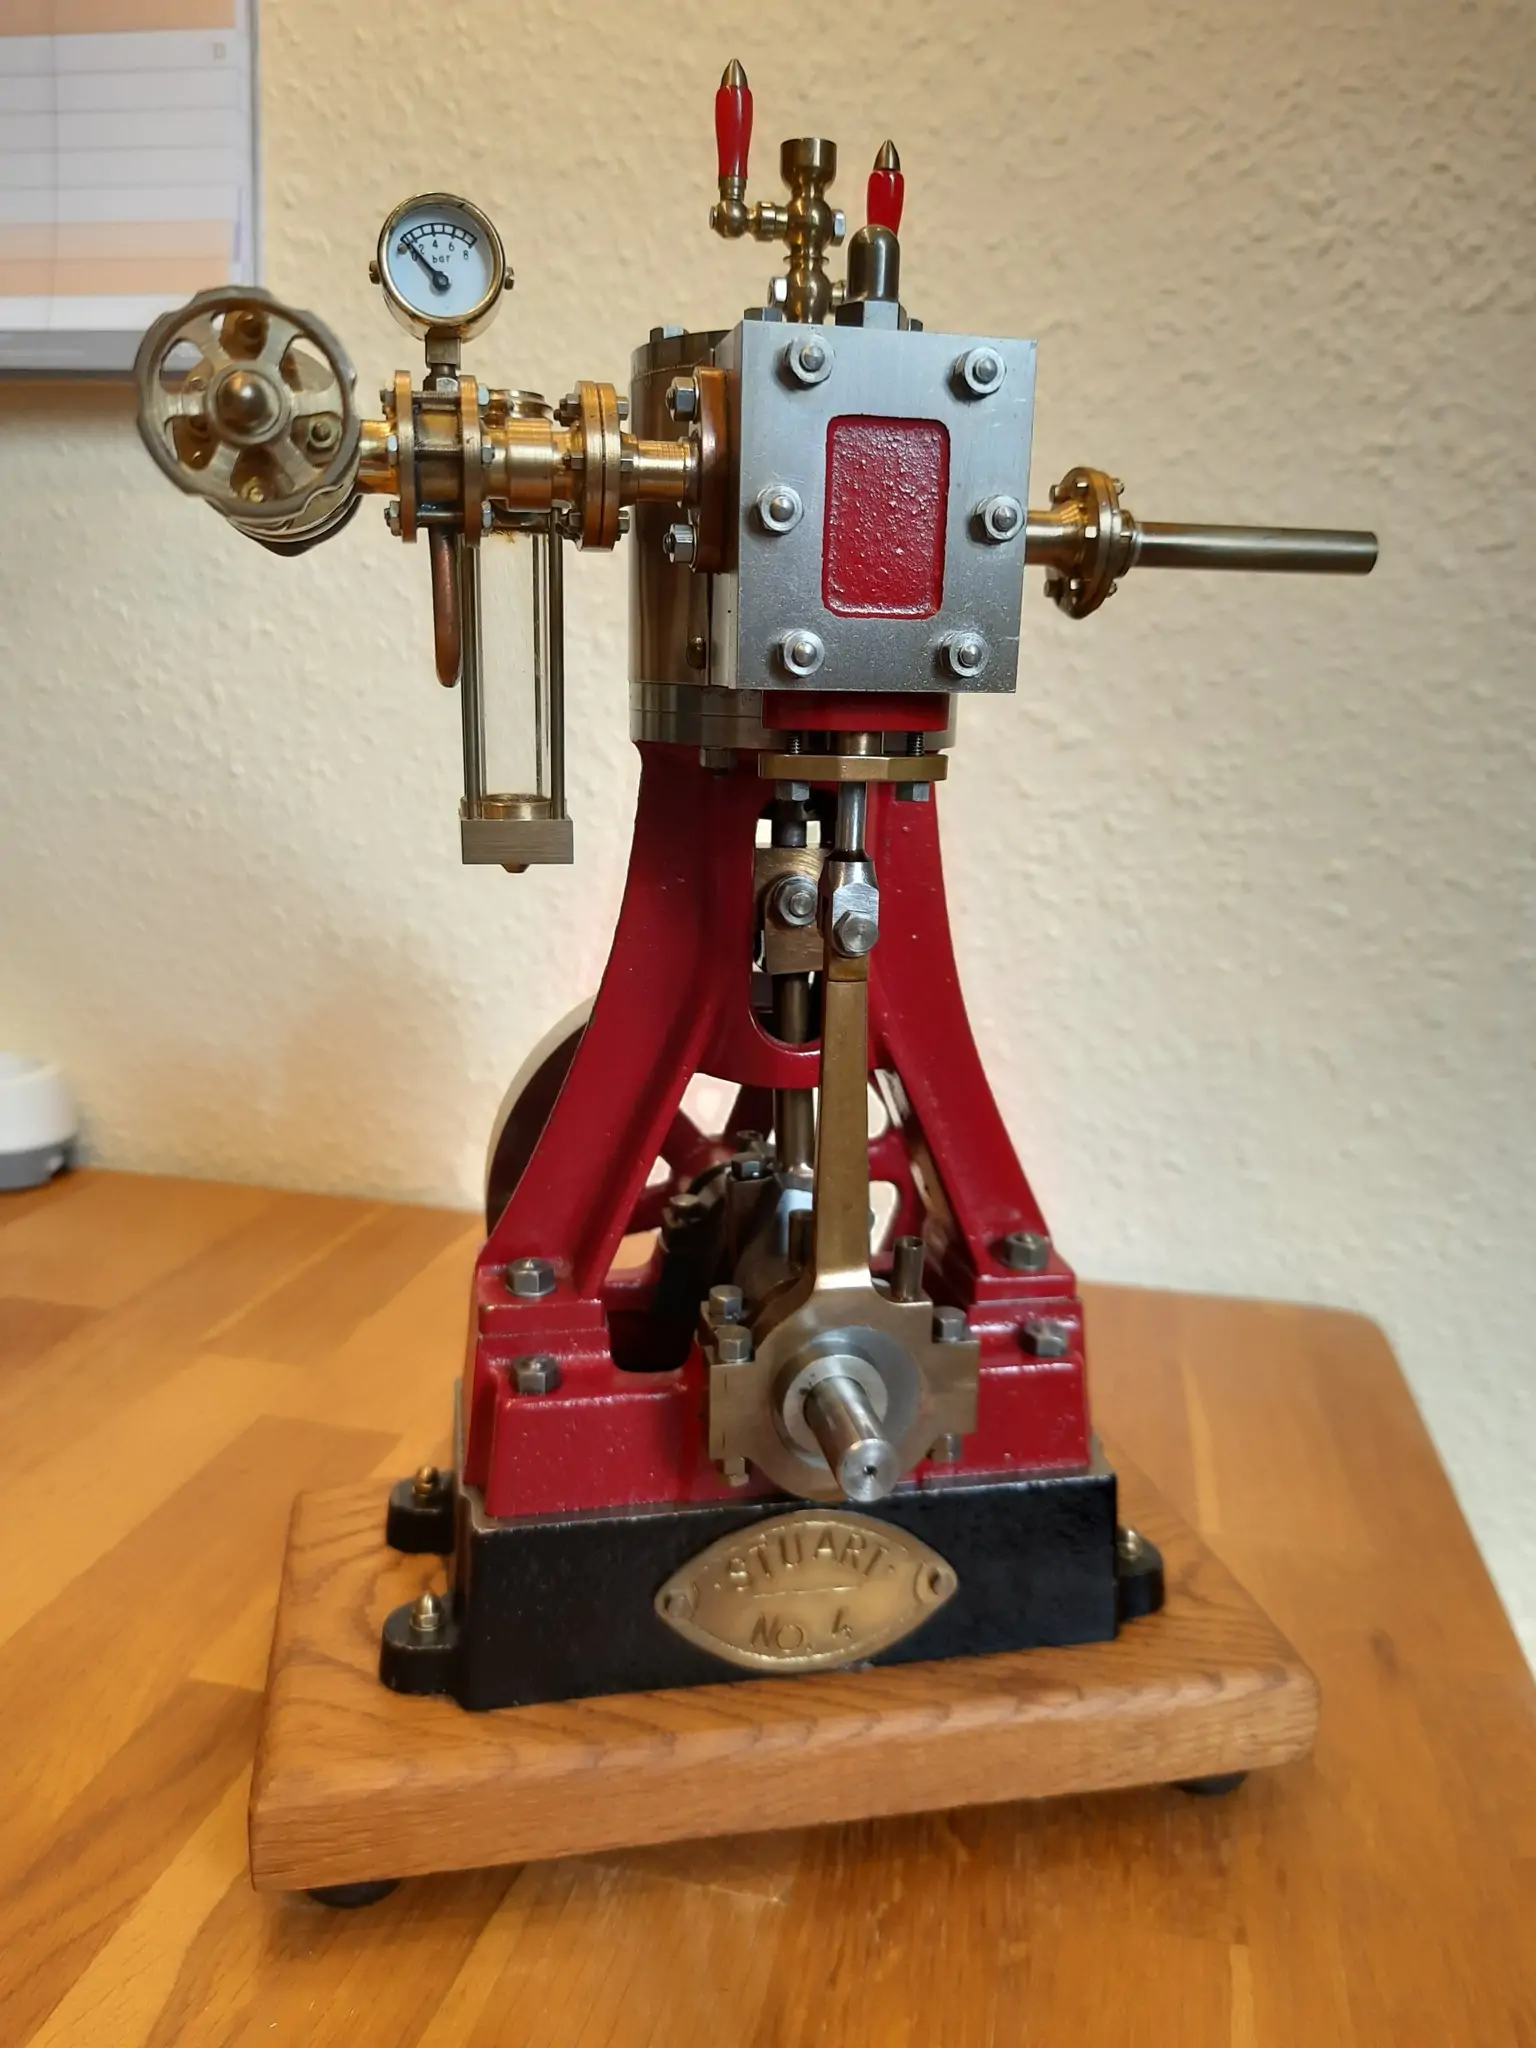
It is difficult to comprehend what a piston powered steam engine is capable of doing. It is a different sort of beast than the internal combustion engine.
For those that are old, you might have grown up with a manual transmission. There is a considerable skill in learning how to balance the clutch and engine speed to get smooth motion.
This is hidden in a value we call “horse power”. Horse power is also expressed in Watts. There are 745 watts to a HP, depending on sources. Close counts in this calculation. HP and watts are a measure of work.
Consider picking up a barbell. By measuring the force required to lift it, the time it takes to lift it, and the distance moved, we can measure the power used.
Now consider that same barbell, but it is too heavy to lift even a fraction of an inch. You strain trying to lift it. You have expended energy but have no performed any work. Hence the HP and watts are zero.
Regardless, an internal combustion engine needs some type of clutch to allow the engine to run at a comfortable speed while slowly bringing a different part of the powertrain up to speed.
With a steam engine, you have full torque at every speed. They are spectacular engines at slow speeds.
This takes us to present times.
I’m using FreeCAD to create the 3D model of the engines. A side advantage of this is that I also get assemblies that allow me to check how all the parts fit together. All very nice. This has helped me identify errors in my reading of the drawings.
A simple little thing: The cylinder has a built in bracket system. This is a face used to mount the cylinder to the base and the face used to attach the steam chest. These faces are slightly offset from the bore.
Which leads to my error, times 3. The cylinder mounting holes are not on the center line of the cylinder. They are instead on the center line of the bore. The bore is offset away from the steam chest and away from the mounting holes.
My error? I’ve put those damn mounting holes in the wrong place multiple times.
In the end, I added a spreadsheet to the model. For every shared measurement between parts, I’ve put that value in the spreadsheet. This means that I can do things like change the stroke by changing one value. Sort of.
My understanding of this mechanical marvel is much improved from being able to see the parts work together.
Another thing I noticed was that all the engine plans have an assumption you will be working with castings. They expect you to hire a pattern maker to create the patterns and then have your local foundry cast them.
While I would love to make my castings from iron, I will start with making them from aluminum. And the new tools I have and new skills I have in woodworking allow me to make real patterns.
My final goal is to have master patterns and molding boards for patterns for a couple of different engines. If I can accomplish that and make a few of them, I’ll be very happy.
Next stop, learning how to be a safe boilermaker. And not the happy drink type.
I’ve had a fascination in steam engines since my childhood. There are pictures of my brother in the museum in D.C. standing next to the drive wheels of a steam locomotive. The wheels were taller than my father.
What I didn’t realize as a child was that the actual engines were small compared to the size of the locomotive.
The engines of steam locomotives are the expansion cylinders that drive the wheels. Most of the rest of the locomotive is the boiler generates the steam for the engine.
As a child I was able to ride a steam locomotive a few times and always found them interesting.
Later I found out that steam engines are used for more than just locomotives. They were used to power tractors, steam shovels, boats, mills, and workshops. They were everywhere. It wasn’t until electric motors became cheap and plentiful that we saw the end of the steam engine.
Off Grid Use
An electric motor is used to convert power into rotational force. That power has to come from somewhere.
The most common “somewhere” is the power grid. If you are going off grid, that is not an option. It is also not an option when the grid is down.
Grid down is a common thing in these parts, it happens two or three times every year. It is so common that we do not depend on electricity for heat.
Yes, we have an oil fired furnace; no, it can’t be used without electricity. The burner unit requires power to inject the fuel and then it requires electricity to power the fans moving air through the system to warm the house.
Suck, Squeeze, Bang, Blow
This is used to describe a standard four-stroke engine. Each word indicates the purpose of a stroke of the piston. First the piston moves down, sucking in fuel and air; then it squeezes that fuel-air mixture; next a spark happens and the fuel-air mixture goes bang, pushing the piston down (this is the power stroke); finally the piston moves up, blowing the exhaust out of the cylinder.
There is one power stroke out of every four or one power stroke for every two revolutions of the crank.
To make this all happen, we have the camshaft. The camshaft consists of multiple lobes that push a rod upward to open a valve.
There is one lobe for each valve in an engine. For a single-cylinder engine, there are two valves.
That camshaft holds the magic timing for the valve train. It is synchronized to the crankshaft. The camshaft opens the intake valve and closes the exhaust valve at the start of the suck stroke. It closes both valves during the squeeze stroke and keeps them closed during the bag stroke. Finally, it opens the exhaust valve to allow the hot gases to escape during the push stroke.
Those camshafts are a engineering marvel.
Push, Push, Push, Push
A double acting steam engine generates power on every stroke of the piston. This is accomplished by being able to pressurize both sides of the piston, alternating between strokes.
Whereas the four stroke engine gets one power stroke in four, the double acting steam engine gets four power strokes in four.
Most steam engines use a slide valve; some use piston valves.
An internal combustion engine has the valves in the cylinder; slide and piston valve engines have an externally located valve.
There is a single passage for the steam to flow into and out of for each end of the cylinder. The slide valve moves in such a way that sometimes it is venting high-pressure steam into the cylinder, and then it vents that same passage to the exhaust port.
This single valve controls the ingress and egress of live and dead steam from the cylinder. It is very magical.
And just like that camshaft is an engineering marvel, so are these slide and piston valves.
The Rabbit Hole
A slide valve consists of three slots parallel to each other. The two outer slots lead to either end of the cylinder; the center slot leads to exhaust. The valve is shaped like an upside down square cake pan with large lips.
In the far end of the motion, the edge of the pan is between the steam passage and the exhaust passage. This allows the high pressure steam that fills the steam chest to push down on the cake pan/slide valve and flow into the exposed steam passage to one end of the cylinder.
At the same time, the center section of the pan covers both the exhaust passage and the steam passage to the other end of the cylinder, allowing the dead steam to escape down the exhaust passage.
As the valve slides in the other direction, the lip of the pan starts to cover the steam passage that had accepted the live steam. At the same time, the lip on the other side of the valve is starting to close over the other steam passage.
The size of the passages and ports, the size of the area under the valve, the size of the lips of the valve, the distance between ports all play a part in the efficient running of the engine. These have to be designed and manufactured correctly.
We can time the motion of the slide valve to the crankshaft. We can also adjust the valve so it is centered correctly. We can change the geometry of the valve without remaking it.
Which all takes me down the rabbit hole of learning about slide valves.
There are multiple textbooks, written during the age of steam, describing how the valves work and how to design them correctly.
And I haven’t even figured out what questions to ask to figure out what “wire drawing” in steam passages means and how to design the steam passages.
On the good news front, I will be able to get patterns made for everything that needs to be cast. Now to find a foundry to cast them.
Concise and Specific Directions For the Construction of Small Steam Engines and Boilers of Modern Types
Copyright 1899
Wow, isn’t that a mouthful.
Preface
The intention of the author in writing this work has been to furnish specific directions and correct dimensioned plans for small engines and boilers, used either for pleasure or power purposes, in lieu of sketches and gossip about such machines. It has been assumed that those who need a guide of this kind have some acquaintance with ordinary machine work, and the usual facilities for it, if even but a small lathe and a vice-bench; with this outfit a great deal may be done.
The boilers shown will do a great deal of work for their superficial dimensions, if properly managed. They have ample grates and heating surfaces, and will maintain a steady evaporation continuously with good fuel and management. The work also contains hints upon lathe-work, vice-work, and finishing metals, which it is believed will be of service to those who have had but a limited experience.
High expansion engines have not been treated, for the reason that they are beyond the mechanical and engineering experience of the majority of persons who will purchase a work of this character.
I have been known to use polysyllabic words when a monosyllabic word would work just as well. This guy writes at an entirely different level.
Here is the gist of it: This stuff used to be simple and well known. It wasn’t uncommon to have regular people just make a steam engine in their barn.
He talks about how easy it is to make some of these things, until you find that he strongly suggests that you have patterns and castings made by a good quality foundry and pattern shop. It is better to pay 10 cents per pound for your castings, knowing them to be good, than to pay 6 cents and struggle.
I know how hard it is to make good patterns. I’m horrible at it but am willing to try again; now that I am better at hand woodworking, it makes a difference.
So I did some looking around. Did you know that you can still hire people to make patterns? Or you can just 3D print them, and I don’t mean the 3D printers in your house; these printers are designed to make foundry-ready patterns.
I’m not looking for an iron foundry near me to cast the patterns. I could do it myself in aluminum, and I want to try iron, but I’m unsure of myself at this point. I still might give it a go.
One thing I do know is that the shrinkage between aluminum and iron is different, so I can’t use the same pattern for both unless I design for it.
On the other hand, it might be nice to be able to have a place where I can get castings done.
Back to the book
This is the third major attempt I’ve made to read this book. I realized today why I was having so much difficulty. I am not used to illustrations being fully dependent on the text.
This is a perfect example of what I’m talking about. This looks like a mechanical drawing, something to build a model from. It isn’t. It is a “skeleton diagram”. I think I got the term correct.
What this shows is the relationship between the different parts of the engine so that you can know how big it needs to be.
The figure shows the cylinder, frame, cylinder brackets, packing gland, packing nut, piston rod, theoretical cross slide, connecting rod, and theoretical crank. Oh, and the base plate.
The connecting rod is 3 times the length of the stroke. The diameter the crankpin travels is the stroke of the piston, so 2 inches. From the length of the connecting rod, the location of the crank at center of the cylinder, it is possible to determine the clearance needed for the connecting arm.
But the words aren’t what I expect; the top double circle is labeled “Top Center”. Today we would call this Top Dead Center (TDC). Likewise, “bottom center” is Bottom Dead Center (BDC), which we use for timing car engines today.
I studied this figure for hours and never did figure it out. There aren’t enough dimensions to make anything from this.
That’s because it isn’t a drawing to make things from; it is a diagram to help you with your design of an engine.
And this is why it is so hard. This is a mechanical drawing that was well within the ability of the target audience of this book to read and understand. Yet it would be nearly impossible for someone with the same knowledge base to use it as is today.
First, we don’t draw objects this way. It is missing views.
This would have been drawn with at least a top and side view as well as from both ends. The cross section would have been indicated with a cut line in one of the other views. Instead, all of that information is buried in this one figure and maybe something in the text.
The bore of this is defined as 3 inches, and the depth of the bore is 5 11/16 – 5/16 or 5 3/8 deep. But that is not called out. From this diagram, today, we would assume that the critical dimension is the 5/16 thickness of the rear wall. We can guess that the front flange is also 5/16, but there is no callout for that.
And while the steam passage is called out to have a 3/8 diameter, the distance from the steam passage to the front face is not defined. We also have radii that are not defined. This being left to the workman.
I made it most of the way through the book today. I need to go back over a couple of the paragraphs. The important thing for me was to stop focusing on the figures and instead to focus on the text.
Well, I did a couple of things differently. I used the good welding helmet. I used my shop safety glasses. I got the angle more vertical.
I have two and a half welding helmets. Two auto-darkening, one by Jackson with a 3 or 4 inch tall window, the other by somebody with a 1 inch window. The cheap 1 inch window is on the welding cart. The good 4 inch window is hanging up safely.
Which did I find easier to get to when starting this? Yes, the one on the cart.
Today I fought my way through the garbage, four lathes, two milling machines, two bandsaws, a table saw, a jointer, a planer, a shaper and more to the Kennedy to get my shop glasses.
With that and the good helmet, a remarkable thing happened: I could see the puddle. Not only could I see the puddle, I could see the intersection of the two pieces of metal. I got welds that looked like a trained monkey made them instead of an untrained monkey.
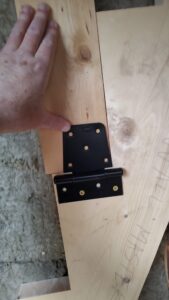
All seven hangers have been attached to the beam. All hangers have been hit hard with a hammer. All rang beautifully and stayed attached.
The rattle can yellow failed, something about being good to 50° and I was spraying at 10°.
Tomorrow, the beam gets mounted, and I’m done with this part of the project. I can then move forward with window installation and completing the insulation of the lower part of the hut.
Oh, I have decided to install a handrail on the steps. 3/4 inch nominal black pipe.
I do not look this cool or this hot. More than a few years ago, I gave up on stick welding. I got tired of cussing all the time. I wish I had spent more time learning how to do it well, but I never did. I “upgraded” from a Lincoln Electric “Tombstone” to a Lincoln Electric 140HD. Got a cart and a tank of gas and went to it.
I suck at this. Today I got three of the 8 hangers welded on. That includes the breaker popping twice, because of the extension cord. I’ll get rid of the extension cord today and finish this up.
You might have heard the term “stacking dimes.” There is nothing that pretty happening here. The only thing I can say with confidence is that the hangers ring when struck with a hammer, and they show no signs of cracking off. I’m now to the point where I can get nearly consistent bacon sizzle.
I’m also going to use a different pair of glasses tomorrow. I’m pretty sure that I’m blind through the visor, and not from arc flash. Just the distance isn’t right for my normal progressives. If I tilt my head to focus, the visor window no longer has the arc in view.
Wish me luck. If this gets done, a rattle can worth of yellow paint goes on this monstrosity, and then up into the loft with it.
I am a failure at welding; the fact that it works at all is a happy accident from reasonable equipment.
Update
“How bad?” you might ask. I just picked up the magnetic right angle to weld the other side of the hanger and the hanger came with it. This is why each hanger is individually tested. Yeah, I ran a very pretty bead about 1/16 in above the root.
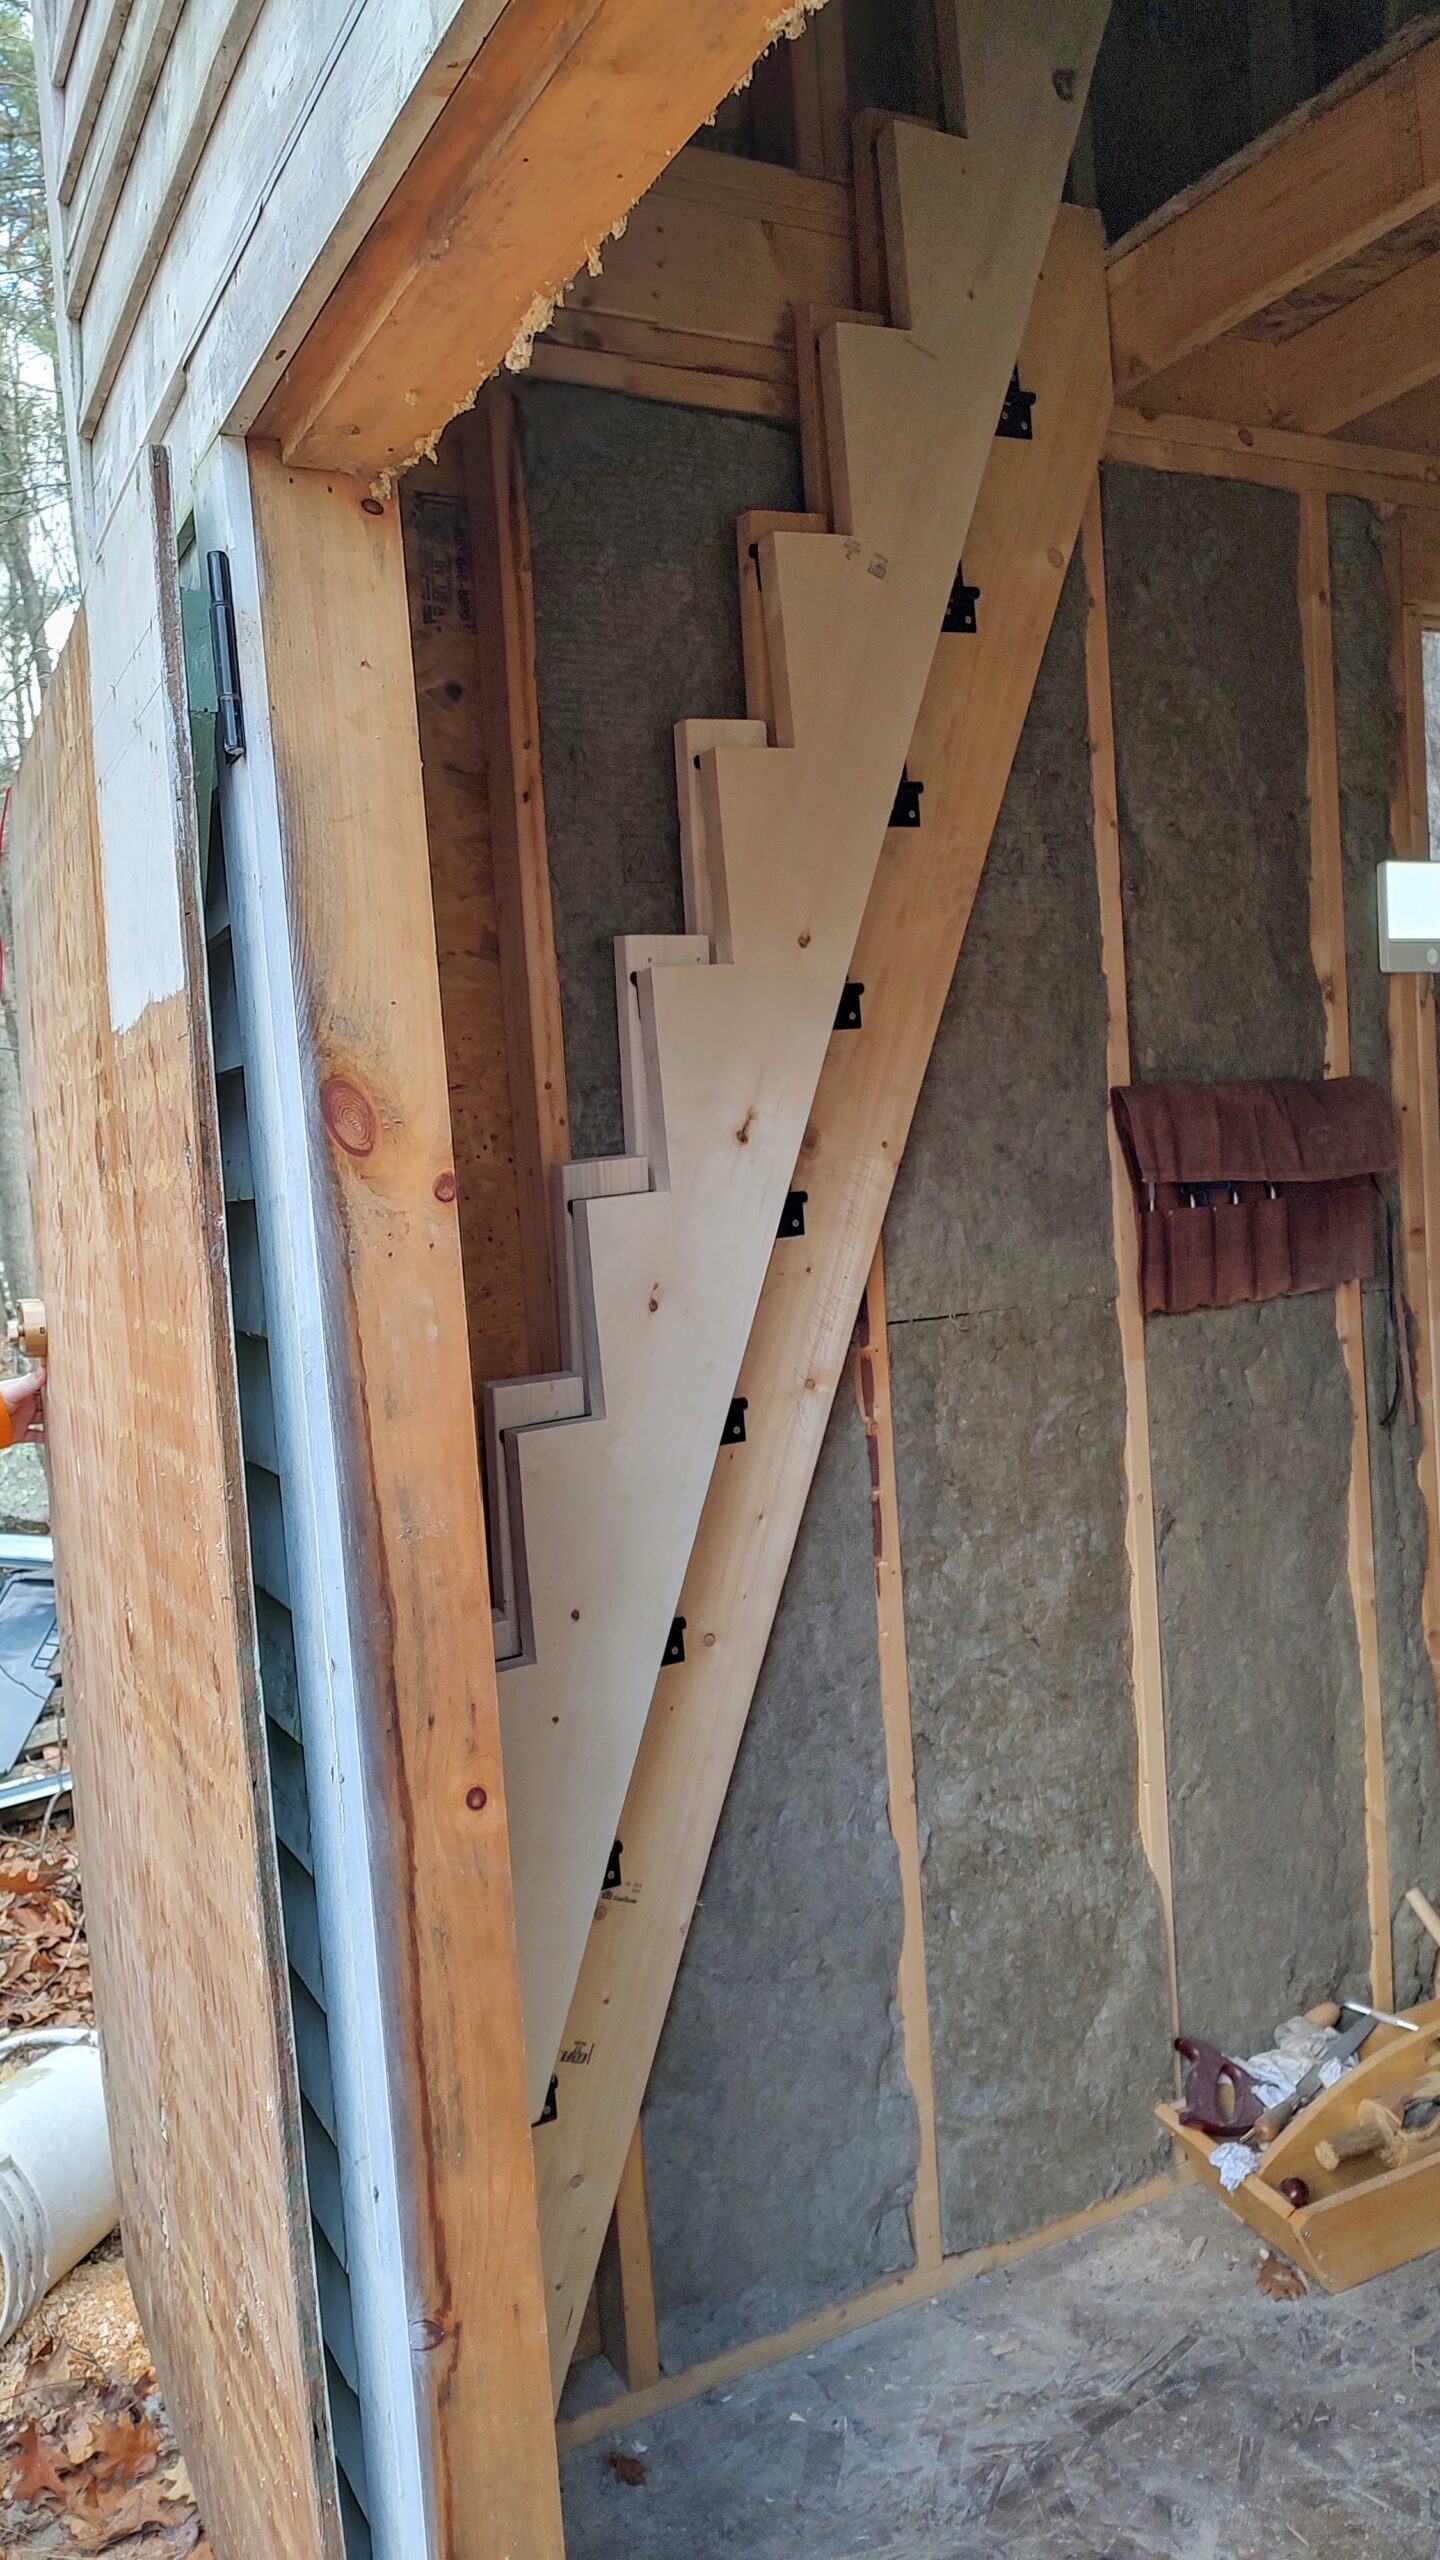
I had originally designed this so that the treads would be supported entirely by the hinges, on both stringers. After putting the first two treads in place, I changed my mind.
With the original design, you would be able to rotate the outside stringer 180° to create a flat 1.5 in. bulge from the wall when folded. The same width of the stringers and treads. I didn’t like the path of the outside stringer during that folding process. Instead I extended the tread to overlap the outside stringer.
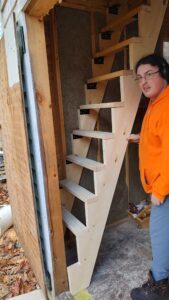
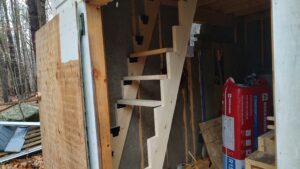
You can see this in the feature image of the stairs folded against the wall. The treads are 1.5 inches above the outside stringer.
The stairs now unfold with a bit of force to move the foot of the outside stringer slightly. I will likely trim that back just a little to allow it to clear the front wall with real clearance, not pretend clearance.
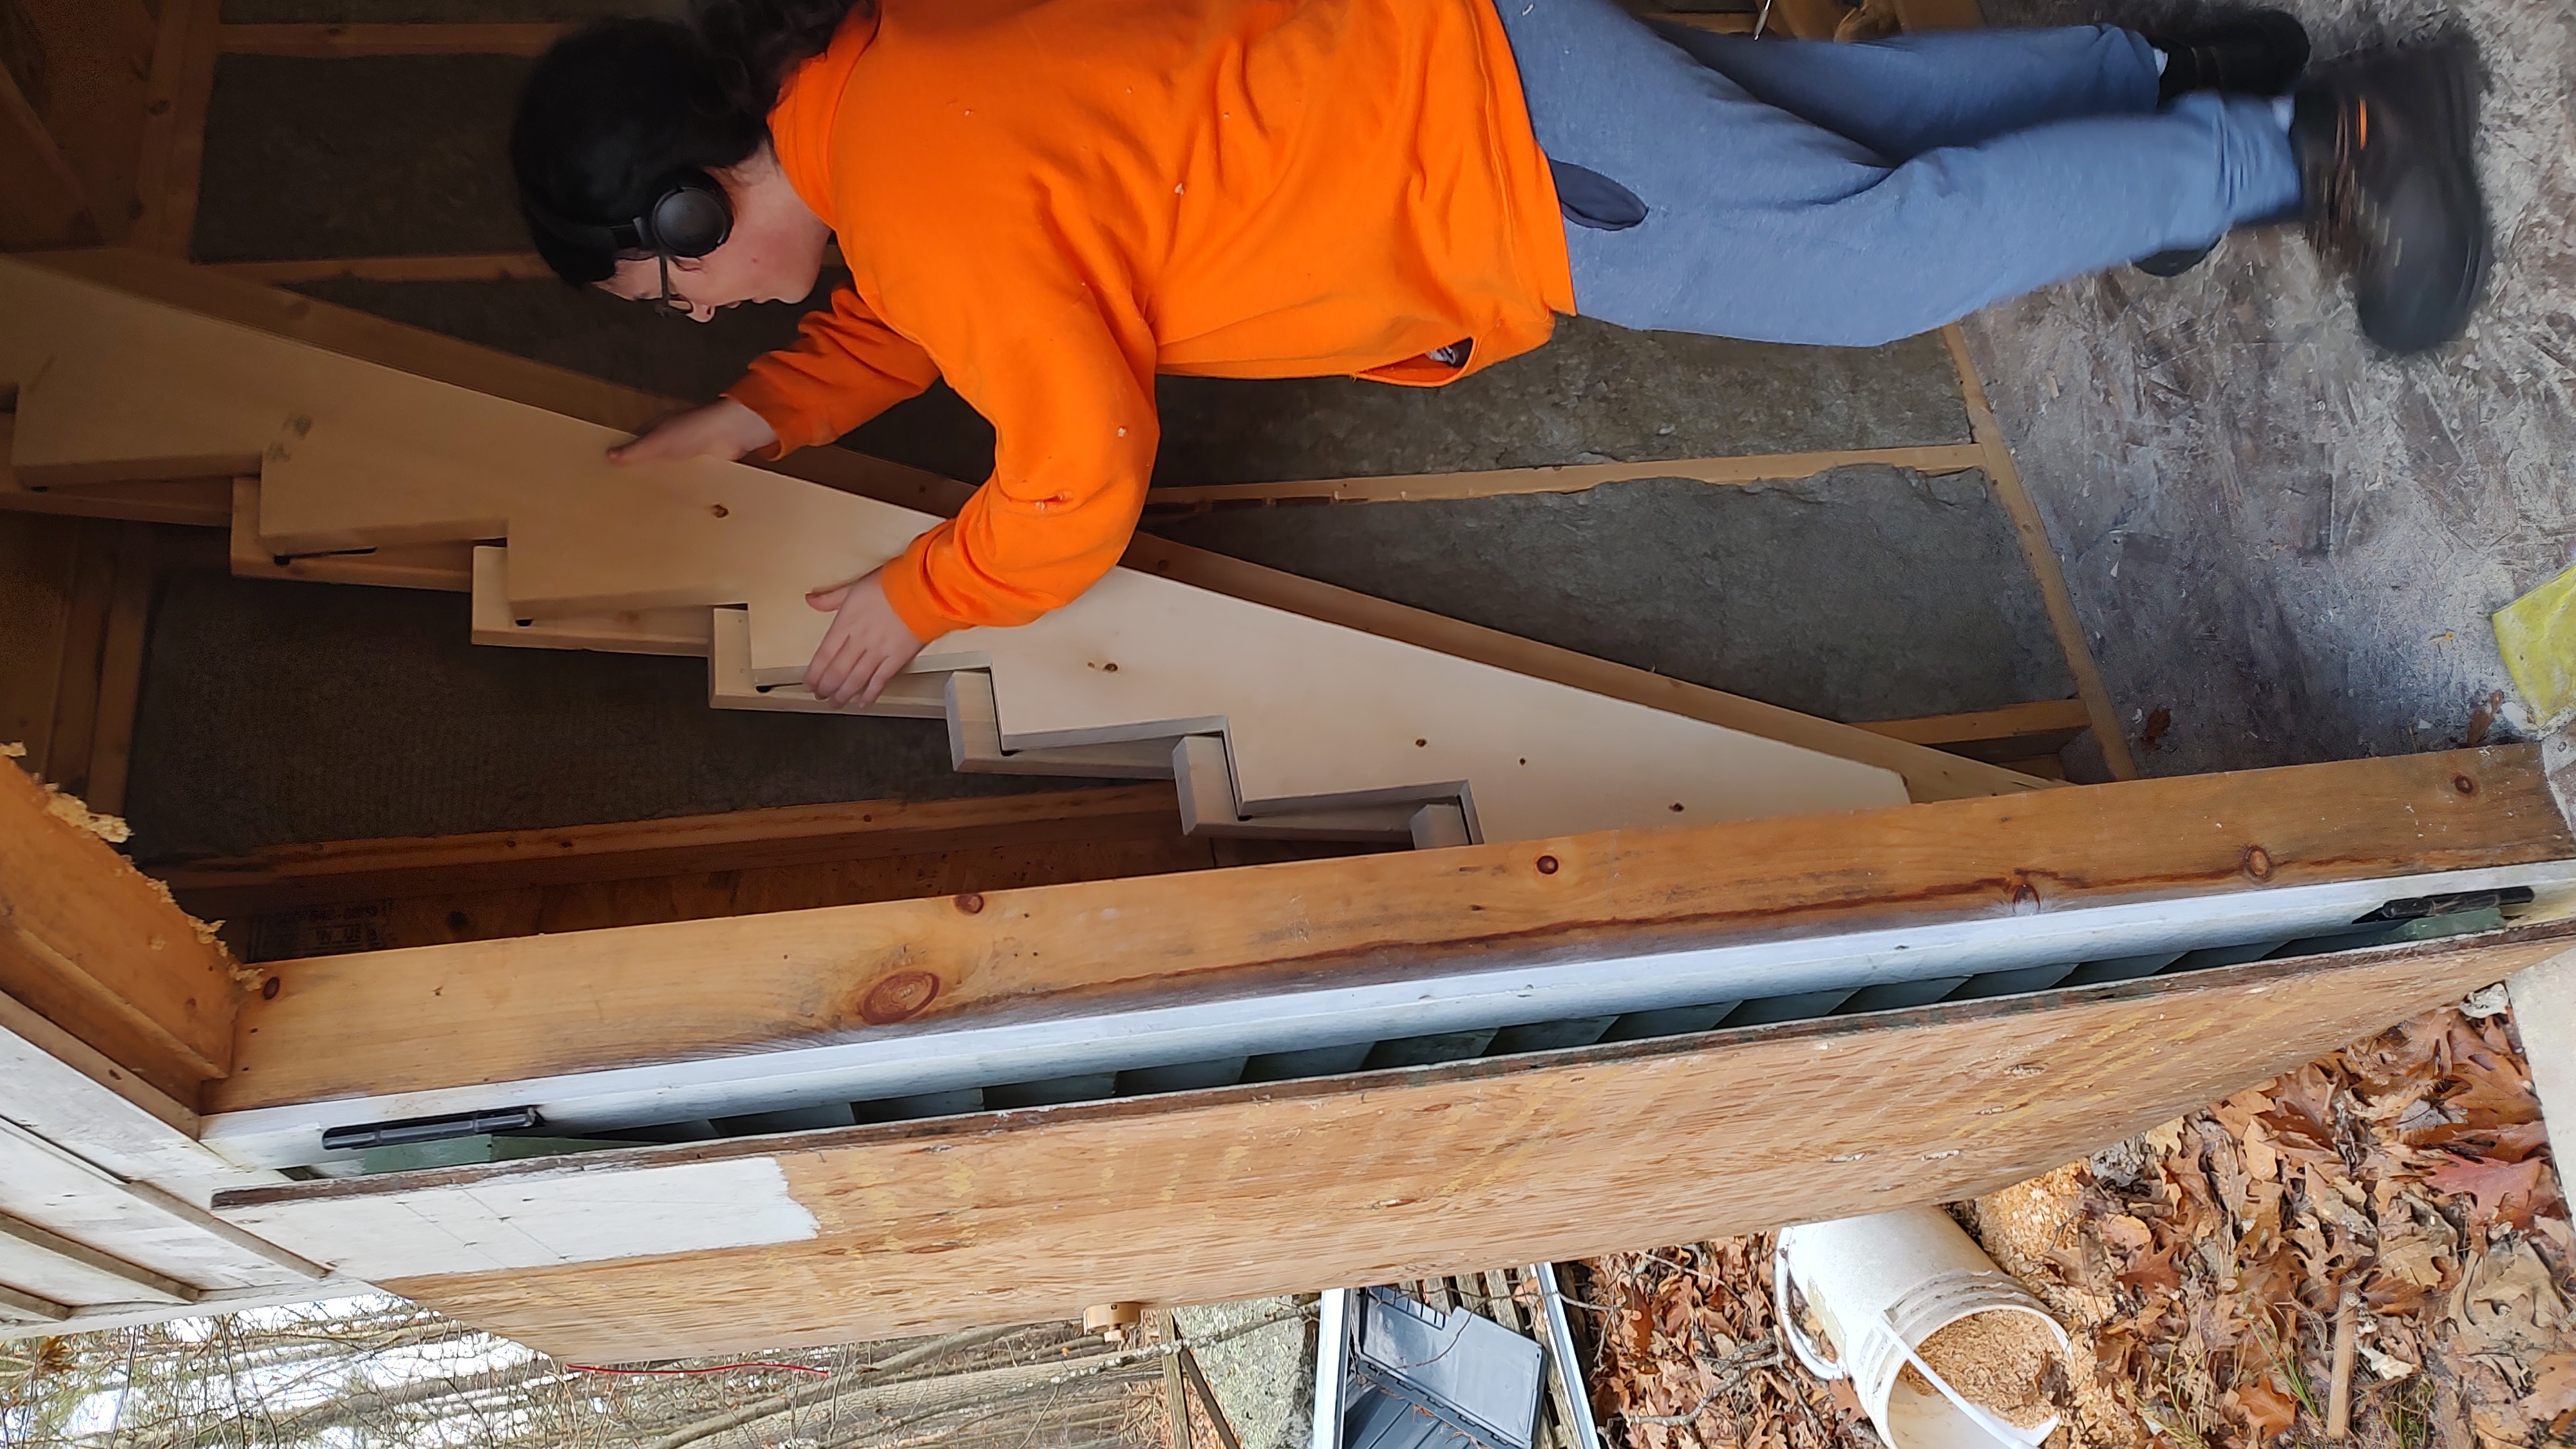
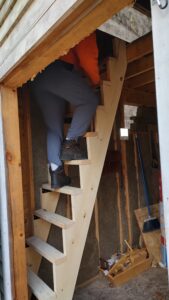
With the stairs fully extended, you can see there is zero space to get onto the steps.
The space was so tight, I didn’t even put a tread on for the bottom. The current method to mount the stairs is to put your left foot on the stringer where that tread should be, then step up with your right foot onto the second step which gives you clearance to rotate and go up the steps.
The fix is pretty simple. I’m going to extend the first tread out 6 inches; for those paying attention, the WLL for that amount of cantilever tread is 600 pounds. I might do the same for the second tread. This will give me two steps forward before I have to rotate my fat ass into place.
Once on the steps, it is an easy walk up into the loft. I can almost stand up right at the high side of the loft. The steps feel very solid. My son did the jump up and down test. I panicked, but the stairs didn’t care. They are overbuilt, like an engineer worried about the extreme load.
At this point the WLL is not limited by the hinges. In this configuration all the forces are in shear. On one side that shear force is on 4 #8 screws with plenty of meat under each screw. There is very little, if any, withdrawal force on the screws. The hinges are not the weak link.
The 1.5 by 4 inch tread of Eastern White Pine is 18.5″ of unsupported span. This puts the center at 9.25″. The WLL for a 90% live load at the center of that beam exceeds 600 pounds. As stated above, the cantilevered steps also have a WLL of over 600 pounds. There is a safety factor of more than 2 in all calculations.
The biggest concern is how something like this will stand up to forces over time. The normal calculations are based on multiple uses per day. These steps are unlikely to be used more than a few times per month.
All in all, I’m happy with how they turned out. It was a pain learning how to make stairs properly. It was very tedious building, as each hinge has to be in line with every other hinge so that they will work in unison. I’ve used up all the tolerance those hinges had.
I think the biggest issue I had while building the stairs was switching drill bits. Put the hinge in place, and drill a pilot hole that is centered where I want the hinge. Switch bits to the Torx driver. Drive screw. Use a level to position the hinge correctly. Switch bits. Drill the other pilot holes. Switch bits, drive the screws.
We have a 101.25″ rise and a maximum run of 43.75 inches. We cut the master stringer and lean it against the wall and hold up a hinge and fake tread to give you an idea of what will happen.
You can’t actually attach the hinge to the stringer or the stringer to the wall until you have used the master stringer to trace the other stringer. The SKIL 20V brushless circular saw is underpowered, and with the 2Ah battery it comes with, I can’t even cut a single stringer. Thus the delay in getting the stringers and treads cut.
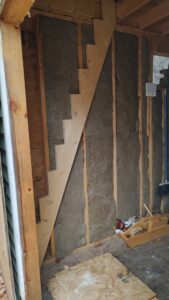
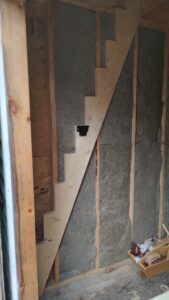
I’m worried about how this will all work when done, but I’m moving forward. Here it is with most of the hinges attached to the wall stringer. The lowest hinge is not attached, but you can’t see that. Three treads have been attached to the wall stringer and two to the moving stringer.
I’ll be doing the bottom step and the top step next, but this is proof of concept. Here it is in its mostly folded mode.
I didn’t have it exactly right, but it does go up further. I expect it to get easier as it gets less wobbly.
New skills are so much fun. Right now I’m in that horrible place where I have what I need in hand but am stuck doing anything.
Hopefully I’ll be finished with at least something by the end of today.
Here is the issue: I have my hut, which is becoming my woodworking shop. It is a small 8 by 12 stick-framed building with a loft. My son and I have almost finished insulating the bottom section. I’ll be installing the front window this coming week. All good stuff. But there is no easy access to the loft. And no easy way to get stuff in and out of the loft.
Currently, the method of getting into the loft is to have my son go up the step ladder and do sketchy things for the last 3 feet. The fix? Put in a staircase.
If I were to put in normal steps, it would eat up way too much space. Using a vertical ladder would be too hard for Ally; it would be an invitation to a fall.
The answer is a folding ladder. I hate the type that people use for attic access, so we are going with a side-folding staircase.
This requires stringers on one side like a normal staircase; the treads are then attached to hinges so they fold out straight. A second stringer is then attached with hinges the same way. The entire thing folds up flat against the wall, taking up only 1.75″ of space. The treads are 4.5″ wide, not to code but perfect for a ship’s ladder style.
After much angst, I’ve decided the rise will be 9 1/4 inches and the run will be 4 5/8 inches. Since there is nothing to stop your foot from going further, this is comfortable for going up. Wide enough so you don’t feel like you are standing on a rung. The 9.25 inch rise is very comfortable.
So how do you do this? Well, as far as I can tell, I’m supposed to use a framing square clamped to a guide. One leg clamped at 4 5/8 and the other leg at 9 1/4. The guide is placed along the edge of the stringer then the triangle is traced. Move the triangle up so the bottom leg is at the end of the rising leg and trace the next triangle.
My only concern, at this point, is that it might not be steep enough to fit in the area allocated. Once I verify the total run I’ll decide if I need to remove a step.
Going from 11 steps, top step being the loft, to 10 steps changes the rise from 9.25 with a smaller step at the top to 10 1/8 for each step.
Well, thanks, guys and gals; you just saved me a ton of issues.
Math is hard, but doing it right the first time is worth the mathing.
And looking up the specifications, 10.125 is 0.625 out of maximum rise for a ship’s ladder. The other option is to make the treads narrower. Moving from 4 5/8 to 4 inches. My total run is 43 3/4 inches. My original math was for a total run of 48 inches.
Which is why stairs are hard. Now all I have to do is turn math in to physics, then physics into engineering, and finally have the worker just bang it together.
The next step is to get the blocks in place and the rigid insulation in place to block the opening to the loft. That will fold accordion-style.
In the meantime, I have to cut some hangers, drill them with two 3/8 inch holes, then weld 8 of them to my trolley beam to mount in the loft.
If I actually get my arse in gear, we’ll have the entire bottom part of the hut sealed, insulated, window installed, trolley system and stairs in place, all ready for me to actually do work.