


Skill is not knowledge. Knowledge is not skill.
20 years ago, I made one net with a 4-inch mesh with rope. It was large enough to roll a small boulder into with the backhoe, then I could lift the boulder and move it where I needed before dumping the boulder.
I designed it to be able to lift in excess of 1.5 tons.
Once I completed that task, I forgot about making nets.
The primary reason? In my state, fishing with a net is (generally) not legal. I had intended to make a gill net to take fish from a local river.
Getting Started
The cost of tools for netting is very low. You want a netting needle and a sizing stick. I made my sizing sticks from a chunk of wood off an oak tree. I did purchase a set of netting needles. I will make a netting needle shortly.
Other than the needle and the sizing stick or card, you will need cordage. I started this learning adventure because I saw an ad for “Tarred Bank Line #36”. The price was ok, and it had a nearly five-star rating.
When it arrived, I found that #36 was larger than I wanted for what I was going to make. I ordered a pound of #15, which turned out to be precisely the size I wanted. Tensile strength of approximately 117lbs and a diameter of 0.051inches.
The first loops
They say you can make a net without a sizing card/stick. Don’t bother. The time/cost of a sizing stick is so low and the advantage is so great that it isn’t worthwhile to do without.
You make a loop. I tied a double half hitch, knowing I was going to be pulling the loop tighter after the first set of loops was cast on.
Use the sizing stick to make your first loop the correct size. Tie a double half hitch on the main loop. Then make your second loop using the same sequence. Repeat until you have created 16 new loops.
Pull your main loop tight.
Second Round
This is where you start tieing actual net knots. Each loop you add, from here out, will be a tied to an existing loop with a sheet bend.
Tie the loose end and tie it to a metal ring or a dog clip or carabiner. I would use a carabiner, but I don’t have any handy. Tie a six-foot length of line to the ring. Now anchor the long line to something sturdy, such as the leg of a heavy table.
I used #36 bank line. I wrap it around something, then put a one-way slip knot in. This allows me to shorten the anchor line as my net gets bigger. Otherwise, I need to move further from the anchor point, which might not be possible.
To make your first true loop, run your line around your sizing stick, down the front and up the back. Bring your needle from back to front from your first static loop. Pull everything tight, so that the static loop is pulled hard against the top of your sizing stick. Use your thumb to pinch the running line hard against the stick to keep it from loosening.
Take your needle over the top of your sizing stick and around both lines of the static loop, back to the front. This should leave you with a loop in the running line resting on the top/front of the stick. You want to feed the needle down through this loop.
Now pull the running light tight, slowly. You should feel and see a bight tightening around the static loop. As it starts to pull up, it will pull out from under your thumb. Make sure that the loop coming from under your thumb snaps on top of the static loop.
If this knot is made correctly, it will be small, tight and lock the line in place on the static loop and create a new static loop.
You can now repeat for the next static loop. You will now have two new loops.
We want to expand the net, so we are going to make a second loop on the same static loop.
This pattern repeats, 1 loop to a static loop, then 2 to the next loop.
When done, you should have 24 new static loops, completing your second round.
Note, you will have been adding loops to your sizing stick as you go. When you need, just slip the loops off the back end of your sizing stick.
Third Round
This is where it starts to get fast and easy. From here it is a one for one. You keep going around the net until your needle runs out of line.
Fourth Round
If you want to make your net a little bigger, you can do a 1,2 pattern or a 1,1,2 pattern. It all depends on what you require and want. For me, the fourth through final rounds were the same.
Tieing On
When you reach the end of the line on your needle, it isn’t an issue. Because the net is a series of knots, nothing will happen as you prepare the next length of line.
Load your netting needle. Put as much as you are comfortable pushing through your loops. Unlike other fiber things I’ve done, such as knitting, there is nothing difficult in tieing on.
Once you have loaded your needle. Tie the tail of the old line to the new line using a sheet bend. The loop should be in the new line. Trim the loose ends relatively close. Not so close that the knot will pull apart under tension, but not so long that you have something distasteful.
The only issue is to make sure that the connecting knot does not interfere with tieing on to the static loops. It shouldn’t be placed within the knot connecting to the static loop.
Finishing
When you are done, stop. Trim the tail close, but not too close.
Now get a larger line to use for the rim and handle.
I used the #36 line. I should have used something larger. Or I need to whip the line to make a comfortable handle.
Feed the finishing line through each static loop in the final round. Always feed in the same direction. For me, that is from in to out. But it doesn’t matter.
You are going to tie the finishing line to itself to create a finishing loop or handle.
Make sure the finishing loop is large enough that the mouth of your net will open as wide as you want or need.
It was surprising to me how large the mouth will open.
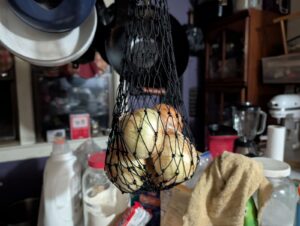
Put something in your need to shape it. Hang it by the handles, enjoy the results.
Conclusion
The next one will be better.
Here is an ok video on what I made. I got sizing (16 and 24) from her video.
Leave a Reply to pkoning Cancel reply