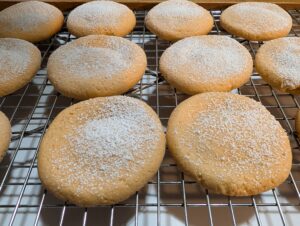
Okay, I made these because they seemed funny and amusing, and very retro. I am making more because they’re also easy and REALLY yummy. They also have a lot less sugar than some of the cookies I’ve seen out there, which is nice. This is based on an early 1970s Jello recipe.
Ingredients:
- 4 cups sifted all-purpose flour
- 1 teaspoon double-acting baking powder
- 1-1/2 cups butter (room temperature)
- 1 cup sugar
- 1 package (3 ounces) jello gelatin, any flavor
- 1 egg (room temperature)
- 1 teaspoon vanilla
Preheat your oven to 400°F. It doesn’t take long to pull the cookie dough together, so you should be ready about the time it comes up to temperature!
Sift your flour and baking powder together. I don’t normally do that, but because these are technically spritz cookies, the dough is supposed to be very soft. Sifting helps the dough come together the way it should. If you don’t have a sifter on hand, pour your flour and baking powder into a strainer and tap the side of it until all the ingredients fall through.
In a separate container, cream your butter. If you’re doing it by hand, you can use a fork or whisk, and work it. I recommend using a stand mixer, however. Using the wire whisk attachment, whip the butter until it’s soft and fluffy. At that point, add in the sugar and Jello packet, about a quarter cup at a time, creaming it well after each addition. This makes the dough very light and fluffy, which is necessary. Add the egg and vanilla, and continue to beat well.

Gradually add in the flour mixture, and ensure that you mix well enough that the dough is smooth each time before adding the next portion. About half way through the process, if you’re using the whisk attachment, you’ll want to switch to the paddle attachment on your mixer. The dough gets a bit thick, though continues to be light and fluffy.
There are two ways to make the cookies. They both start with lining two or three baking sheets with parchment paper. Do not grease them.
For shaped cookies, force the dough through a cookie press. Decorate however you wish.
For round cookies, use your hands to make inch-wide balls of the dough, and place them onto the parchment paper. Lightly grease the bottom of an appropriately sized glass or cup, and press gently into the dough to make it into a circle. It ends up looking almost like a wax seal, to be honest. Again, decorate as you wish. This is the method I used, and I put on sprinkles to most of my cookies. I just shook them on, then pressed very gently with clean hands to seat the sprinkles into the dough. I also did one batch with “snow” on top, by baking them and adding powdered sugar AFTER they came out of the oven but when they were still very hot. To do “snow” you add a tablespoon of powdered sugar to a small sieve and then tap the side of it over the cookies. The sugar will fall through and dust the top of the cookies. You can even use pre-cut shapes like stars and trees to decorate with “snow”.
Bake your cookies for 13 to 15 minutes, or until they’re golden brown at the edges. They can be frozen, or they can be stored in a loosely covered container.
Notes:
I used orange jello for my first batch, and the result was very tasty. The “snow” batch had a sort of orange creamsicle flavor to it, and the rest it was hard to taste the jello. The color definitely comes through, though. I also used margarine for my cookies, since I can’t digest dairy. They turned out just fine!

