So some of us live in the boonies or in largely “settled American” areas, and the likelihood we’ll see ICE or DHS is pretty low. But let’s look at this as a “what if” scenario. What if ICE arrived in your town? What do you think would happen?
I live in an area that has a lot of Conservative folk, but a lot of Liberals as well. Considering we have a small contingent of people who stand on the corner of what used to be the Rite Aid building every Friday, protesting whatever (I don’t read the signs), I can say we have some people here who would choose to cause problems for ICE. I don’t know what our Chief of Police, our Firemen, or our Sheriff would do. What this means is that there are likely to be armed LEOs in my vicinity, and they will be agitated and possibly there will be people actively obstructing them.
I will tell you that if someone starts that whistle crap in my neighborhood, I’ll end it right quick. No, not with a firearm (I understand the desire, but not the morals of it, if that makes sense), but with a noise ordinance complaint. Or a lot of noise ordinance complaints. That would not fly well in my little bedroom community. Even some of the libs might find it unconscionable.
I would find it disturbing to see armed, armored men walking the streets of my little town. And where I live would set me walking or driving past them every time I wanted to leave home, because of where my home is situated. I would need to make outings something that happened only during down times, when mobs weren’t being active. I have less then zero interest in getting caught up in ICE stuff. I certainly wouldn’t be interfering in their duties. But that doesn’t mean I wouldn’t somehow end up in the middle of something, unintentionally.
The first and most important thing I would do is continue my life as normal, as much as was safely possible. The moment I allow someone else to make my life change, they win. On the other hand, if I’m stopped by ICE or other LEOs, I will happily provide whatever they ask for that’s within my power. If I’m armed and I’m stopped, I will keep my hands either above my head (if out and about) or at 10 and 2 (if driving). I’ll let LEOs know I’m armed, what the weapon is, where it is, and where any relevant paperwork is. If someone “jackboots” me, I’ll argue about it AFTER the stop, not during. Hard to argue if someone gets rushed and you end up shot dead. My goal is to make it through any such stop with the least problems for LEOs and myself.
For those who don’t like to show ID, I get it. I don’t either. My general position, prior to the current mess, has been to prepare myself to ask, “Am I being detained?” Because if I am not being detained, I am not showing ID (tho of course if driving you have to show a license if asked). If I am being detained, then I will invoke my right to silence, after asking for a lawyer. None of those things are likely to bother a LEO, especially if you’re otherwise polite and non-threatening.
I don’t need to be threatening. It’s not my goal in life to have others afraid of me. On the other hand, I don’t like being questioned unnecessarily. That whole Fourth Amendment thing about being secure in my person, papers, home, etc. is important, after all. But I’m also going to look at the situation in hand. A random traffic stop is not anything like ICE asking for proof of citizenship. ICE is showing up in places where there are dangerous criminal aliens, and dealing with them. I’m pretty sure they’d rather be dealing with picking them up at the local jail, but if they have to, they’ll hunt them down. I want the cops to pick up serial killers, rapists, and the like… and I want ICE to remove criminal aliens when they find them. That requires at least a little cooperation on my part.
Here’s the thing, though, when it comes to these ICE protests and riots. You don’t have to participate. Yes, it’s possible to get dragged into a mob by accident (and it’s terrifying, by the by), but if you keep your wits about you, you get away from it as soon as is possible. You don’t have to celebrate ICE, either, if you’re concerned they’re being a bit over zealous about doing their job. You just don’t interfere. It’s that simple.
Most of us are highly unlikely to ever get caught up in an ICE sweep. We’re not hanging around with illegal aliens or criminals. We’re not protecting them. Therefore, ICE really isn’t that interested in us. So our goal is just to stay out of their way.
That is the best preparation you can have, when it comes to ICE. Don’t play stupid games, and you’re not likely to win stupid prizes. Don’t FA and you probably won’t FO.
The “want” of a 3D printer was to be able to make foundry patterns. This is quickly becoming the standard for small run castings. It is much easier and faster than traditional pattern making, and you don’t require the same set of specialized tools.
The downside is that most 3D printers don’t have a large enough print volume of interesting castings, requiring printing in parts and then assembling the parts to create a whole.
This want was not enough. There had to be something that was a reasonable fit with our household. It isn’t like I’m going to be printing dragons and dice and hoping to pay for the hobby with that. There are hundreds, if not thousands, of people doing that.
My son just showed me a site where he has purchased D&D figures. He and I will see what we can do for him.
One of my issues is organization. If something has a place, it goes back to that place. Most of the stuff in my life lives on a flat surface. And it is time sorted. The oldest stuff is on the bottom.
I want organizational tools.
Enter two 3D solutions. One is a system of displaying things in an organized way for quick access. The other is the worlds fanciest peg board.
I plan to use GridFinity for most of the “flat” storage areas. That means draw and shelf organizers.
The more extensive system if Multiboard. This is much more complex than GridFinity.
Here’s a simple example of what sorts of things can be done. The eco-system consists of MultiBoard, the pegboard, hooks, and simple shelves. MultiBin, containers to hold things that can be attached to the MultiBoard. With MultiPoint me the connection system.
Take the time to watch the introduction video, get some ideas.
Pie crusts in the medieval era were rarely the flaky, buttery confection we are used to today. Instead, they were the ancient version of take-out food containers, only sort of edible, and designed to allow you to eat their delicious innards and then throw the crusts away. This recipe is a more edible but just as solid version of those “hot water crusts” as they were known in later periods of history.
Ingredients:
1.5 lbs flour
2 tsp salt
3 oz lard
3 oz butter/margarine
8 oz water
To make a standing paste crust, we’re going to ignore the sort of instructions you may be used to while attempting flaky pastry. There is a reason these crusts were sometimes called “coffins” and you’re about to discover it in person!
Add your flour (by weight, please) to a large bowl, then sprinkle the salt over it. Whisk or otherwise mix the dry ingredients well to distribute the salt as evenly as possible.
In a small pot, add the water and heat it up gently. Add in the butter or margarine, and the lard, and heat until they are all melted together. DO NOT BOIL or even simmer this mixture, if at all possible. You just want it warm enough that the ingredients can combine together.
Add the liquid ingredients to the dry ones, and then use a spoon or fork to begin mixing the dough together. You should continue using the spoon or fork until the dough has come mostly together, or it’s cool enough for you to knead by hand without burning yourself. Please be careful, and remember that the water you just poured into your flour mixture is HOT. Knead this until the dough has come completely together. It will be a very stiff dough, and that’s fine. You don’t want to over-work this dough.
If you are making a single pie, split off about 1/4 of your dough (this will be turned into a lid for your pie) and set it aside under some parchment paper or in a plastic baggie. On a Formica counter or granite dough surface, sprinkle some flour and then begin to roll out the dough. You want to have a circle of dough large enough to fill an 8″ spring-form pan, and it should be between 1/4″ and 1/8″ thick when it is ready.
To make the pie crust, you are either going to press the dough into a pie pan, or drape it over the outside of the pie pan, in order to get the shape right. Flour the pan well, regardless! While the dough is still on or in the form, refrigerate it for at least one hour. While the pie crust is chilling, roll out the lid for your pie, which should be about one inch larger in diameter than your pie pan. If you look at the pictures in the header, you can see that the crust for a standing paste pie goes inside the outer crust, not over it as you would for a flaky pie. Let the pie lid sit, sandwiched between two pieces of parchment paper, until it’s ready to be used. If it will be more than an hour, consider covering it with plastic wrap so it doesn’t dry out. Do NOT put it in the fridge.
If you are making multiple small pies (this recipe should make about 3 individual pies), separate the dough into three equal sized pieces. From each of those, remove about 1/4 of the dough for the lid of that individual pie. To form small pies, flour a glass or mini pie pan and follow the same general directions as for a large pie. Roll out the lids as well, and set aside for use after refrigeration.
When the crusts are well chilled (which allows them to be standing until they bake and become stiff), unmold them from the pie pan or whatever you’re using for a form. Put the pie crust on a parchment paper lined baking sheet (lipped, please), and add in your filling. Please note, fillings can be cooked or raw, as your cooking time will be about 90 minutes, which is enough for most meats to cook. The fillings should be cool when added to the crust, however. Hot fillings would melt the fats in the crust, making them prone to drooping, and you don’t want that! The filling needn’t be cold from the fridge, but make sure it isn’t hot, either. If you can’t stick your finger in it for 30 seconds, it’s too hot.
Once your filling is in, regardless of size of pie, whisk up an egg to use for an egg wash. Brush the edges of the lid and pie with the egg wash, then add the lid to your pie, and crimp the edges closed with your fingers, a pie crimper, or a fork. Cut a small hole in the center of the pie. This is easily achieved by using a sharp knife to cut an X in the center, then peeling back the triangles. Egg wash the entire pie and sprinkle with herbs, if you like.
If you want to decorate your pie, simply use bits of left-over crust rolled out thin to create leaves, vines, or other images. Have some fun with it! Attach them by using egg wash as a “paste”, then egg wash over the decorations as well. You could also press herbs or cracked spices into the lid, if you liked. I would suggest doing that before attaching it to the top of the pie, however.
Bake the pie in a 350°F oven for 80 to 90 minutes. Start checking your pie at the 60 minute mark, and every ten minutes thereafter. When the pie is dark brown and solid when tapped, it’s ready. See the pictures in the header for reference!
Many types of fillings can go into pies like this. In medieval times, they would add chunks of beef, goat, or chicken into standing pastes, and then cook them up. Gravy wouldn’t be added until it was time to serve the pie. The gravy was poured in the hole on the top. Later period pies of this type would have contained ground or minced meats, or mixes of meats and fish. They also had fruit pies made in these types of crusts.
In my opinion, standing paste done this way is much easier than a flaky crust, and more forgiving. It doesn’t require “blind baking” (pre-baking the crust before filling it, in order to keep the crust from being mushy) because it’s so darn solid.
Serve your pies with a side of mashed potatoes or some “bashed neeps and carrots” for an authentic meal that will fill your belly and warm your soul.
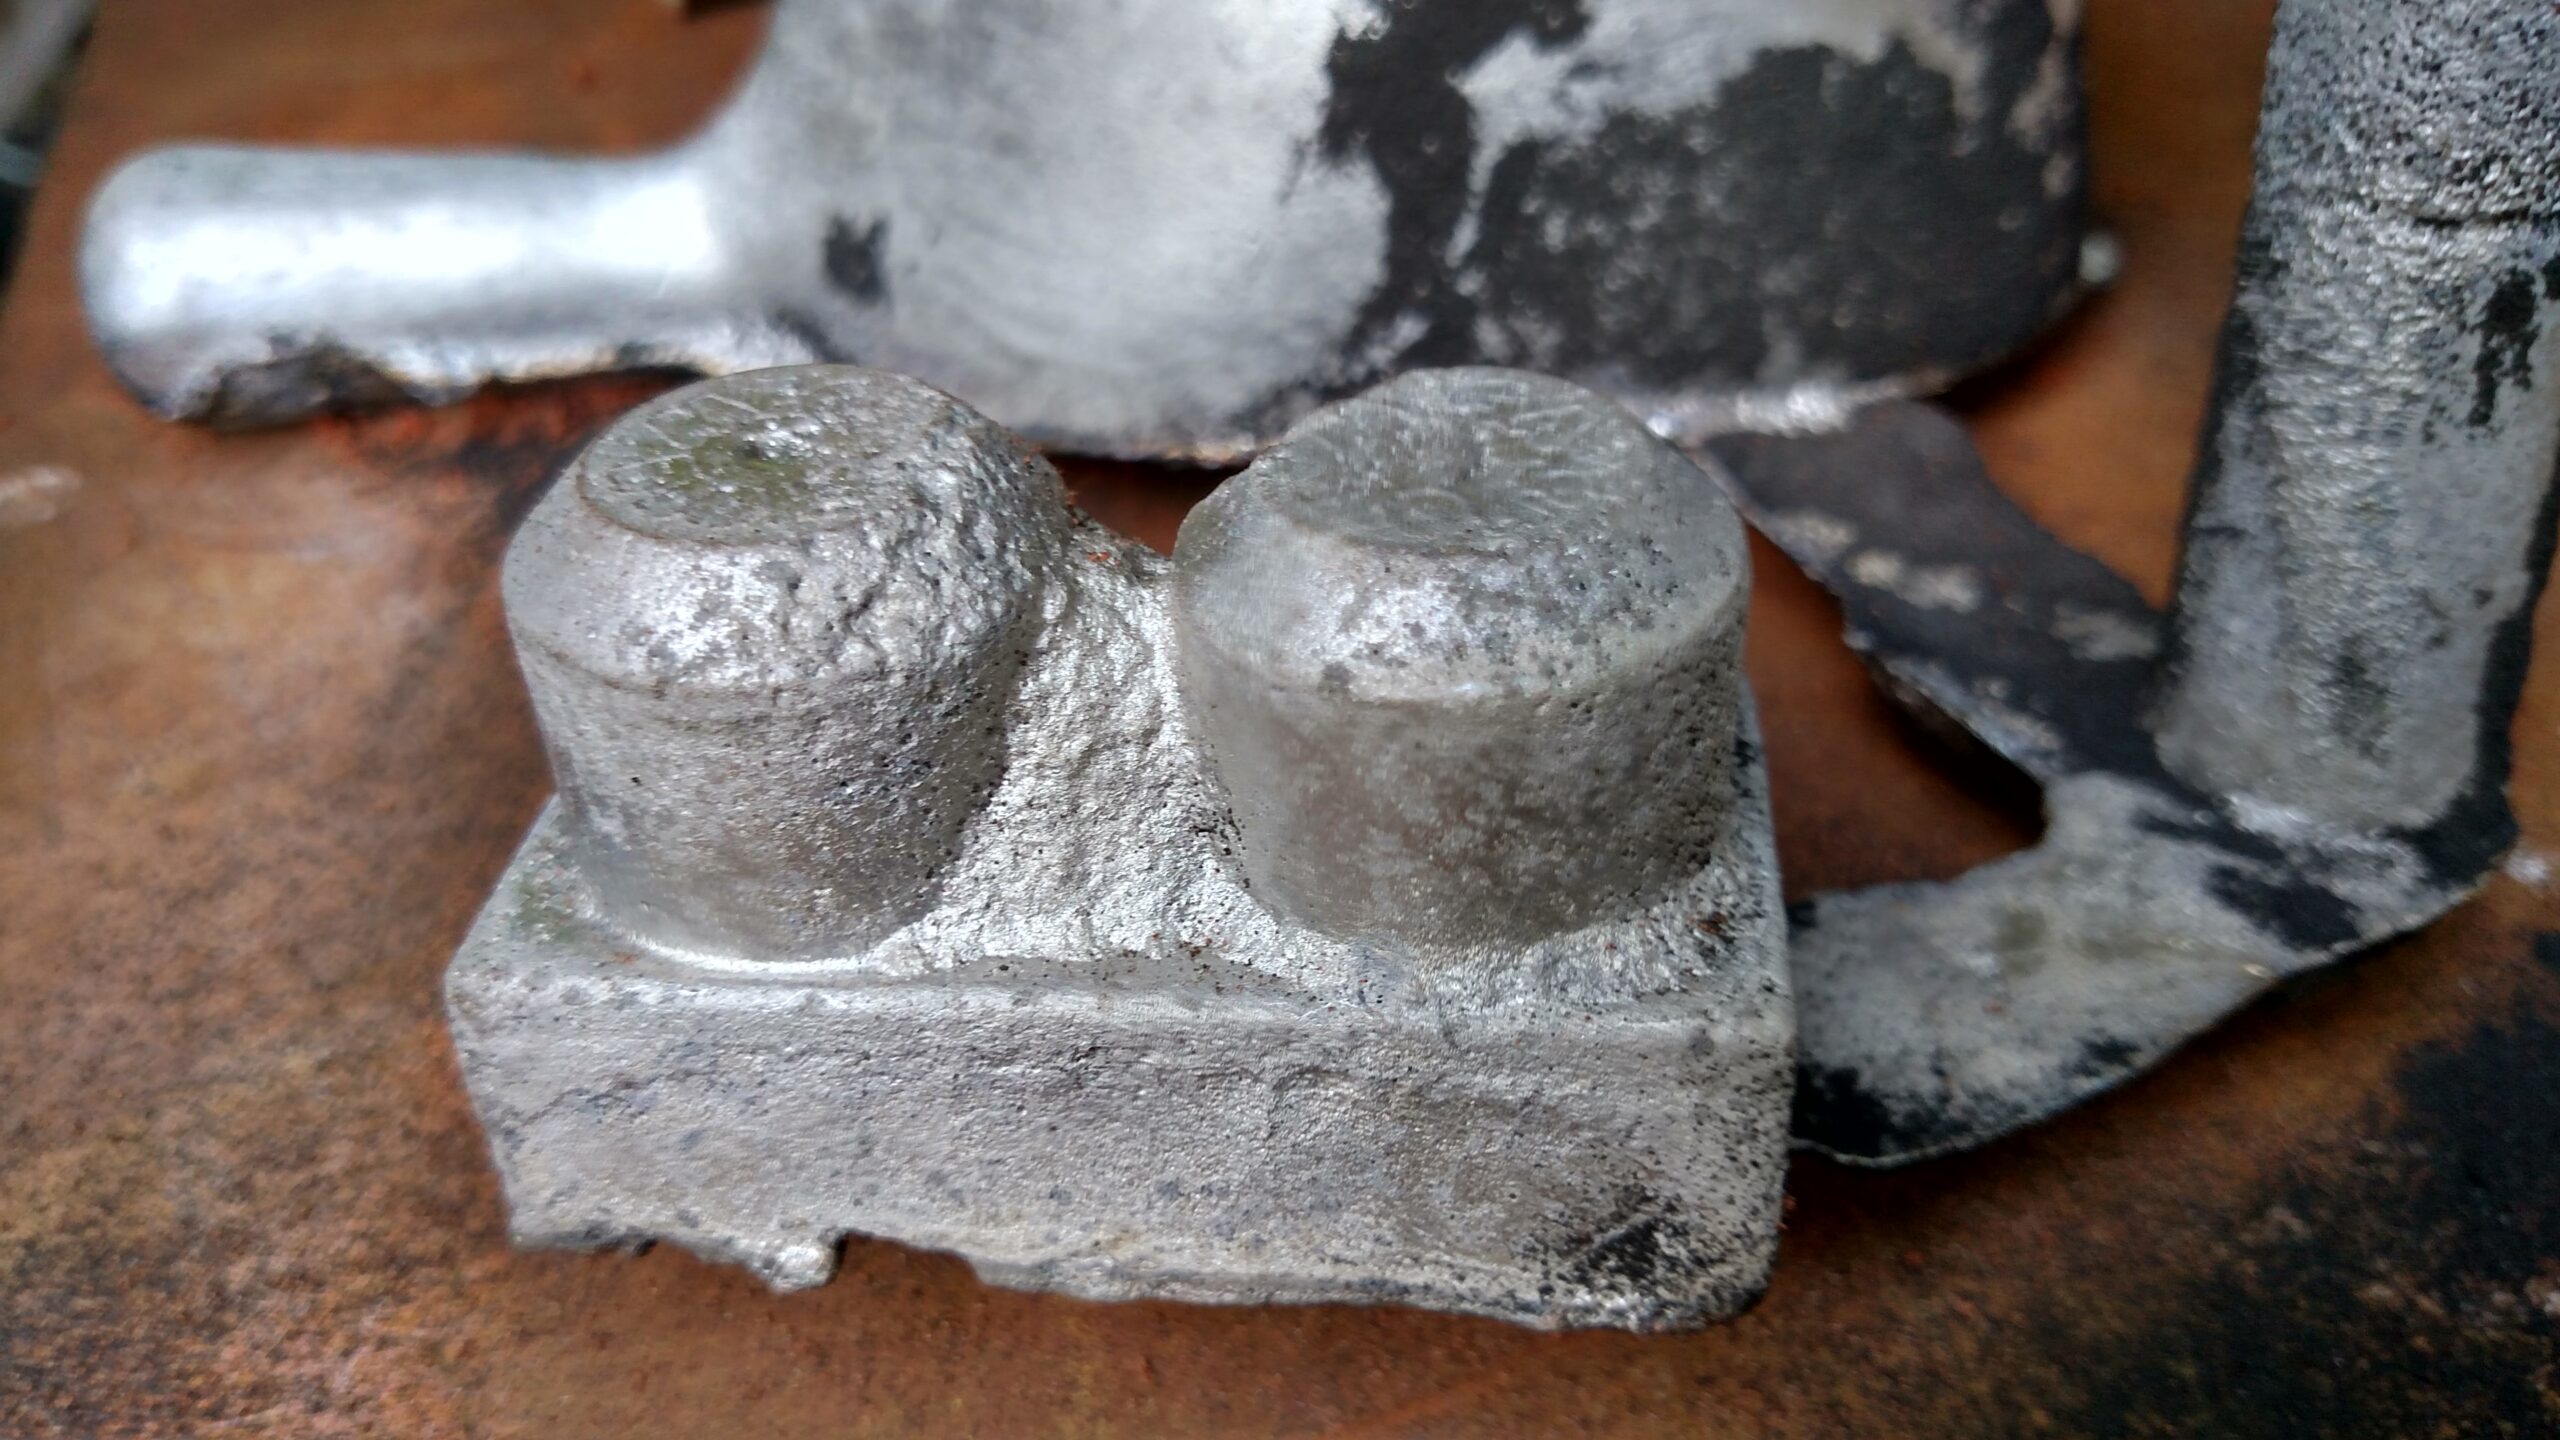
The featured image is of one of my very first sandcastings. It came out better than expected given my level of experience. My later castings were much better.
I used Petrabond for this casting, which gives fine details. The item in the front is a Duplo block, and the part in the back is from a wooden bowl with a handle.
Sand Castings
A sand casting starts with a pattern. The pattern needs to create a void in the sand, which will be filled with molten metal. To allow the sand to hold its shape, fine sand is mixed with a binder and a liquid. When the binder and liquid are in the proper ratios and thoroughly mixed, when compacted, the sand will hold its shape after the pattern is removed.
This means that you must be able to remove the pattern from the sand without damaging the void. Any sand that crumbles from the sides will cause an imperfection in the surface of the casting. Or worse, it can cause a void inside the casting.
Because we need to be able to remove the pattern safely, The pattern is created with “draft” or taper. With proper draft, as soon as the pattern releases, it is no longer in contact with the sand at all. If the pattern is undercut, meaning the sand covers the pattern, there is no way to remove the pattern from the sand without disturbing the sand.
For the parts shown, there is only one piece of the pattern. For a pattern that does not have a flat side, we use two patterns that fit together to form a whole, called a split pattern.
The Flask
The flask is a two piece box that is open on the top and bottom. The bottom piece is called the drag because you drag it across the molding board. The top is called the cope.
You start by placing the drag upside down on the molding board. Then you position the pattern inside the drag with the taper pointing up. The molding sand is then added to the flask until the pattern is covered.
The sand is then “rammed” up. This means compacting the sand by ramming it again and again with the end of a stick. This will force the sand to bind together and bind to the edges of the drag. More sand is added and the next layer is rammed up. This is repeated until the drag is overfull of sand.
Once the drag is full, a stick is used to scrape off the excess sand, called striking off. This leaves a flat sand surface.
A second molding board is placed on top of the drag and then the sandwich of the bottom molding board, drag, and upper molding board is flipped over. This leaves the pattern exposed on top side, sitting in a cavity in the sand. The sand is extremely firm if rammed correctly.
Now the cope is put over the drag to complete the flask.
Ramming Up the Cope
With the cope in place, we can put the other half of our split pattern in place. More parting powder is dusted over the pattern and top of the drag. Think of parting powder as non-stick spray for sand casting.
Once the pattern is in place, we can then ram up the cope the same way we rammed up the drag.
When we finish striking off the cope, we cut a sprue for pouring molten metal into the mold.
The cope can now be lifted straight up, and with a little luck, the top pattern will come away in the cope and the bottom pattern will stay in the drag.
To make sure everything goes back together, the cope has alignment pins, and the drag has alignment holes.
Pattern Extraction
This is the most frustrating part of the process for me. The two halves of the split pattern are firmly held in their sand voids. We need to get them out. The surface of the pattern that is facing us is normally very flat.
If you have made the pattern correctly, there should be threaded holes to insert screws into. Once these screws are in place, you tap and rattle them to cause the pattern to shift slightly in its void. If done correctly, this makes a very thin space between the pattern and the sand.
When you think you have done this enough, you carefully lift the pattern straight up. If you don’t, you can destroy some of the void in the sand.
This is why making patterns is such a high skill level job. The pattern must have enough draft, or it won’t release. The surface needs to be very smooth to reduce the friction between the pattern and the sand. There can be no undercuts. And the pattern must be sturdy enough to withstand being rammed up, over and over again.
Once the patterns are drawn out of the sand, gentle air from a squeeze bulb or from a low pressure air hose is used to remove all the stray sand. Sharp lips of the pattern might be gently touched with a soft brush to remove any sand that might separate from the walls when the casting is poured.
Cutting Runners and Gates
Tools are now used to remove sand from the drag to make channels, called runners, from the sprue hole around the different patterns in the drag. Smaller channels are then cut from the runners to the void/patterns. These are called gates.
Cutting runners and gates is a science unto itself. They have to be large enough for the molten metal to reach all the gates before it starts to freeze. It can’t be so large that you waste metal that is needed for the casting. The metal needs to be a laminar flow; turbulence can cause erosion of the sand of the walls of the runners and gates.
In addition, you want a place for sand carried in from the pour to go and settle out without the loose sand entering the casting.
Closing the Flask
Once all the work is completed on the mold, it is time to prepare the mold for the pour.
The mold needs to be transported to the foundry floor. For large castings, the mold is created right there on the foundry floor. I’ve watched videos of them molding and casting drive wheels for steam locomotives, wheels 5 feet or more in diameter.
The process is the same, except the flask is huge and is rammed up on the floor. Overhead cranes or other types of cranes are used to lift and flip the flask. It is remarkable to watch.
If the mold is small, then the cope is put on the drag, the alignment pins bringing the two parts in to perfect alignment with each other. It is important to note that it is not relevant that the cope and drag be in perfect alignment, just that they align repeatably. That is to say, when the alignment is correct, the voids in the two halves of the flask will be perfectly aligned.
Once closed, the mold is transported to the foundry floor for the pour.
Occasionally the mold is too heavy to be closed and moved. In this situation, the drag is first moved to the foundry floor, then the cope is moved and put into place.
If the mold is truly too heavy to move, even in halves, then the mold will be rammed up on the foundry floor. Cranes will lift the cope off and put it back when required.
Pouring
When the mold(s) are in place, ready for the pour, the furnace is started. The metal is brought up to temperature. Additives will be added to create the correct type of iron or steel or aluminum.
When the metal is up to temperature, the crucible will be lifted out of the furnace and transferred into a pouring gizmo; the word escapes me. For large pours, the furnace has a pour spout at the base; the furnace is opened, metal runs out and is caught in a crucible or ladle.
Regardless of the method of getting the molten metal into the pouring crucible or ladle, the metal is carefully carried to the molds and then poured into the feed sprue.
The metal has to be poured at a constant speed into exactly the correct spot on the mold. If the pour is too slow, the metal will freeze, and you will not get a good pour. If you pour too fast, you risk overrunning the sprue, which will get metal to run out over your flask, which can be very dangerous.
You want to continue pouring until you see metal start to come up the risers. If you don’t see this happen, then you have a short pour, meaning that the casting might not be complete because it didn’t get enough metal to completely fill it.
The pour has to be continuous as well. You can’t stop and start. To do so would be to cause chill spots and potential freezing.
The Wait
After pouring, you need to wait for the metal to completely freeze. To cool enough that it can be handled.
Different metals have different wait times, affected by the mass of the castings.
I was able to observe a bronze bust being poured. I asked when they would break open the mold. They laughed at me because it would soak in the mold for at least 24 hours.
Certain metals perform much better if they are allowed to cool slowly.
Luckily for me, the wait time for aluminum castings is about an hour.
Even after 2 or 3 hours, the castings I make are warm or hot to the touch.
Rough Finishing the Casting
Once the casting is cool enough to work with, the casting is cleaned. The means to remove all the sand that is still attached after breaking the casting out of the mold. If there was a core print, the casting might be soaked in water to help remove the core.
After all the sand has been removed, the casting is cut free from the gates and risers.
The flashing is also removed. The flashing is where metal leaks between the two halves of the mold. You can see the parting line in most objects that are cast or molded.
In some foundries, the casting is then processed to clean up any remaining excess metal.
For some metals, the casting needs to be heat-treated before it can be machined. This consists of putting the casting in a heat treat oven and bringing the metal up to temp. Then the casting is held at that temp for a known amount of time. Finally, it is allowed to cool according to the heat treat instructions.
Most metals have internal stress. I’ve watched a piece of 1/8″ steel curve like a banana when I cut it longways due to the internal stress being removed.
There is a good reason for using internal combustion engines instead of steam engines in our modern world. IC engines are very portable and very fuel efficient. A gasoline engine is about 20-30% efficient, while a steam engine of the type I’m working with will get between 8 and 15%.
In other words, an IC is about twice as efficient as a steam engine.
Having said that, most of the power you use comes from steam. Instead of using a reciprocating engine, we use turbines in the modern era. We still boil water and use the pressure from the steam to get radial motion, which is converted into power. You get that power in the form of electricity.
When you hear about coal power plants, or nuclear power plants, the difference between them is the fuel used to heat the water, not the electrical generators.
The advantage of steam, for me, is that I can use almost any fuel to generate the steam.
Fuel For Steam
Depending on the design of your boiler, it can use wood, coal, propane, natural gas, gasoline (bad), kerosene, diesel, or a host of other fuels. The only requirement is that the firebox be able to handle the fuel and the temperature generated by that fuel.
Coal was often used for locomotives. It produces more BTUs per pound than does wood. It burns hotter and typically longer than wood. Plus, it will keep for a fairly long period of time. The downside of using coal is that it emits sulfur dioxide (SO_2) which will eat at almost anything it touches. It is a primary source for “acid rain”.
This means that burning coal is hard on your firebox, fire tubes, and smoke box/stack. It is why many restored locomotives use wood instead of coal to fire the engines.
I want to be able to use coal or wood but have a burner that can be put into the firebox as needed that will burn liquid fuels. I have an axe, I have trees and fallen branches, I can make steam.
I will buy coal in fifty pound bags and that will provide steam for hours and hours.
Types of Boilers
There are two primary types of boilers and one “toy” boiler. We’ll start with that toy.
With a toy boiler, you have a tube filled with water; you heat the tube up, it creates steam, you tap the steam off the top of the tube.
The boiler I used for my first live steam test was a pressure cooker. I attached a hose to the rocker port and then the other end to the steam engine, a simple double-acting wobbler.
Skip about halfway to see it actually running.
A boiler of this type wastes much of the heat that is put into the system. It can make high pressure steam but at a fairly low rate.
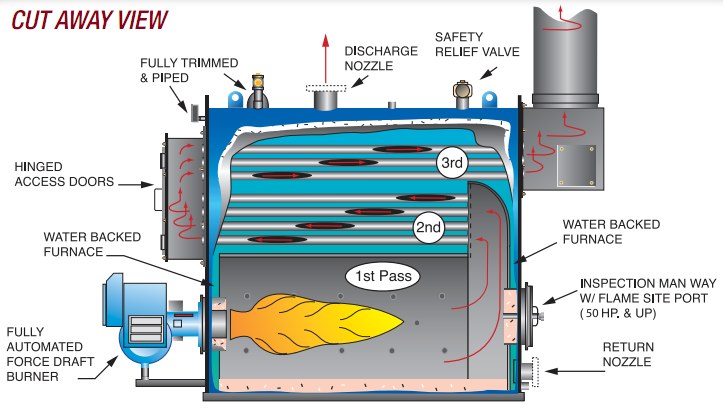
The next type of boiler is a firetube boiler.
A firetube boiler captures more of the heat put into the system by routing the fire through a series of tubes surrounded by water. The goal is to extract as much heat from the fire and gases as possible and still have a good fire.
Water completely covers the firebox. The hot gases then pass up into the first set of fire tubes, which brings the hot gases through the water back to the left side of the image. The hot gases are then mixed back together and pass forward through the third stage before being exhausted to the outside air.
The design criteria include the size of the fire tubes, the length of the tubes, and the surface area of the tubes.
A small diameter tube has more surface area per given length of tube because we are measuring the ID of the tube. For small tubing, the wall thickness adds a larger percentage to the OD than for larger IDs. But as the cross-section of the tube goes down, the velocity through the tube goes up. A smaller pipe requires a faster flow to move the same amount of gas.
As the diameter grows, the required size of the walls of the pipe also goes up. This creates a balancing act. You also need some way to create draft as the fire is starting.
The pressure is working to crush the tubing; this is the right direction for the strongest vessel with the thinnest walls.
This is the standard for boilers from 200 years ago through today. As long as you have enough water in the boiler it will be a very safe boiler.
Water Tube Boiler
This type of boiler runs water through the tubes inside the firebox. It is a faster method of getting to steam pressure but has some downsides.
Water enters at the top left at room temperature or lower. It is pushed through some lazy coils within the firebox to warm it up but not to create steam. It is then added to the very hot, near boiling water in the separating drum. From there it is pulled down and pushed back into the firebox at the bottom.
As the water moves through the coils, it absorbs more and more heat until it wants to boil but can’t because it is held under pressure. When it finally reaches the steam separating drum, again, the steam is free to escape; it boils.
That hot steam is still carrying too much water; it is considered saturated. As it is tapped off the top of the separating drum, it travels back through the firebox for a third time; this time it is being pushed by pressure, not pumps.
During this third trip through the boiler, it is “super heated” which is to say, it becomes so hot and the pressure so high that it is no longer considered saturated.
In other words, it is “dry” steam.
This type of boiler requires two pumps, one that can inject water against high pressure. The other is actually running at “normal” pressures. While the contents of the pipes is at a higher pressure, the inlet pressure and the outlet pressure only differ by a small amount, as compared with the feed pump, which is working against 150 psi or more.
The Ofeldt Boiler
My Ofeldt was attempting to design a better still, for making alcohol; he designed this instead:
In this design there are no circulating pumps. The water is injected into the central drum, where it mixes with the hot, nearly boiling water.
“Cold” water flows to the bottom where it enters the coils. The coils are in the hot gases of the combustion chamber. As the heat transfers to the water, the water starts to rise. As the water absorbs more and more heat, it starts to change phases. As it enters the gas phase it collects at the top of the central drum. From there, a pipe will lead down the side to a pancake coil at the bottom, closest to the burner. This is the superheating stage.
From there, the superheated steam is sent to the engine.
This is a very compact design that works well for small spaces. The firebox can burn any fuel with the correct grating and burners.
This is the boiler or steam generator I plan to make.
Design
I am not a good welder. I will need to be better to make this boiler.
The central tank will be schedule 80 black pipe, as large as I can afford. It will have pairs of threadolets added for each coil, top and bottom.
To the threadolets will be 1/4 NPT, which will connect to an adaptor from 1/4 NPT to double ferrule compression fittings. This means that I will be able to weld the threadolets on with full 360 access to the root. Giving me a higher possibility of success.
After each thradolet or set of threadolets is welded in place, I’ll add the adaptor and then a capped plug. This allows me to do a hydrostatic test of the boiler chamber one weld at a time. And when I start adding the coils, one coil at a time.
I’m hoping for 4, 6 or 8 sets of coils. I think I can do this.
As they say, a grinder and paint makes me the welder I aint.
According to my research, the boiler I’m describing should produce more than enough steam at a high enough pressure to drive the steam engines I’m designing.
If it works, I’ll look into having a real boilermaker make them for me. And be shocked at the price.
P.S.
I read your feedback on this blog. One of the things I realized is that I often write articles that allow me to set down my thoughts and ideas logically. I’m putting my reasoning into words to break cycles of indecision.
Yesterday’s article about cycles is more like how my mind runs normally. I’ll be thinking about something which circles back to the original thought, which will take me in a different direction for another rabbit hole which then cycles back to the same driving force. Frequently without ever reaching a conclusion.
For those that know me in person, it doesn’t look like this from the outside. It just looks like a nearly instantaneous leap to a correct or at least an excellent starting point.
I have an obsession with knowing how to do things. I need to know how things work. And occasionally I get lost in reality.
Years ago, I was working for Cray Research, Inc. We worried about cycles and memory access times. The unit time of accessing memory was a cycle and was 80 ns. I.e., freaking fast.
I became interested in photography. My mentor was already doing some spectacular photography, but I believe I’ve become better than him.
One of the ways I became better was in the concepts of studio lighting. I purchased and was using studio flash, getting good results.
The issue? How the heck did we sync the strobe with the camera? The camera fires, and the flash goes off. There is a propagation delay before the signal reaches the primary light and it fires. There is more delay while the light travels to the next light; there is still more delay before that light can fire. How can this work?
The answer was simple: the real world isn’t the digital world. The lens would be open for 16.6 us. This is 16,600 ms, or 16,600,000 ns. The only requirement was that the flash go off a some point while the lens was fully open. The camera wouldn’t initiate the flash until the lens was fully open, so it was never an issue.
I didn’t wrap my head around reality; I was working in my model of reality. I was wrong.
The Circle
I want to make something. What I would like to make is a steam engine.
To make a steam engine, I need a machine shop. I’ve purchased that. I also need to learn how to use all the machines in my shop. I’ve made a good start at that.
I also require castings for the steam engine. To get castings, I need to purchase or make them. To make a casting, I need to first make a pattern. Once I have made a pattern, I need to “ram” it up, and then cast it.
To make a pattern, I have to design the pattern and then construct it. To construct patterns, I require good woodworking skills and good wood for pattern making. Pine and most common hardwoods are not going to cut it. I’m working on getting those skills.
The pattern design is also a skill; I understand it, but I’m not good at it. CAD can make it easier.
Once I have the design, I need to construct it. This is pattern making, and I don’t have the woodworking skills to do it. But I can CNC or 3D print my patterns.
To get better at woodworking, I have to practice. To practice, I need space. The space has to be heated. I can handle working during the summer; I can no longer handle working in subfreezing weather.
The workshop will be in the first floor of “the hut”. The hut needs to be finished, insulated, and powered. This is a good time to learn about off-grid power systems, like solar. The solar system won’t be enough for this area, so what if I can add supplemental power from a genset? I don’t like the sound of internal combustion engines, but a steam engine? That sounds good to me.
So I want to make a steam engine.
Since I’ve created a cyclic tree, maybe I can break it with something? How about learning to make 3D printed patterns? I’m still doing all the design work, but now I can have a machine turn it into a physical item.
I liked my toy 3D printer, but it was a kit that wasn’t good, and it was never accurate enough. I was never able to build pieces that could fit together. It was retired. But new 3D printers are plug and play, which is what I want. I would rather not build them and tweak them physically; I want to use them to create physical objects.
And look at this, there is a set of modular 3D prints that can be linked together to create a pattern for a flask. The thing that holds the sand that patterns are rammed into. This means I can actually have sturdy flasks that won’t burn.
But all of this requires some skill in CAD. I have years of experience doing 3D solid modeling. What I don’t have is experience in creating the blueprints for translating these models into reality. But a CNC mill would be helpful for some of that. And I have a mini-mill that I got from my father. I can convert that to a CNC machine for certain operations.
And with the ability to make standard flasks of standard sizes, I can then make molding plates for those flasks to simplify casting certain items.
I can use a 3D printer to make runners, gates, spouts, and risers to make it easy to make castings.
The cool thing is that I can make a 3D printed pattern with proper shrink rates, then cast that pattern in aluminum. The aluminum then becomes the working pattern, so we have to allow twice the shrink so the working pattern can then be used to create our final castings.
If I’m going to be making my own patterns, I will need to make core boxes. Cylinders for steam engines are complex; they have ports cast into them as well as steam passages. Which means I will need to machine or print core boxes.
But there is a minimum size that cores can be. You don’t make 1/8 in cores 2.5 inches long. What is the right size steam passage?
Well, the steam passage should be able to transfer the swept volume without ever having a velocity above 6000 ft/minute. Where did they get 6000 ft/minute? Don’t worry, they used it in the age of steam, and it was empirically tested.
What does it mean though? Well, we know the volume in in³/s. If we divide that by 6000*12 in/60s, we will know the cross-sectional area required.
The area required is equal to pi*r^2, where r is the radius of the steam passage. We can use this same area when designing the ports for the valve and cylinder.
But I’d really like to know if this value was any good. Well, the “easy” method is to run a CFD analysis of the steam flow in the engine.
This would seem to be easy, since the workflow is to build a mesh of the domain for the CFD analysis, then set the initial conditions and let someone else’s code do the work.
What the heck is a CFD “domain”? Well, that’s the part that isn’t modeled. Which means I need to make an inverse model of the steam engine parts that are important for a CFD analysis.
But that requires new skills in my CAD program.
And all of this must be done because I want to be able to build steam engines that are fractional HP in size, but big enough to do the work required.
What would it be like if I had a steam engine that was driving a hydraulic pump for a wood splitter? Would that be cool? Motors for hydraulic pumps are built around HP requirements, but steam engines produce excellent torque at low RPMs. Do we really need a 5 HP engine to drive a wood splitter?
Now, If I get a 3D printer, I can use it to print Gridfinity and multiboard systems to organize my reloading room. My reloading room is full. I can’t get to the press, and I need to get there because I require more 9 mm ammo. And I want to reload a few hundred 30-06 and 7.62×51 rounds with something for taking deer.
So having a printer is a good idea. And I know where it will go. All I need to do is throw away the three junk paper printers that are stacked there, and I’ll be good to go.
While protesting, in and of itself, is not protected by our Constitution, American do consider it to be a right. As with all things, though, there is a right and a wrong way to go about it. We’ve all seen plenty of the “bad” way of doing it on social media of late. So let me share with you the same information I shared with my children when they wanted to join a protest at school.
First and foremost, do you care about the subject of the protest enough to put your life on the line? If the answer to that is no, then don’t go. It ends right there. While it may not be likely that you’ll be killed at a protest, it is never off the table, and you have to think of that very issue first, every single time.
Can you clearly explain what the protest is about, what it is actually protesting, what relief you’d like to see as an outcome to the protest? If not, educate yourself before you go back and ask that very first question again.
Do you understand that, at a protest, you may be arrested? Being detained and/or arrested may involve bodily harm to you, and you MUST be willing to be arrested and/or detained, knowingly, before attending.
Are you aware that you may be “group thinked” into performing actions that you didn’t intend? Any protest can easily and quickly turn into a mob, and a mob is an animal that doesn’t have single parts. It’s one big entity, and you can and likely will get sucked up into it. In order to avoid being part of a mob while being at a protest, you must always be aware of your surroundings and you must never devolve into letting someone else think for you.
You must know that you may be ordered to stand down, detained and/or arrested, hit with non-lethal rounds (rubber bullets, beanbags, etc), sprayed with pepper spray or other chemicals, knocked down and hurt and injured, hit with icy cold water from water canons, spit on, screamed at, and dozens of other non-lethal things.
There is always, ALWAYS the chance that someone will do something truly stupid, push the authorities too far, and someone gets shot. That someone could be you, EVEN if you are not part of the truly stupid person’s stuff. Bullets move in a path, and authorities who are rushed can and will shoot downrange. They’ll attempt not to get innocent people hurt, but it can happen. There is no protest, ever, that doesn’t include this possibility.
I support the right to protest. I support the right to publicly air grievances. I support free speech. But none of those block traffic, emergency vehicles, LEOs, or authorities. The moment you take your protest to a roadway or block non-participating people, you are breaking the law and you not only may be arrested, you SHOULD be arrested. The only time you should be on a roadway is if it has been lawfully blocked off by authorities to allow you a space to protest in (and this does happen, and it’s fine).
Do not block or impede people who are not involved in your protests. It can become violent, which is never good. More importantly, though, it makes those people angry with your protest. Protesting is supposed to be about bringing notice to an issue that needs changing, and if all your protests are doing is ricocheting around your own echo chamber, and pissing off the people who live in the vicinity, then you’ve lost. People in the area should look fondly upon you as the folks who came, made a loud noise and brought attention to something, then left the streets cleaner than they were when they arrived. THAT is the kind of protest that people pay full and positive attention to.
If all of the above is not being taught to you by the people organizing your protests, then they are not safe people. Stop, walk away. They may only be ignorant, which is dangerous… or they could be using you as cannon fodder, which is even more dangerous, for you.
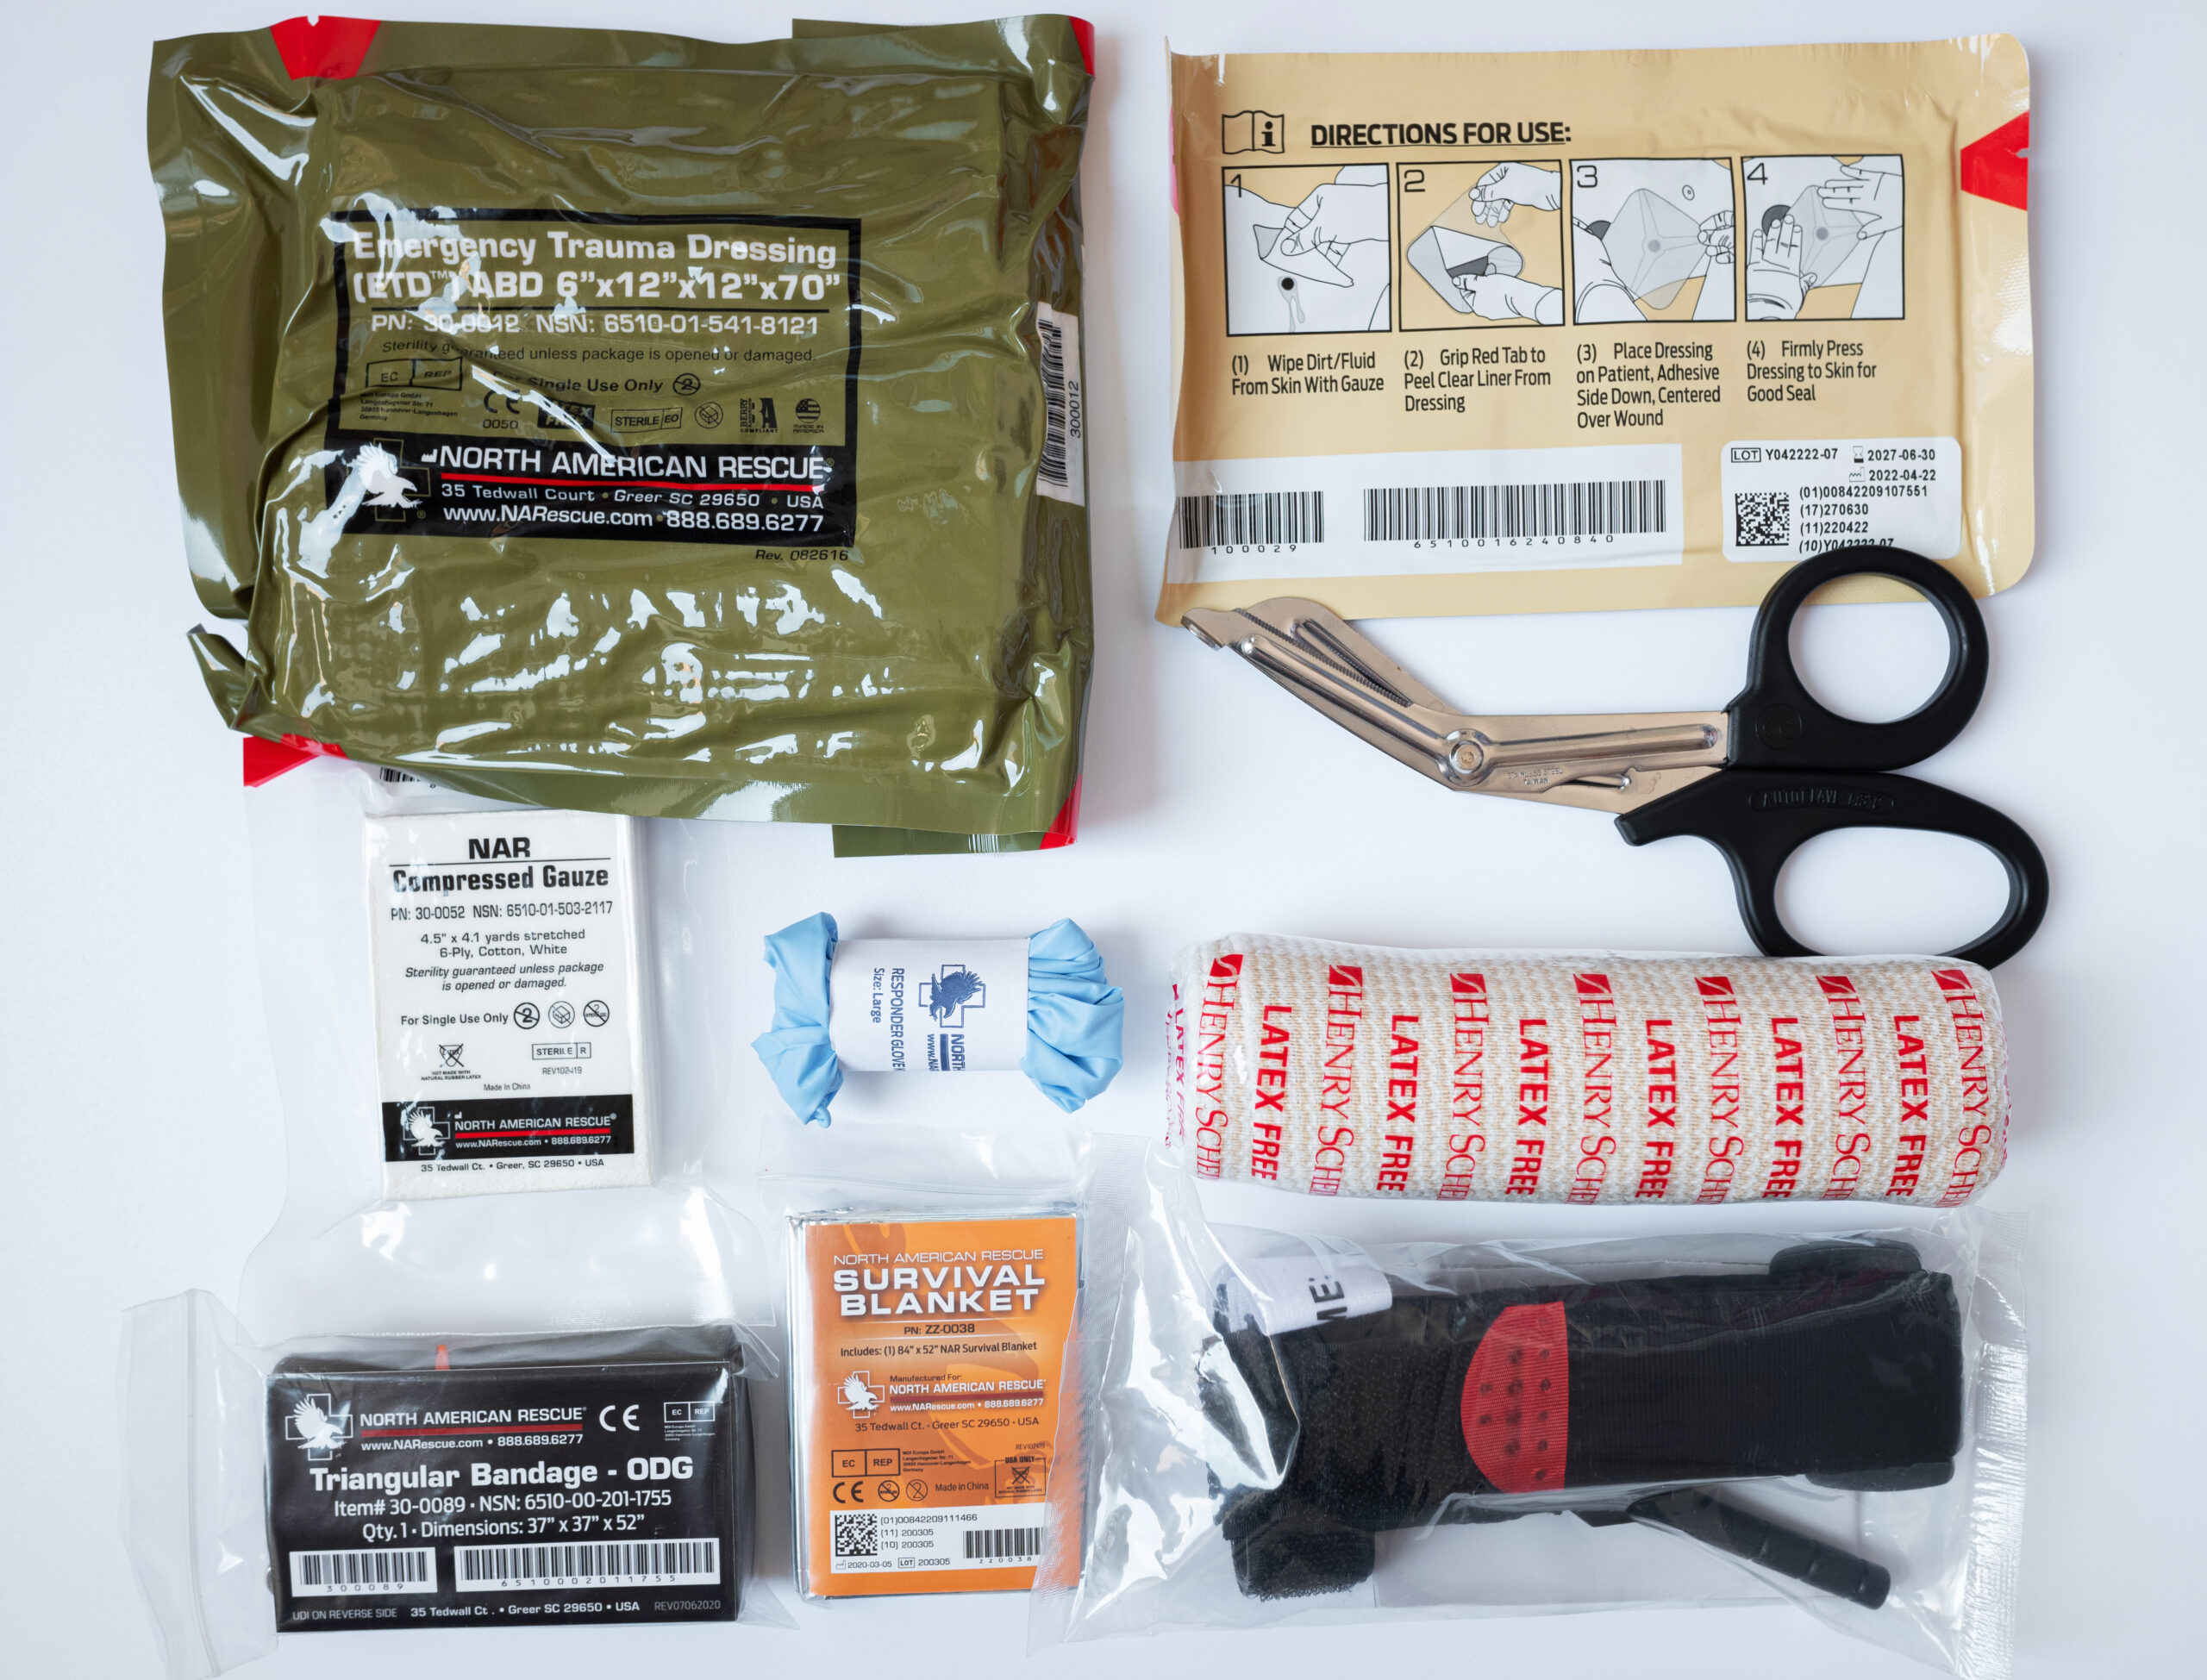
If you have the best possible trauma kit in the world, it does you zero good if you don’t have it with you.
I believe that I have as many trauma kits as any other person. Every load bearing vest has a trauma kit. The range bag has a trauma kit, my get-out-of-Doge-expeditiously (GOODE) bag has trauma kits.
My car has multiple kits in it.
What I was missing was something that I had on me every time I went out. I decided to buy an ankle trauma kit to try.
I have been 100% consistent since getting it; if I have a firearm on me, then I have the kit on me.
First things first, it is comfortable. I was expecting it to cause issues or to print in horrible ways. It doesn’t print, and it is comfortable. When wrapped around my sock, it is noticeable for about 3 minutes, then I forget it is there.
What I purchased I expected to be good enough. I’ve decided it isn’t. What it comes with is a SOFT-T tourniquet, a 4″ combat bandage, and a pair of nitrile gloves.
What is it missing?
A mini-Sharpie, mini-bandage shears, and z-fold gauze for wound packing. That’s it. If really pressed, a pair of mini-hyfin chest patches, for sucking chest wounds.
I could upgrade my ankle kit with another pouch, but I’ve not found one that I like. I want to have a QuickClot Z-Fold bandage, and that is a slightly larger package than simple gauze.
If you don’t have an ankle kit, look into it. I think you will be surprised at what you can get that will meet your needs and still be extremely comfortable.
Be safe out there. Keep your head on a swivel. Stay out of stupid places at stupid times. Stay away from stupid people.
I had two rifles to zero and time to spend with my wife. It was a wonderful day!
We took seven guns to the range and shot 4 of them, never noticing we didn’t have a chance to shoot the pistols.
We took two fun guns as well as my serious rifles for zeroing.
Wife brought Mrs. Pink, her AR-15. Yes, it has all pink furniture. It is most definitely hers. We set her up with a half size torso target at 50 yards. Truth, we don’t think she put a single round from her AR on paper.
On the other hand, she had a blast! She was using a single 20-round GI magazine from the 60s. What she got was manual of arms training. She learned how to load magazines, rather than having me hand her loaded mags.
She knew how to operate the rifle, but she didn’t have it down to the point she could just do it. So she got to practice charging the rifle, dropping the bolt after inserting a new magazine, removing and inserting magazines.
She was at a bench with a bench separating us. She did it all on her own. After getting her going, the next time she interacted with me was when she told me that Mrs. Pink was out of food. That was 100 rounds downrange. 3 of which were mine.
From there she moved to a Henry Big Boy in beautiful brass. This one is chambered in .22LR. She went through a couple of 100 round boxes, just beaming from ear to ear. She loved how smooth it was and how nice it was to shoot. She declared that she liked it better than Mrs. Pink.
At my bench, things were not going as well. My primary goal was to get the AR-10 zeroed. I have a new LVPO 1-8 by Vortex. Beautiful scope.
I had no real issues with the scope, except for having difficulty spotting where rounds were hitting the target. I never did get that figured out because after about 5 or 10 rounds I started to get failure to feed.
After I got back home, I did a bit of research, and AR-10s are known to be picky. They need 50 to 200 rounds before they are worked in, and they need lots of lube to begin with.
For me it was a single shot rifle with painful ergonomics to charge the next round. AR-10 buffer springs are much stronger than AR-15 buffer springs. I was there with 40 rounds in two mags. I think I sent 20 or so rounds downrange.
She’s been cleaned, lubed, and put away. I require some more range time. I require her to feed flawlessly every time.
On to the beauty of the day, my CZ 600 in 30-06.
This rifle has a trigger that makes my 1911s feel like Glock triggers (Yes, that is an insult to the Glock fanboys). It is a light trigger with zero take up. You put your finger on the trigger, think about pressing the trigger and the round is on its way downrange.
It has a vertical safety. It is likely a “crossbolt” style, but instead of the left to right arrangement I’ve seen for crossbolt safeties, this is vertical. The engage button is just behind the trigger guard. The disengage button is just behind the bolt. You just press down with your thumb to take the safety off.
I didn’t test the magazine feed; it comes with a 5-round magazine, but I feed each round individually.
With just boresighting, my first 3-round group was about 0.5 inches at 50 yards. It was also 4 inches left and a bit high from where my point of aim was. It took around 20 rounds before the point of aim and point of impact were nearly the same.
I don’t think I’ve shot a rifle as accurate as this before. I brag about punching primers with the 7.62×51 NATO Remington 700. This was easily 50 fold better than that Remington.
With the overkill of the scope, I could actually see point of impact. I could see my breathing modifying point of aim. I also found myself aiming for the corner of the 1″ square bullseye because that was more consistent than “somewhere” in the 1 in^2 red blotch.
For fun, I just put the crosshairs on the center of the 1/2 steel target at 100 yards. That rang true. So did aiming for the head of the steel.
It was just a little to crude to have any idea where on the steel I was getting impacts.
I’m still smiling from range day. Oh, it was warm today, with the temperature just above freezing and no real wind.
There are times when I wish I had entered the Computer Science world a few years earlier.
My mentor was born four years before I was. He went through the computer science program four years before I did at a prestigious university.
His academics took place as electrical engineering was morphing into computer science. Which meant that he was taught circuit design at a lower level than we were taught. He was taught how to design transistors and to build the hardware.
My class was taught bits, bytes, and words. We built on what his generation was learning as computers advanced.
A bit is the smallest amount of data that a computer can store. In fact, it is the only type of data that a computer can store.
Bits are grouped into bytes and words. Today, a byte is 8 bits long; in past years, it could be larger or smaller than that. I’ve worked on machines where a byte was defined as 12 bits.
Bits, by themselves, have no meaning. A programmer assigns meaning to a sequence of bits. Let’s take a byte of 8 bits, for example. The byte we will be looking at has a sequence of bits like this 0011 0001.
Again, this is meaningless until we assign meaning to it. If we say that it is an unsigned tiny integer, then a byte represents a value between 0 and 255, while our byte represents the integer 49. 0*128 + 0*64 + 1*32 + 1*16 + 0*8 + 0*4 + 0*2 + 1*1 = 49 base 10. We can also express that integer in base 16 as 0x31 or in base 8 as 061.
We could define it as a signed tiny integer; then a byte represents a value between -127 and 128. But one of the most magical ways of looking at the byte is as a character. In this format we have a table of values to glyphs or characters. The value 0x31, 49, 061, 0011 0001 is interpreted as the character “1”. In the same way, the value 0x41, 65, 101, 0100 0001 is interpreted as the character “A”.
In other words, a bit pattern doesn’t have meaning until we define what the value means.
Primitive Types
The CPU in a computer has several registers. Each register holds a bit pattern of a given size. The CPU can then manipulate registers with a fixed set of instructions. Those instructions define the meaning of the register for that instant. If we use the integer add operation, then the two registers are treated as integers with the result being stored in a third register. If we use floating point operations, then we treat the registers as 32 or 64 bit floating point numbers. Doubles are 128 or 64 bits. We can treat the registers as containing one byte or character or a multiple characters. Or, we can treat each bit as a boolean.
For languages, we normally have integer, unsigned integer, float, double, character, and string. These are all referred to as primitives.
While we have defined the type, we have not defined the meaning. For example, 1234.70 is a floating point number. But what does it mean.
It could be a price, a quantity, a physical measurement. If it is a physical measurement, then it is expressing units.
It is the meaning we give values that allows humans to interact with the data.
Formatting
Let’s say we are working with a basic product object. Each product has a SKU, price, description, and quantity in stock. We will call these “labels”. We give a primitive type to each. SKU=>string, price=>float, description=>string, quantity=>integer.
This is a good start, but we also define how we will format these values when we display the product for a user. We can say that SKU and description will be left-aligned, price will be formatted as currency ($x,xxx.xx) right-aligned, while quantity will be formatted as an integer (x,xxx) right-aligned. This formatting is encoded in the knowledge of the meaning of the labeled data.
Formatting is not part of the data; it is associated with the label. The label allows us to assign meaning to the data.
Viewing Data
Humans have a difficult time applying meaning to bit patterns, so each primitive type has a standard text format. This allows us to see the values of the data.
For example, we say that strings are input and displayed as quoted strings, “This is an example string”. Integers are input and displayed as an optional negative sign followed by a sequence of digits, 1-9 as the first character followed by 0 or more 0-9 characters. Or it can be a 0. This defines a base 10 integer. If integer starts with 0x, then what follows the x is an integer in base 16. if the first character after the sign is a 0, then it is octal.
Simple.
These rules for displaying and inputting values are well defined.
Information Interchange
This is a gigantic subject. We are going to barely touch on it. To transfer information in a meaningful way, we have to define the meaning of each datum that is exchanged.
There are specific tools for doing this. XML, JSON, YAML, SOAP, and others are designed specifically for this process.
Unfortunately, there are de facto “rules” for exchanging data. Rules that must be followed but that the people using them do not understand.
Excel, Word, and Other MicroSoft Monstrosities
The default for most people when exchanging a table of information is an Excel file, an xls file. How I hate this.
An Excel file gives labels to values and adds formatting but does not add meaning. Meaning comes from external sources.
So, we might have a two cells we are looking at; B1 has a value of “Price”. It is formatted as bold text, centered. B2 has a value of 7.50. It is formatted as text, so it displays as “$7.50”. If the cell was formatted as “number” or “general” it would display as 7.5.
It is the user who applies these formatting rules. It is the user who provides meaning to these values.
If you have an application that can read and display Excel sheets, then all is good.
But Excel sheets are not a great way to exchange data. As a matter of fact, they suck. Each cell must contain both formatting and values. There are linkages between cells and a hundred other things that can be added. They are painful to create programmatically.
The Savior of Data Interchange, CSV
It doesn’t get any simpler than a comma-separated values file. They use the well-defined primitive type display rules; they are easy to generate, they are row independent, and they can be read by a simple text editor.
The biggest thing to understand is that CSV exchanges values. The meaning of those values is up to the receiver.
Which is why expectations and Excel suck.
It’s Bad Data, No! It’s Being Displayed Wrong!
When a normal user receives a CSV file, they want to open the file and view it. On Microsoft platforms, the program tasked to do this is Excel. On many Linux platforms, the tool is LibreOffice. For Solaris it was OpenOffice.
These tools import the CSV file. That import process can break things, badly.
By default, a comma separates each field. If a comma is part of the value, it must be escaped. Quotes are used to provide escaping. Quotes within quoted strings must also be properly handled.
So we end up with client bug reports like this: “Data is misaligned throughout”.
What does this mean? It means that the client hasn’t properly defined the type and formatting for the column. In this case, the SKU sometimes consists of just digits. When this happens, Excel treats the value as an integer type. By default, integers are displayed right justified. If the value has characters in it, then it is displayed as a left justified character string.
Once you tell Excel that the SKU column only contains text, then the alignment issue goes away.
“The price column is missing dollar signs” means that values are being displayed as floating point numbers, not as currency. Change the format to currency, and it all just works.
“There are symbols instead of letters.” means they get what they put in. The value stored in the database has an accent in it. Like résumé.