
Skills

I can do it, concept. Successful business man jumps over a rock at sunset. I can't turns into can, creative idea

I can do that

Good points on flintlocks. Then again, making your own primers is definitely possible, including the charge inside. I ran into a reference (online) about making primer charges. You do need some chemical skills, though not a whole lot more than what it takes to make powder for some of the options. I once made mercury fulminate way back in college following the procedure listed in a German textbook I had read (Die Explosivstoffe by H. Brunswig, you can find it online). Not an optimal choice but easy and it would do the job.

On “technology would return quickly”, maybe so, but I wonder about that. A month or two ago on a list I follow someone posed the question “what is your book list for the books to save if civilization were to collapse?” I tried to make a list of 3, a list of a dozen, and the outline of a list of 100. Even with 100 it’s not so easy.

Suppose you have to start over with basic hand tools and a stock of metal. Can you make things? It would help to have a lathe. Can you make a lathe? A basic one (wood turning style) is not too hard. What about a screw cutting lathe? Maudsley figured out how to make a lead screw without a screw cutting lathe. How? Chase it? I suppose that must be the answer, but I haven’t seen the procedure documented.

And this is just one example. You’ll probably want nitric acid. Can you make that?

Do you want to communicate? Can you find Morse code, or semaphore code? Do you want a radio, and how would you make the parts? Even a first generation radio (spark transmitter, crystal receiver) takes electric power and headphones and other stuff you would have to learn to make.

pkoning

Black powder is a low explosive. It deflagrates instead of explodes.

Does this mean it is less powerful than a high explosive? I’m not the one to answer that.

In doing research, I found that in some mining situations in the past, they would create a room to hold the explosives. The room would be filled with high explosives to shatter the rock and black powder to push the rock out. The cartoons of rooms filled with “gunpowder” and “dynamite” were based on real-world things.

I have not attempted to make any high explosives. I have the knowledge, I have some books on how to do it, I have not done it. Therefore, I do not have the skill(s) — yet.

One of the interesting aspects of high explosives it that many don’t like to go boom. They need an initiation charge to do so. So you need a small amount of a more sensitive yet still energetic enough explosive to make the high explosive go boom.

One of my manuals describes how you create a blasting cap from a 5.56 case. Simplified, remove the primer from a spent case. Feed a slow fuse through the primer hole. Place it in the “press” to be filled.

The press is a wooden dowel that fits in the case mouth. It is attached to a wooden lever, with one end of the lever attached to a firm upright. The dowel is positioned only a couple of inches from the pivot point.

The lever is a couple of feet long. At the far end is a hole for a rope. The rope leads down to a snatch block (pulley) on the ground.

To use the press, you put a small amount of the primary explosive in the case. You GENTLY put the wooden dowel in the case mouth. You go a good distance away to the end of your rope, and you gently pull the rope to pull the lever down to press the primary explosive into the case.

When you have an unexpected explosion of the primary explosive, you are hopefully far enough away and behind cover so you are not harmed.

Yeah, not for the faint of heart.

Primers, again something I have knowledge about, I haven’t attempted it. I have been collecting spent primers for a few thousand rounds, just in case.

As for technology returning rapidly? Yeah, it will. Not because of any one person, but because of the wealth of skills that exist. As my mentor used to say, “If the Internet were to be destroyed tomorrow, it would be back up in a couple of weeks because geeks can’t live without their porn.”

It isn’t so much that we could rebuild everything, it is that we have so much “scrap” that could be brought back on line.

My plan for books is to take a few thousand with me. A Kindle device with a low-power draw and a few thousand books sitting in a cage to protect it from EMPs. Hell, multiple such devices. I have small memory devices of 64GB. You can put a hell of alot of data on one of those. And duplicate it.

Paper books would be a back-up, and we have bookshelves of such books.

Suppose you have to start over with basic hand tools and a stock of metal. Can you make things?

I have a foundry. I can make castings. I can make patterns. This is a good first step. Can I pour iron? I have the knowledge and tools to do so. I haven’t poured iron. I’ve only poured aluminum.

Aluminum isn’t as good as iron for most castings, but it is better than wood. There is plenty of aluminum to be had as scrap.

I do have a lathe. The lathe I have is belt-driven. That belt is powered by a 3 phase electric motor. I have the skills to make new leather belts for it. In a worse case situation, I can get slow speeds from it with a human-powered system, like a bicycle.

This is the reason I learned how to make safe steam boilers (knowledge) and steam expansion engines (skill). I have a generator set that I plan to make steam powered, if required, to make electricity for the mill.

Can I make a wood cutting lathe? Yes. I have the skills to use it.

Can I make a wooden screw? Yes. I have done so. The thing about making screws is that you only need to make one course and nearly correct screw to be able to create any screw of any quality.

The magic is in the reduction gears. Assume you want to make a screw that is a precise 8 threads per inch. You start with a hand cut screw of whatever pitch say 1.5x6tpi. This is a tap and die set you can pick up on Amazon. You can get different diameters and pitches.

Even if this thread is not that precise, you can use it to make a more precise thread. If you feed this at a 4 to 1 ratio, you can get a pitch of 24. If you run it a 4 to 3, you can get your 8 threads per inch. The gearing might be a bit complex, it will take some time to get it right, but it can be done.

Of more interest is making flat surfaces and right angles. With three right-angle samples, you can create three right angles and with 6 flat faces.

Start by making a flat surface. This is done by starting with three nearly flat surfaces. Call them A, B, and C. Ink B and use it to find “high spots” on A. Scrape down the high spots on A. Repeat with C on B.

A and C are now flatter as referenced to B. Ink C and use it to find high spots on A and B. Scrape the high spots. A and B are now flatter as referenced to C. Repeat for switching your inking surface each time. You can get a flat surface within the limits of your ink and the material you are using in short order.

It took me a couple of weeks to accomplish this with rough aluminum castings. Mostly because I was only working a couple of hours per week on it.

Once you have your flat surfaces, they become your reference. You can now make one face of each of your right angles flat. This doesn’t take much time because it is relatively easy because you are only scrapping one surface at a time.

Now that you have those three faces flat, you can use the same method of A, B, and C with the vertical surfaces. If A is your reference surface, and it is out 0.100 over 4 inches, and you use it against B and C. Both B and C will be scraped towards a 0.100 IN over 4 inches.

If you continued like this, you would end up with angle blocks that are not square.

But, when you rotate through a different master each time, the angles will move towards vertical.

A is out 0.100, this causes B and C to be IN by a little. Not the full 0.100. We now test A against B and A will be cut IN a little, making it more correct. B and C will hit lower than the top and will modify there.

Each round, the surfaces get better and better.

Can I make nitric acid? I have the instructions someplace. Again, knowledge, not skill.

I don’t know morse well enough. I have knowledge but not skill. I have references for semaphore. Knowledge, not skill. I have real-world cypher experience. I haven’t built a radio in 50 years, but again, I have the references.

So the brief answer is keep learning. Have fun learning. And make sure you translate that knowledge into skills.

There is a shed on my property that my children and I built. I built it as if I were building a house, but in small. I built it to translate knowledge into skills. And we learned. Boy did we learn.

Zombie hands rising in dark Halloween night.

Preppers and The Zombie Apocalypse

I grew up a prepper. Most of the people I knew were preppers. The difference was that it was normal.

My parents were born at the tail of the great depression. They lived through WWII as children and suffered the rationing that took place in the US.

My grandparents planted and tended a garden every summer. It was just the norm.

We once lived a good 2 hours from any supermarket. There was a local grocery, but everything there was pricey. It was the sort of place you went if you ran out of eggs.

Once a month, my mother would drive onto base in DC and shop at the commissary. She would have three or four carts of food. She purchased a month’s worth of milk. When we got home, everything was put away in freezers. We had “fresh” milk for about 3 days per month, thereafter, it was from frozen.

When we could, mom had a garden. She was never happier than when she had an entire acre of garden.

People think about “getting started” with prepping.

I believe this is the wrong mindset. The correct mindset is to start thinking about what knowledge and skills do you need?

Skills and knowledge are entirely different things. You might know how to wire an electrical outlet, but do you have you done it? Do you know how to use the tools? Do you have the right tools? Can you do it without harming yourself or others?

Because of my parents, I started with a “being prepared” mindset. There was always enough food in the pantry, freezer, and refrigerator. It was just the way I grew up.

I remember the first major snowstorm in Maryland after my daughter was born. Wife number one wasn’t satisfied with what we had in the refrigerator. Our child would starve if I didn’t get some milk, right now.

I put on my calf high moccasins, my wide brimmed hat, my winter coat and walked to the 7/11 to get milk.

On the way there, I pushed a female cop’s car out of the snow bank three times.

My wife was in a panic. I was not. I had powdered milk, a supply of gravity feed fresh water, and a camp stove. There was nothing to worry about.

I was wrong. I had knowledge, but not enough skills.

I’ve spent the last forty years learning more skills. What skills I didn’t learn for myself, I found people I love and trust to have those skills.

When I lived in Maryland, it felt like there was a strong chance of a war engulfing the East Coast. Not American vs. American, but of actual foreign soldiers on our soil. I had the money, I spent that money on firearms for battle. I wasn’t thinking of hunting. I wasn’t thinking of food and shelter.

I was ignorant. But it was a step in the correct direction.

Today I have more skills, I have a better idea of what I don’t know. I still don’t know what I don’t know, but I can see that I have gaps.

One of the people making comments suggested that I have a flintlock style firearm. Amazingly enough, that is coming to my home shortly.

The Fort At #4 represents the time around of the French and Indian war. I am working with some reenactors to find a smoothbore that is period correct and a rifle. I want a Kentucky long rifle. I’ve loved the look of that rifle since watching Daniel Boone on TV.

I not only know how to make black powder, I’ve done it. I have extensive notes on how I did it. I have the tools to manufacture it, about 2 pounds at a time.

We are practicing making salt-peter but haven’t succeeded yet. I’ve made proper charcoal. And I have some sulfur. KNO3 is also around here.

I want to make my own primers, but it is not worth the risk.

I’ve made my own slow fuse and my own fast fuse. I’ve made fireworks. All cools stuff.

If I’m talking to somebody knew to prepping, I always start with the rule of threes.

  1. You can live 3 minutes without air
  2. You can live 3 hours without shelter
  3. You can live 3 days without water
  4. You can live 3 weeks without food
  5. You can live 3 months without hope

Without air is first-aid, hygiene, medical. If you are bleeding out, you aren’t going to make it the 3 hours to die without shelter. If you aren’t breathing, nothing else will matter in a few minutes.

Without shelter includes fire making, proper clothing, proper shelter from the elements, and the skills to build a home.

While 3 hours sounds extreme, consider falling into a freezing river in winter. How long will you survive? How long will you survive in the desert without proper protection from the sun?

For whatever reason, most people put food before water. Water is life.

Back in the ’80s, the army was looking at the best way to hydrate their soldiers. One method was to only allow the men to drink at rest stops, and only as much as they wanted. Another was to make them drink a certain amount at rest stops. Another was drinking on the move and making sure they drank “enough”.

The test was simple, take a group of soldiers, make them hike a distance, then test them in a combat situation.

Method one had the men combat ineffective at the end of the march. They were combat ineffective for a couple of days after.

Method two had the men combat effective after a few hours of rest at the end of the march. They were combat ineffective for the next few days.

The third method? The troops arrived and immediately went into combat, they were effective. They were able to repeat the test the next day without issue.

There is a reason that the military has hydration rules that push water into the men. There is a reason that hydration packs are worn by sailors.

Three weeks without food is pushing it. People become less capable after only a few days without food.

Our family added, “Three months without hope.” Hope is having some form of joy with you. Pictures of loved ones. A deck of cards. Anything to help take your mind off what you are going through.

One of the biggest takeaways I can give you, if you are starting to prep, “Don’t plan on survival, plan on living. Life was strong before our modern society, and life was good.”

I close with a definition of a zombie. A zombie is that city dweller, from a deep blue city, that hasn’t eaten in a week, is drinking unfiltered water wherever they find it, and they are stripping the countryside clean of all food and goods.

We saw zombies burning down cities because a criminal died of heart disease while in police custody. When you think of zombies, think of those drones, living in a city with less than 24 hours of food.

On the wall…

There are five rifles on the wall. Four lever action and “Mrs. Pink”, an AR-15 platform with pink furniture. Don’t ask.

They are known as “Bear”, “Deer”, “Raccoon”, “Squirrel”, and “Mrs. Pink.”

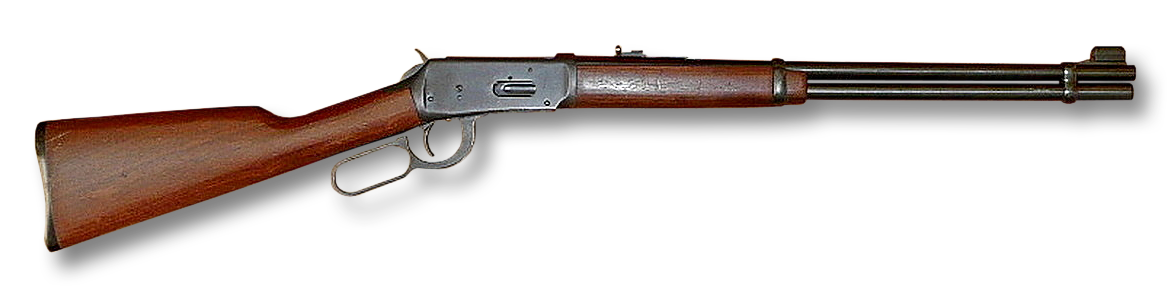
Bear is a Henry Big Boy in 45-70. Deer is a Winchester model 94 in 30-30. Squirrel is a Henry Golden Boy in .22LR.

We do have bear around here, and I know that Bear has enough stopping power, with rapid follow-ups.

Deer has taken a couple of deer. She does a fine job with iron sights for me out to around 150 yards.

Squirrel isn’t used for squirrel hunting, but damn he’s fun to shoot.

That leave’s Raccoon. Raccoon is a Rossi R-95 in .357 Magnum. She eats .38 special just fine. She is a little loose where the stock attaches to the receiver, but she will put rounds on target out to 100 yards with no problem.

The lever action in .357 is a nice, mid-weight, rifle. I’ve used it for taken fat raccoon and opossums. One shot and they are down.

She is easy to reload for, and it is easy to police up all the brass. I cast hollow point bullets for her and have some commercial bullets for her as well.

All in all, she is a great rifle.

There is a matching wheel gun in .357 magnum. I don’t have enough time with that revolver. It is more than capable of putting rounds on target, I’m not. It doesn’t shoot like my Sig nor my 1911s.

Would I recommend an R-95 for a first-time gun buyer? No.

They don’t have a great reputation. The loading gate is nasty sharp, it needs a little care to get it to function easily. I found that finding ammo for it was a bit of a pain. With reloading, it is a joy.

Mrs. Pink as a red dot on her. She belongs to my wife. We run the manual of arms every so often, but I figure she has 30 rounds before she needs an assist to load the next magazine. But I know that those 30 rounds are going exactly where she wants them to go.

The iron sights on the four lever guns work fine for me today. I have another 30-30 that has a scope mounted on it. I need to spend a few dollars to replace the scope with something modern and then sight everything in.

All in all, those rifles make up the “go to” when needed now.

The other part of this are the LBV that are available for use. Each vest has 6 30 round mags of 5.56, at least 2 spare mags for the pistol that goes with the LBV, and a first aid kit.

Past Plans

When I was considering buying my first firearms, I was looking at “what happens if…” My thought process was based on the concept of availability of ammo after the fall.

That lead me to an AR-15 in 5.56, an AK type rifle in 7.62×39, a 9mm Glock, a bolt action in 7.62×51, a black powder revolver, and a black powder rifle.

The firearm I have the most fun with, to this day, are the AR’s. They are gentle on the shoulder, the ammo isn’t too expensive, they are easy to carry and are just plain fun.

Though I will note that they eat ammo rapidly. It isn’t an unusual range day when I won’t send 300+ rounds down range.

I still have .308 from the original ammo buy. I’ve augmented it with reloads, but I don’t feed much through that rifle.

Of course, once I started buying firearms, it hasn’t really stopped.

Regardless, as more than one person has said, when the SHTF, the best firearm is the one you have.

Prepping – Leggy Seedlings

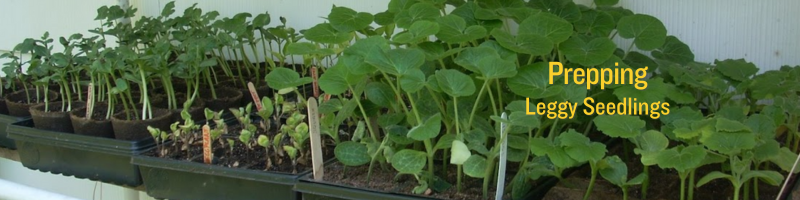
See those seedlings hardening off in the header image? Those are from a garden I was growing about a decade ago. They’re strong, healthy seedlings. They’re ready to be set into the ground to thrive and grow and make veggies for us.

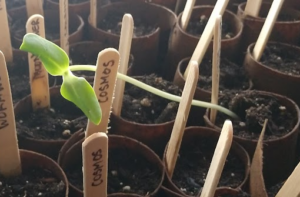
And then there’s this specimen:

See how it’s falling over, and it only has a single set of leaves? Those aren’t even leaves, by the by. Those are called cotyledons, or “seed leaves.” They’re just there to get the plant going. By the time a seedling is as tall as this one is, it should have several sets of leaves. So why is this poor thing falling over and not growing better and stronger?

The first thing it’s lacking is probably light. Most of the time, when we’re starting seedlings indoors, we’re short on light. There are plenty of ways to fix that, of course. You can put them on a rack with a light right above them, and put a timer on it to give them 12 hours a day. That will fix the light problem, even if they’re cheap light strips. What if you don’t have a rack with light strips, though? Well, you can make do by giving your plants as much light as you can. I have a “daylight lamp” that I use in the winter to help with depression. This time of year, I no longer need it, so I give it to my plants. I move it around, so they all share in the glory of it. Any lamp put close enough to the seedlings will help.

Your seedlings also may be too cold, or alternatively, too warm. Most seeds like to germinate between 65 and 80° F, so if your home goes below that at night (or, like mine, never gets that high even in the daytime), you  may need to pick up a seed mat. The mats aren’t that expensive, and you just place your seed trays right on top of them. They keep the temperature warm but not hot, and convince your seedlings that it’s time to grow.

A third option is that you are not watering your plants enough, or that you’re over-watering them. You can tell if your plants have enough water by feeling the soil they’re in. If it’s dry and flaky, you need to water them, stat! If it’s saturated and dripping, it’s probably too wet. You need moist soil that clumps when you take a handful of it, but that isn’t dripping and sopping wet. It’s my strong opinion that the best way to water seedlings is from below. The containers your seedlings are in should have several small holes in the bottom (and if there aren’t, add some), or be made out of porous material like paper egg cartons. The containers should be sitting in a waterproof container, either one designed for the purpose or whatever you have on hand. Pour the water into the bottom of the tray, and let the soil suck it up from below. This encourages strong roots, which is important for your plant. If there’s a tiny bit of water in the tray, you’re fine. If it’s an inch deep, you need to drain it out. I also keep a mist sprayer on hand full of water, and each day I will spritz my seedlings. This helps prepare them for the rigors of a rainfall when they get outside.

The last option for helping seedlings develop strong stems and avoid them being leggy, is to blow a fan over them. This should be a VERY gentle fan, aimed above but not directly onto the seedlings. This simulates the breeze outside, which is part of what causes a plant to create thick stems and rigorous root systems. The fan, sweeping back and forth, will make your plants signal themselves to create more roots and stronger stems. Another method is to (GENTLY) brush over your seedlings with your hands each morning and evening. This need take only a couple of seconds, and should be done very carefully.  You don’t want to break or damage the plants.

If you get to the point where you need to thin out seedlings (an unfortunate thing but necessary), don’t pull them up. Pulling plants disturbs the soil and surrounding plants, possibly causing more than intended to die. Instead, cut them off at the soil line. The plant will die off and feed the soil, and you can feed the thinned plants to your chickens or bunnies (so long as they aren’t poisonous).

Ivory Ball Phython Snake curled up in the straw.

How Many Languages Do You Speak?

In computer languages, there are very few that are structurally different.

FORTRAN is like COBOL, which is like Pascal, which is like BASIC, which is like ADA, which is like …

Forth is not like those above. Nor is APL or Lisp.

Assembly languages can be used in structured ways, just like FORTRAN, COBOL, Pascal, and many others. It requires the discipline to use if not condition jump skip_label; do stuff in condition; skip_label:. The actual programming logic stays the same.

The two computer languages I dislike the most are PHP and Python. Both because they are weakly typed.

In a strongly typed language, you declare a variable’s type before you use it. The type of the variable is immutable for its lifetime.

In other words, if you declare a variable of being of type integer and then attempt to assign a string to it, it will barf on you during compilation.

In PHP, all variables look the same, any variable can hold any type at any moment. The type can change from line to line. And the language will do implicit type casting. It is hateful.

Python has all the same characteristics I hate in PHP, with the added hateful feature of using indentation instead of begin-and markers for blocks.

I’m lucky that Python has an optional typing capability, which I use consistently. The optional part is a pain when I want to use a module that has no typing information. When that happens, I need to create my own typing stub.

But the worse part of all of this is that they get jumbled together in my head. How many entries in an array? In PHP, that is determined by the count() function, in Python it is the len() function.

In Python, the dot (.) is used to access methods and attributes of objects. In PHP, it is the concatenation symbol.

I am tired of writing Python in my PHP files and I dread switching back to Python because I know my fingers will mess things up.

The Weekly Feast – American Goulash

Sometimes known as American Chop Suey (no idea why), this dish has been served in American homes since the mid 1800s. It’s usually a macaroni based ground beef dish. This week, I made Orecchiette pasta with Chris last night, and we enjoyed it in my American Goulash. This is my own recipe, and I recommend it highly!

Ingredients:

  • 16 oz elbow macaroni or fresh pasta
  • olive oil as needed for cooking
  • 1 large onion, diced
  • 2 cloves garlic, minced
  • 1 lb ground beef
  • 1 medium carrot, finely diced
  • 1 stalk celery, finely diced
  • dash of red wine
  • 2 tbsp all purpose flour
  • 28 oz (2 cans) diced tomatoes, any flavor
  • 1/4 to 1/2 cup tomato juice or V8
  • 1 tsp brown sugar
  • 1 tsp dried oregano
  • 1 tsp dried basil
  • 1 tbsp salt
  • ½ tsp black pepper
  • 1 tsp Worcestershire Sauce (optional)

Fill a large pot with water, add a dash of salt, and bring it to a boil. Cook the pasta according to package directions. If you’re using fresh, cook your pasta until it’s al dente, which can take anywhere from 3 to 7 minutes, depending on the thickness and overall size of your pasta. Drain the pasta, and set it aside.

In a heavy pot, add a bit of oil to the bottom and brown the ground beef. When the meat is thoroughly cooked and no pink remains, add the onions, carrots, and celery, and continue to cook until the onions soften and become translucent. Stir often, to make certain the mixture doesn’t stick to the bottom of the pot. If necessary, add a bit of olive oil or butter to the pot. Add in the garlic and cook for one more minute.

Drizzle in some of the red wine and deglaze the bottom of the pot. Make sure nothing is sticking to the bottom, and add more wine as necessary, but not enough to make it very wet. Sprinkle a tablespoon or two of flour over the ground beef mixture, and stir gently to incorporate it. The result should be a slightly sticky, somewhat gummy mass in the bottom of your pot.

Add in the tomatoes, sugar, Worcestershire sauce, and spices, and cook until it begins to thicken. Add in as much tomato juice or V8 as necessary to make the consistency similar to a thin gravy. Simmer for 2 minutes or so, until all the food is evenly heated. Pour in the cooked pasta, mix it in well, and add salt and pepper to taste. Let this simmer on a very low heat (or in your oven at 250°F) for about 15 to 20 minutes, checking often to be sure it isn’t sticking. If it’s too thick or dry, you can add a bit more tomato juice.

Serve this up with a bit of crusty bread or a side salad for a delicious and hearty meal.

Prepping – Keeping out the Neighbors

You can take that title however you like. When I first wrote it, I was thinking of the four legged kind of beastie that sneaks in and eats your broccoli while you’re sleeping. However, if we’re talking prepping, there’s a legitimate chance that the critter in your garden is two legged and armed. So let’s unpack that!

Regular Critters

The most common form of problem in your garden is likely to be pests. These include, but are not limited to, ants, roaches, moths, hornworms, tent caterpillars, aphids, and bunches of other multi-legged beasties, as well as mice, voles, moles, possums, raccoons, deer, porcupines, and other wild and domestic animals. A cat that digs up your kitchen garden in order to use it as an outdoor toilet is just as destructive as the raccoon that takes out whole plants.

Poison is one method of getting rid of pests. It’s not a method I recommend, only because I know that poison can be transferred from its intended victim (the mouse or raccoon) to unintended victims such as owls (who keep the pests down naturally and should be cared for and preserved) and local cats and dogs (who sometimes do eat pests outdoors). There’s also a possibility that vegetables covered in poison might be transferred to deer that we harvest later for our own eating pleasure, and that would be a Very Bad Thing, indeed. When it comes to mice in winter, I occasionally lift this personal ban, only because I dislike mouse poop in my kitchen more than I dislike the thought of accidentally killing an owl.

Traps are another method, and while they do work, they’re a LOT of work. You can dead-trap or live-trap, but regardless, you have to deal with what’s in the trap on a daily basis. Depending on what you’ve caught, it can be problematic. Consider the person who accidentally captures a skunk in a “have a heart” trap, and then has to figure out what to do with the stinky critter. When it comes to live traps, again, I really don’t recommend it. When you unload your traps, your victims have the ability to just wander home and do more destruction.

Read More

The Weekly Feast – A Springtime Feast in 1750

I’m at the Fort this weekend (if you’re in the area, come on over and visit!), presenting life in the early spring in a cold environment. I’ll be staying all weekend, with no running water (it’s turned off until all danger of frost is gone) and little electricity (the gift shop has some). I decided that the food I was going to make should reflect the environment I’ll be in, and so these meals are ones that conceivably could have been served at the Fort in the spring of 1750.

Soup Meagre

I’ve adapted this from Hannah Glasse’s recipe of 1765. I find it amusing how closely it resembles the Green Soup that I made a couple of weekends ago for a Viking reenactment I did. There’s never much food in the spring, and what you can get your hands on has to “make do” until you can plant and harvest crops. It’s a tough time of year! This is a very plain soup, but with the seasonings, would probably have been quite the treat. Early greens in New England would include ramps, asparagus, watercress, fiddleheads, dandelion greens, and things we consider weeds like stinging nettle, onion grass, and dock.

Ingredients:

  • 2 tbsp butter
  • 1 onion, finely chopped
  • 2 celery stalks, cut into 1- to 2-inch lengths (“half as long as your finger”)
  • 6-8 oz mixed greens, (spinach, lettuce, arugula, etc), chopped if large
  • 3 tbsp parsley, finely chopped
  • 1 tbsp flour
  • 2 to 4 cups broth
  • 1/2 tsp salt, plus more to taste
  • 1/2 tsp black pepper, plus more to taste
  • 1/4 tsp ground mace and/or nutmeg

Melt the butter in a large kettle or Dutch oven over medium heat. When the bubbling has subsided, add the onions and cook for about five minutes, until transparent.

Add the celery, greens, and parsley, stir, and cook over medium heat for about 10 minutes. Sprinkle the flour over the greens and stir to blend. Add the broth, salt, pepper, and mace, and stir well. Simmer the soup over medium-low heat for about 30 minutes.

Taste and add more salt and pepper, if desired. Serve warm, with bread if you have it.

Notes from Mistress Allyson: If you want to add a bit of protein to this meal (something that would have been in high demand in the 1750s in spring), try some beans or a bit of salt pork. Beans get added right before simmering. Salt pork should go in with the butter at the beginning.

Read More

Person holding a small paper

Remote Repositories for GIT

Definitions

When working with git, there are several areas we might be discussing. The most important areas are “working directory”, “staging”, “local repository”, and “remote repository”.

A repository without a working directory is called a “bare repository”.

The working directory is a location where your files live, with a reference back to the repository. It is possible to extract the files without keeping a reference to the repository.

Most working directories, and what we will assume for our discussion, have the bare repository within the .git directory (folder).

A remote repository is normally a bare repository located somewhere apart from your local working directory. This could be a different directory on the local machine, or it could be located on a remote, network connected system.

Creating a Local Version of a Remote Repository

This is what the remote repository looks like. A pretty simple version.

gitGraph
   commit id: "d6458df1e"
   commit id: "0ccd79797"

We don’t copy it, we clone it. The implication is that what we have in the local version is the same as what is in the remote version.

git clone ssh:git@github.com/author/book.git

This creates a directory named “book”, it clones/copies the bare repository from GitHub and places it in “book/.git”. It creates a “remote” reference within “book/.git/refs/remotes” named “origin”. With “origin” it creates a copy of all the branches that are in the remote repository, in our example, just “master”

The clone command then checks out the working directory into “books”. This would be the files “chapOne.md”, “chapTwo.md”, and “chapThree.md”. It creates a file in “books/.git/refs/heads” named master with the commit hash (identifier) of “0ccd79797”.

This is a copy of refs/remotes/origin/master.

Our diagram now looks something like:

%%{ 'gitGraph': {'rotateTag': true}}%%
gitGraph
   commit id: "d6458df1e"
   commit id: "0ccd79797" tag: "origin/main"

At this point, you start work on your three files over two commits, your local repository now looks like:

%%{ 'gitGraph': {'rotateTag': true}}%%
gitGraph
   commit id: "d6458df1e"
   commit id: "0ccd79797" tag: "origin/main"
   commit id: "7d918ddc0"
   commit id: "f4b0d4086"

Meanwhile, your editor has fixed some typos and grammar errors and pushed those to the remote repository.

gitGraph
   commit id: "d6458df1e"
   commit id: "0ccd79797"
   commit id: "cd6023b24"
   commit id: "ac6d2dd15"

These two look the same, but notice that the last two commits have different values/hashes. This is because they are different.

Since you are done with your edit, you attempt to send your changes back to the remote repository named “origin” via a push command. git push origin main This fails because there would be two versions of the repository if you did this, there can be only one.

To correct this, you first fetch an updated copy of repo.

gitGraph
   commit id: "d6458df1e"
   commit id: "0ccd79797"
   branch origin/main
   checkout origin/main
   commit id: "cd6023b24"
   commit id: "ac6d2dd15"
   checkout main
   commit id: "7d918ddc0"
   commit id: "f4b0d4086"

This is done with git fetch origin This command updates only the bare repo.

We now need to combine these two branches, this is done with git merge origin/main After which our local repository looks like.

gitGraph
   commit id: "d6458df1e"
   commit id: "0ccd79797"
   branch origin/main
   checkout origin/main
   commit id: "cd6023b24"
   commit id: "ac6d2dd15"
   checkout main
   commit id: "7d918ddc0"
   commit id: "f4b0d4086"
   merge origin/main id:"119c29222"

We then add some more to the story line and make one more commit.

gitGraph
   commit id: "d6458df1e"
   commit id: "0ccd79797"
   branch origin/main
   checkout origin/main
   commit id: "cd6023b24"
   commit id: "ac6d2dd15" tag: "origin/main"
   checkout main
   commit id: "7d918ddc0"
   commit id: "f4b0d4086"
   merge origin/main id: "119c29222"
   commit id: "040e63c01"

We do another fetch, there is nothing to do as nothing else has been added. We then push our commits back to the remote repository. git push origin main

gitGraph
   commit id: "d6458df1e"
   commit id: "0ccd79797"
   commit id: "cd6023b24"
   commit id: "ac6d2dd15"
   commit id: "7d918ddc0"
   commit id: "f4b0d4086"
   commit id: "119c29222"
   commit id: "040e63c01"

Because I’m not the program, there might be some small ordering issues in the final commit.

The point in all of this is that all of this magic happens behind the scenes. The program can do most merges with no assistance from you. In the rare cases where there is a merge conflict, it is relatively easy to manual merge the changes.

A merge conflict happens when two commits modify the same line of code. In your version, you had “Ciliorys hat” originally. You modified it to be “Billy-Bobs hat” Your editor had changed it to “Cilory’s hat”.

Now you have two edits to the same line. Git says, “You figure it out.” and shows you the two versions of the line, in context. You can pick one version or the other, or put in an entirely different version.

You choose the third option and put “Billy-Bob’s hat”. The world is good.

Conclusion

git is powerful. This discussion barely touches on the power of git.

There is an entire process of modifying code by “forking” a repository. When you are finished with your modifications, you can contribute them back to the original repository with a “Pull Request”.

Git has multiple methods of inserting code review and other tools into the process.

It is so powerful, It can be used to create a full wiki, on the fly. The raw files are served as wiki pages.

There is a method of doing a binary subdivision to find bugs that were introduced in the past. There is a method of tracking who introduced an errant line of code.

There are tools for pulling a commit out of the middle of a branch and applying it to a different branch, without taking the rest of the modifications.

In general, there only about a dozen commands that a user needs to know to work with git.

If you would like to work with git, there are communities ready to help you, there are multiple cloud providers that will allow you to host your repo on the web.

Person holding a small paper

Source Code Control for Beginners

Update

My introduction to source code control came at University. The name of the program was “update”. It took an “update deck” which described lines to remove, by line number, and lines of code to insert.

This format allowed us to inspect the code that was actually being changed, as well as the surrounding code. Every line of code I wrote for the Systems Group that was installed went through three levels of code review and QA testing before going live in the system.

Having those change decks helped in the review process. As a side note, the author’s initials were attached as a note to the right of every line of code we modified. Easy stuff.

After a change deck was accepted, it became part of the “installed version” of the software.

One of the powerful features of working with change decks is that two (or more) people could be working on the same piece of code and unless their changes overlapped, they could be applied independently.

RCS

When I left University, I started working with the BRL CAD project. This introduced me to the RCS system.

RCS was something like “update” but not quite. And you didn’t think in terms of “change decks”. That was handled behind the scenes.

You had a directory (folder) in which you had your code. You also had hidden files that stored the RCS history of the code.

By default, files were stored read-only. You could read them, you could compile from them, but you could not modify them.

To modify a file, you needed to first check out the file. When you checked out a file, it was “locked” to you and nobody else was allowed to modify the file.

You made the changes you wanted to the checked out files, then you tested. When you were happy that your code worked, you checked in the file you had checked out.

This is great when modifying a single file, but if you are modifying more than one file to accomplish your fix or enhancement, you have to check in each file in a separate operation.

There was no linkage between the files to indicate that all the changed files needed to be processed as a gestalt.

When you were ready to make a release, you had to do some magic to mark each file as being part of that particular tag. Then, at a later time, you could check out that entire tree and work on it as if it was the day of the release.

RCS did magic behind the scenes to figure out the “delta” between the checked out code and the original. This was equivalent to the “update deck” I was used to from University Days.

To work in a collaborative methodology, you would have a single “working directory” with everybody on the team having read/write privileges to the directory. If you were working across multiple machines, each machine had to use the same shared directory via a network file system. (NFS at the time)

At one point, I was working on BRL CAD on my home machine. I did not have enough space on the drive to copy the entire RCS tree to my local drive, so I was using NFS over a 28.8k dial-up modem.

Compile times ran about 3 days. And if anybody changed one of the “big” include files, I would have to start the build over again.

If you were working on a copy of the source code, you would extract a patch file from RCS to submit back to the master RCS directory.

It felt easy at the time, but it wasn’t as easy as it seamed. We just didn’t know what we didn’t know.

CVS

CVS was the first major paradigm change in source code control for us. The basic use was the same as with RCS, but they had changed the layout.

You now had an explicit directory, CVS, which contained the history files. When you checked out files, the lock was done in the CVS directory.

In addition, you could check out the files read-only (no lock) remotely from the CVS directories and then checkout with a lock, edit on the remote system, then check in your changes.

This was a game changer. We no longer required a network file systems.

Unfortunately, we had some of the same issues as we had with RCS. The main one being that only one person could check out/lock a file at a time. With team members working nearly 24 hours per day, it was a pain when the morning dude wasn’t available at 2237 to release a lock.

SVN

SVN solved most of the known problems with CVS. It had the concept of a remote repository, it allowed multiple people to work on the same file at the same time. It had better branch and tag capabilities.

All in all, it was a vast improvement.

The two primary weaknesses were no gestalt for files and very slow check out of branches and tags away from the main trunk.

I remember using SVN. I had to use it just a couple of weeks ago. I don’t think I ever fell in love with it. It was a step-wise improvement over CSV.

git

Git is my favorite source control system. I understand that there is another SCS, but I can recall its name at this point. I’ve not used it.

Git changed the paradigm we use for changing the repository. Whereas all the previously discussed SCS’s work on a file by file basis, git works on a “commit” basis.

Even if you are working in a collaborative environment, you work on your personal repository (repo). We will get to collaborative environments shortly.

In the simplest form, you create a “working directory” which you populate with your code. That could be a book, a program, an application, or a web page. It doesn’t matter. Git doesn’t care what the files contain, only that they be text files.

Git can work with binary files, but that is not our focus.

Once you have your initial contents, you create your repo with git init. With this magic command, git creates all the required files to track the history of your project.

Let’s say you are working on a book. You have placed each chapter of the book in a separate file. One of your characters is named Cillary Hlinton. Your editor tells you that the name is just too close to a real person, and he would rather not be sued. He asks you to change the character’s name.

Under update, RCS, CVS and SVN, you would check out individual files, change the name to “Billy Boy” and then check in your changes. When you have made all the changes, you are happy.

The issue is that there Chapter One is on revision 44, Chapter Two is on revision 37, and Chapter Three is on revision 48. How do you figure out the revision from just before you made the changes?

With git, you do not check out files and lock them. Instead, all files are ready for you to modify. You just edit the files and change the name.

Now you have chapters one, two, and three that have been modified. You group them into a single commit by adding them to the staging area. git add chap1.md chap2.md chap3.md

You can do this on one git add or multiples, in one session or multiple sessions. At some point you will be satisfied with your collection of changed files.

At that point, you commit the changes. You will be required to supply a message.

Each of the following circles represents a commit.

Before Name change

After the name change

If we want to see the version before the name change, we can check out commit 4. When we do, all the files are changed back to the version before adding your name changes.

This makes it easy to find one particular point where the state of the book is one way and in the next commit, all the changes have taken place across the entire book.

The other major improvement that git brought was fast branches.

Branches

Here we see two branches added to the repository. The first “HEAD” is a special branch. It represents the commit associated with the working directory. It is manipulated implicitly instead of explicitly.

“master” is the default branch until “rrracist” was applied, so some repos now use “main” instead of “master” branch.

This ability to create branches rapidly allows us to make and destroy branches at will.

We are going to create a new branch, “editor” for our editor to work on. Meanwhile, you are continuing work on chapter four.

Editor and Master branches

And here is where git shows another of its powers, the merge. With the ‘master’ branch checked out, we merge the editor branch, fixing all the little grammar and spelling errors. git checkout master; git merge master

After Merge

With this merge completed, the master branch contains all the work done in the editor branch, but the editor branch does not have any of the new work done on master. To synchronize the editor branch with the master branch we do git checkout editor; git merge master.

After merging master into editor branches

If there is no more editing to be done, it is acceptable to delete the editor branch. No code will be lost.

Because the ability to branch and merge is so quick and powerful, it is normal procedure to start a new branch for each issue being addressed in a project. When the issue is resolved, the new code is merged into master or discarded.

Remote Repositories

Is a tale for another time.

Conclusion

If you can use a source code control system to track your work and changes, do so. It makes life so much easier in the long term.