Yeah, I know, we’re all tired of hearing it. But I want to throw out my two cents, as someone who was only recently liberated from the Left.
When I try to evaluate situations that are politicized (and this situation definitely has been), I attempt to re-set the incident in a non-politicized setting and see if I’m still angry/upset/whatever. So let’s look at this entire situation between ICE and Ms. Good from another angle.
Let’s pretend this was not ICE. Let’s pretend this was a random person walking on the roadway (not illegal, but some might consider it stupid). He didn’t have a gun. He didn’t have a method of defending himself. Another person approaches Ms. Good at her car window and orders her out of the vehicle. She doesn’t comply (whether that’s legal when ordered by ICE or not doesn’t matter for this scenario). Instead, she backs up to leave, inadvertently aims her car at the random person walking, and then shifts into drive and hits the gas.
The end result is similar: the person walking or standing is hit. The difference is that, being unarmed, the person who was hit is actually damaged, and possibly killed. How do we know this? Well, cars weigh a lot, and when you gun an engine that way, you move fast (especially when shooting forward off an ice patch as Ms. Good was doing). Even at slow speeds, a car or van can do a ton of damage to a human body, and bumpers are placed right where kneecaps are.
In my pretend scenario, Ms. Good’s intent would only come into play for one reason: to determine the length and breadth of her punishment. The fact that she would be punished (whether it be for manslaughter, murder, or intended murder) does not change. Only the severity of it. There is no excuse on the book that allows someone in a vehicle to hit someone not in a vehicle.
So to my understanding, Maduro stole more than one election. There’s information online about elections in 2018 and earlier, and then 2020, and again in 2024. This most recent one was won by the opposition leader, supported by Maria Machado (who couldn’t run, don’t know why, didn’t bother looking it up). Maduro ignored the win and claimed the presidency anyhow.
Sometime in Trump 1.0, we put a $15mil target on Maduro’s head. Biden’s people upped that to $25mil. Both sides of the aisle wanted this guy gone, very obviously. And why shouldn’t they? Venezuela has good oil reserves, and we’re set up to refine them. They have stuff we want, and we have stuff they need. Seems like a good connection. We also want to stop cocaine from coming to America from Venezuela, and since it seems that Maduro and his cronies were in on that, it just feels like a win all over.
Having the crazy Left standing up and protesting the capture (not murder, not assassination, not maiming, but *capture*) of a wanted fugitive that has a price on his head put there by both a Republican AND a Democratic President is just… bizarre. I don’t understand it at all. As several people have pointed out, the Left has been crying “no kings” for some time now, but when we removed an honest to goodness dictator, they get their panties in a wad.
Of course, the anger is all because “orange man bad.” It’s TDS run amok. I hate saying that, but it’s true. Most people have no idea what they’re talking about. And frankly, I’m not the idiot whisperer. I am not interested in educating most of the people who are Left of me. It’s exhausting even to talk to them. I have to prove every point and they get to “feel” I’m wrong. There’s no point.
All of this brings me to talking about socialism. I originally hail from Canada, having moved to the States some 25 years ago. I am American now. I have assimilated (with the possible exception of my continuing love of Tim Horton’s coffee and my occasional mispronunciation of “roof” lol). I now teach American history to people at living history museums. I love my chosen country, and I will defend her to my last breath.
Having grown up in Canada, however, I can tell you that socialism is not a good thing. Canada isn’t entirely socialist, but it’s very democratic (mob rule) and that’s not far from socialism on the political spectrum. The health care system is definitely socialist, and it’s dismal. The insurance is much less complex than America’s, certainly, but the CARE is horrendous. Here, insurance is a shit maze, but the care you get is phenomenal. I’ll pick door #2 every time, thank you.
She thought she was studying milk. What she uncovered was a conversation. In 2008 evolutionary anthropologist Katie Hinde was working in a primate research lab in California, analyzing breast milk from rhesus macaque mothers. She had hundreds of samples and thousands of data points. Everything looked routine until one pattern refused to disappear.
Mothers raising sons produced milk richer in fat and protein. Mothers raising daughters produced a larger volume with different nutrient balances. It was consistent. Repeatable. And deeply uncomfortable for the scientific consensus.
Colleagues suggested error. Noise. Statistical coincidence. But Katie trusted the data. And the data pointed to a radical idea. Milk is not just nutrition. It is information. For decades biology treated breast milk as simple fuel. Calories in, growth out. But if milk were only calories, why would it change based on the sex of the baby? Katie kept going.
Across more than two hundred fifty mothers and over seven hundred sampling events, the story grew more complex. Younger first time mothers produced milk with fewer calories but significantly higher levels of cortisol, the stress hormone. The babies who drank it grew faster. They were also more alert, more cautious, and more anxious. Milk was not only building bodies. It was shaping behavior.
Then came the discovery that changed everything.
When a baby nurses, microscopic amounts of saliva flow back into the breast. That saliva carries biological signals about the infant’s immune system. If the baby is getting sick, the mother’s body detects it. Within hours the milk changes. White blood cells increase. Macrophages multiply. Targeted antibodies appear. When the baby recovers, the milk returns to baseline. This was not coincidence. It was call and response. A biological dialogue refined over millions of years. Invisible to science until someone thought to listen.
As Katie surveyed existing research, she found something disturbing. There were twice as many studies on erectile dysfunction as on breast milk composition. The first food every human consumes.
The substance that shaped our species. Largely ignored. So she did something bold. She launched a blog with a deliberately provocative name, Mammals Suck Milk. It attracted over a million readers in its first year. Parents. Doctors. Researchers. People asking questions science had skipped. The discoveries kept coming. Milk changes by time of day. Foremilk differs from hindmilk.
Human milk contains over two hundred oligosaccharides babies cannot digest because they exist to feed beneficial gut bacteria. Every mother’s milk is biologically unique.
In 2017 Katie brought this work to a TED stage. In 2020 it reached a global audience through the Netflix series Babies. Today at Arizona State University’s Comparative Lactation Lab, Dr. Katie Hinde continues shaping how medicine understands infant development, neonatal care, formula design, and public health. The implications are enormous.
Milk has been evolving for more than two hundred million years. Longer than dinosaurs walked the Earth. What we once dismissed as simple nutrition is one of the most sophisticated communication systems biology has ever produced. Katie Hinde did not just study milk. She revealed that nourishment is intelligence. A living responsive system shaping who we become before we ever speak. All because one scientist refused to accept that half the story was measurement error.
Sometimes the biggest revolutions begin by listening to what everyone else ignores.”
– thanks Dale McElroy
Way too many years ago, I went to an interfaith seminary, and trained to be an interfaith minister. It’s one accomplishment I’m very proud of, though I also think I learned as much or more by interning with a UCC minister friend for a year. We studied many different faiths, and how they interact. While I, myself, am quite pagan, I do understand different faiths call to different people. I rather like the idea that various gods have “their” people. G-d (the Jewish deity) called the Jews to be his people, and gave them Commandments, instructions, and information… much of which they didn’t pay as much attention to as they should have. A lot of their rituals and celebrations honor the folks who got them out of messes that their religious indiscretions got them into.
Hanukkah is not a big religious festival for the Jews. It was a minor one, until Christmas became so commercialized and messed with the Jewish kids. So now Jewish kids get presents as well as gelt, and some of the more pagan aspects of Christmas have snuck into Hanukkah celebrations. It’s all good. Winter is a time of darkness, and whether you celebrate the Birth of the Sun, the Birth of the Son, or the Miracle of the Lights, it’s all about warding off the darkness (albeit in very different ways).
This Hanukkah is different, though. Way too many of my Jewish friends (and I have a surprising number of them) are afraid this year. They have watched too many of their fellow Jews be slaughtered, and very few criminals being brought to justice. They’ve heard too many people on the Left calling for their extermination, or celebrating those who harm Israel. They’re not celebrating Hanukkah this year. They’re lighting those eight lights over eight nights because it’s a mitzvah, a … “a helping.” They are putting the light back into the world, in whatever way they can. Lighting the Hanukkiah and singing Ma’oz Tzur are acts of peace, but also acts of rebellion against the violence they are seeing.
For those who may not know, the history of Hanukkah, in short:
Hanukkah’s history centers on the 2nd century BCE Maccabean Revolt, where Jewish fighters led by Judah Maccabee reclaimed Jerusalem’s Second Temple from Greek-Syrian oppressors who had desecrated it. After retaking the Temple, they cleansed it and rededicated it, but found only a tiny cruse of oil, which miraculously burned for eight days instead of one. This “miracle of the oil” established the eight-day “Festival of Lights,” celebrating Jewish perseverance, religious freedom, and divine presence. — Grok
My family and I have celebrated Hanukkah every year since I was in seminary. The act of lighting the candles, sitting quietly in the dark, being a family… these have become important to us, even though we’re not Jewish.
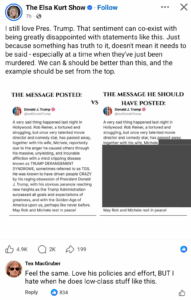
I don’t know who Elsa Kurt is, but this showed up yesterday afternoon on my feed, and I agree with it. It speaks better words than I can.
Chris will tell you that, during Trump 1.0 when I was suffering from TDS, I would often talk about the “mean tweets.” At the time, I was befuddled, and I couldn’t explain why they bothered me so much. I think perhaps now I have a better idea of how to put it into words. Elsa here has helped.
I can see and approve of, and indeed love, the THINGS that President Trump is doing while simultaneously decry some (but not all) of the things he says and/or tweets. I see all the good he’s done for our country, and I am very supportive of that. I see our economy recovering, spending going down, tariffs doing what they ought to, criminals being ousted from the country, and a general upswing in mood. But I also see his words. And they are troubling to me.
At one time, I lived in my parents’ home and in a very abusive situation. My mother only ever hit me once. At the time, I was a foul mouthed teen and I probably deserved discipline (though not a backhand with her ginormous wedding rings on). Her abuse was more sinister, though. It was mental. She was (and is, I suppose) an alcoholic who was undiagnosed and who refused to admit it. She drank frequently, and acted poorly when drunk. She was mean in general, but when drinking became a nightmare. I would be severely punished for such offenses as putting forks in the dishwasher wrong, having the wrong look on my face at a given moment, or asking for physical attention (hugs, etc.). Anything other than an “A” grade was also to be punished. Punishments ranged from being sent to my room, to berating and mocking me, humiliating me, and grounding me for months at a time. It was the digs, though, the mental and verbal digs that just kept coming, that destroyed me.
There was a time when I was 15 or so, when I finally broke and I went to the ER local to me, and begged them to lock me up on a 72 hour hold. After hours of talking to a therapist and various doctors, they basically told me I was fine, it was my mother who was sick. I could not get it through their heads that it didn’t matter if she was the sick one, _I_ was the one who had to change, because she wasn’t going to. That wasn’t just an assumption on my part, either. She’d told me that, to my face. I ended up medicated, because dulling my senses was the only way to get through my time living with her. I took up drinking and drugging, and inappropriate sex, because I needed to get love from somewhere.
Why are you talking about all this, you ask? Because when Trump does one thing and then says another, it shoves me right back into my days with my mother. It’s not so much of a match that I feel gut punched, but the discomfort is there. My mother could put on a dazzling display of “loving parenthood” when anyone else was around. Most people thought I was damn lucky to have such an attentive, wonderful mother in my life. They had no idea of the personal hell I lived through, every single day. When I see someone whose words and actions are at a mismatch, it is my natural reaction to look twice and thrice at every word and action they have made and are making.
I started writing for this blog about a year before I switched to thinking of myself as conservative. Or rather, for Miguel’s blog. I stuck to things I knew well, like prepping and cooking. I rarely touched on political things, because I knew people wouldn’t agree, so what was the point? And then Chris asked me to write “From Behind Enemy Lines.”
At first, I found it offensive. I didn’t think HE meant it to be offensive, but it bothered me. A lot. I was standing “over there” and “over there” was “behind enemy lines” and therefore in his mind I must be “enemy.” That’s the logic that I followed. Since I have known Chris for over 25 years at this point, I know he doesn’t think of me as an enemy (and didn’t when I was on the Left, either), so I knew I must have misunderstood something. Still, it was a burr under my saddle, and it irritated me. I really didn’t want to be writing stuff that I knew no one was going to like.
I used the pseudonym “Hagar” because I was absolutely terrified to out myself in public. No matter how you play the game, this blog is public. I didn’t want anyone on the Left to think I was conservative, and I didn’t really want to be dragged through the mud every time I posted. So “I” didn’t post, Hagar did. As with reenacting, putting on a new face allowed me to write and communicate more effectively. Hagar might get blasted, but Ally was safely tucked away where no one knew her or how to get to her.
Over time, I came to understand that none of you were attacking ME. Some of you might have attacked my positions over the years, but no one attacked ME. And so when we made the big switch to this blog, I used my real name. I opened the door a crack.
As I wrote things for this blog, I had to do research. That’s just the type of person I am. Even though I could just have told everyone “what they were thinking over on the Left,” I didn’t consider that enough. I’ve always been one to be thorough in my writing. So I went down the rabbit hole. I started finding out just how much of what I was told on a daily basis was lies. I had to go look stuff up on a constant basis, because I wanted to prove my stance. I’d get to the research, to the raw numbers, and realize I was wrong. I’ve tried very hard to be open and honest when I’ve been wrong, both on the blog and in my real life.
There are some things Chris wants me to write, and I will get there probably, but not this week. This week is “getting the finances up to date,” put up the tree, put up the lights, clean up the living room of Friendsgiving stuff, do all the laundry associated with Friendsgiving (hint: it’s a lot), dishes upon dishes… You get the idea.
Chris talked about his version of Friendsgiving, and I wanted to throw my two cents in. Well, maybe more like $0.25, but anyhow… 😉
Years ago, when I still lived with my parents and was not yet adult, Thanksgiving was both a joy and a horror. My mother, bless her heart (said in Ally’s most southern ma’am voice, thick with sarcasm), was an abusive and alcoholic soul, and she made every holiday miserable. But I got to see my Hungarian grandparents, which was almost always a happy thing. As with all things that involved my mother in any way, it was very complicated.
We would wake up early, and my mother would be resentful and angry about it. These days, I realize it’s because she was likely hung over, but I don’t know that for certain. In any case, we would have a light breakfast which my father would make (my mother generally didn’t cook), and then we’d get dressed in our nice clothes and go on the two hour car ride out to my Nagymama and Nagyapa’s house. The times it was just myself and my father were nice. We had things to talk about, music we could share, and it was generally pretty chill. With my mother there, it meant we played what she wanted to listen to, and we didn’t talk much because it bothered her, and you really didn’t want to bother her.
We’d arrive at my grandparents’ house about noon or 1pm, and the turkey would just be coming out of the oven. Nagymama would always cook a massive turkey, 20+ lbs every time (in fact I didn’t know they came smaller than that until well into my adulthood!), and stuffed to the breaking point. My father would carve it up, my mother would set the table (something she was good at, thank heavens), and I would help organize the platters of food. Nagymama would bring out a big pot of turkey neck soup with perfectly clear broth (always simmered, never boiled) with homemade noodles, bits of fresh turkey meat, and a single large carrot in the center of each person’s bowl which you had to cut up with your knife. We would enjoy our soup, and then Nagymama was up again, bringing in platters upon platters of food.
She’d grown up in Hungary, in Mezőkövesd (mezo kovesh-d), which sits nestled in the shadows of the Carpathian Mountains. They were just south of Poland by about 40 to 50 miles, as the crow flies, but the mountains were in the way. My Nagyapa had been drafted into the Russian army at gunpoint during WWII, and escaped when his squad was slaughtered by the Allies. He lay under piles of his dead comrades until everyone left, then crawled out and walked some 400 or more miles home. He only ever talked about it once, and after that he’d just pat my hand and tell me “Nem bántsad,” or “Nem zavar.” They had nothing for a very, very long time. When they came to the new world, they came with a handful of photographs, two sets of clothing, their son (my father), and hope. They turned that hope into a tobacco farm, which turned into big money. They were hardly millionaires, but they were vastly comfortable.
Chris and I have had a fundamental disagreement over Trump’s statements regarding the rogue Senators’ video. Let me get the original information here, for anyone who isn’t aware.
The text reads: Americans trust their military, but that trust is at risk. This administration is pitting our uniform military and intelligence community professionals against American citizens. Our laws are clear. You can refuse illegal orders. You can refuse illegal orders. You must refuse illegal orders. Don’t give up. Don’t give up. Don’t give up. Don’t give up the ship.
Trump’s response: truthsocial.com/@WashingtonExa. It’s called SEDITIOUS BEHAVIOR AT THE HIGHEST LEVEL. Each one of these traitors to our Country should be ARRESTED AND PUT ON TRIAL. Their words cannot be allowed to stand – We won’t have a Country anymore!!! An example MUST BE SET. President DJT
Trump’s later comment: SEDITIOUS BEHAVIOR, punishable by DEATH! (later in the above thread)
Alright, with all the information at hand now here on one page, with the actual words and not just copies or reports of them… let me continue.
I will start where I always start, by denouncing the behavior of the dems in question. What they did was wrong, full stop. For the ones who have previously been in the military (I know Sen. Kelley was in the Navy and is retired, but there may be others), the Uniform Code is still in play. That means that, if you’ve EVER served in the military and have taken the Oath, then you are still held to the USC.
According to Grok: 8 U.S.C. § 2387 makes it a federal crime to engage in activities that “affect the armed forces,” such as intentionally obstructing military recruitment, enlistment, or operations. It also prohibits advising, urging, or attempting to cause insubordination, disloyalty, mutiny, or refusal of duty among service members. Penalties include fines, imprisonment of up to ten years, and a five-year ban from U.S. government employment upon conviction. What 18 U.S.C. § 2387 prohibits: Obstruction: Intentionally obstructing or attempting to obstruct the armed forces’ recruiting, enlistment, or general military operations. Incitement: Advising, urging, or attempting to cause insubordination, disloyalty, mutiny, or refusal of duty among members of the U.S. military. Distribution of certain materials: Distributing written or printed matter that advises, counsels, or urges any of the above actions.
It seems quite clear to me that the above statements made by the six falls under 8 USC 2387. Those Dems clearly stated that Trump (“this administration”) is pitting military folk against citizens. It’s simply not true. The phrase, “Don’t give up the ship,” has special meaning in the military harkening back to Cap’t James Lawrence of the USS Chesapeake in 1813, but has been expanded to cover many branches of the military. So the dems were wrong. There are ways to communicate with the military, through the chain of command, that could have stressed the idea of following lawful orders, but they chose to do it via a public video, grandstanding, and not only is that … well, grandstanding… it’s also harmful.
Many of you probably know that the military has classes that teach soldiers what sorts of things are considered legal and illegal orders. Yes, it is expected of our troops, all of them, to not follow illegal orders. However, what constitutes “illegal” is a very specific thing, and they have to learn what that is. So this holiday, instead of enjoying turkey and stuffing wherever they’re stationed, they’re going through the full lecture series again, so that everyone’s 110% sure of what “illegal orders” are. Because for an active soldier to decide an order is illegal, there are hoops to jump through, and they are putting their career and possibly their very life on the line. Doing what they did, those dems ensured our military community will be pissed and irritated for the next several months.
This is copied from a post on Facebook, and I’m sharing it because I haven’t recovered from the 8 billion other things I’m doing this month. It was written by Janet Elaine Parks.
***
THE PATTERN THEY DON’T WANT YOU TO NOTICE..
This is long because it’s been a long 10 years…
So for those who have the patience and the time.. here ya go.
A 10-Year Timeline of Every Attempt to Remove, Destroy, or Silence Donald Trump..
This is not about agreeing with Trump on everything… It’s about recognizing an undeniable pattern:..
Every time Trump threatens the establishment’s power, a new “scandal,” “investigation,” or “emergency” appears out of thin air.
Here are the major attempts (all verified)
The Russia Hoax (2016–2019)..
• Accused of “colluding with Russia.”
• Fueled by Hillary-funded Steele Dossier (later discredited).
• FBI agents lied, altered documents (FISA abuse), and leaked to the press.
• After 3 years and $32 million, Mueller concluded:
No evidence of conspiracy…
Ended badly for several key figures ..including officials reprimanded for misconduct and falsifying evidence..
This was the first attempt to stop him before and after he won…
Sources:
• DOJ Inspector General Report on FISA Abuse (Horowitz Report)


 I don’t know who Elsa Kurt is, but this showed up yesterday afternoon on my feed, and I agree with it. It speaks better words than I can.

 This is copied from a post on Facebook, and I’m sharing it because I haven’t recovered from the 8 billion other things I’m doing this month. It was written by Janet Elaine Parks.