
It’s time to start thinking about gardening. This is not just a pleasant skill that yields tomatoes. It’s a post-apocalyptic skill that is absolutely necessary. Have you ever tried just hunting and gathering? If not, don’t bother; there’s a reason we cultivated plants. Learning to garden now, when we have ample food at the grocery store (because even a lightly stocked grocery store is ample, quite frankly), is imperative. This is not a skill you can learn after the fact. The learning curve is so sharp that it requires early adoption and constant practice.
There are lots of easy plants to grow in a new garden, and I’ll talk about them next week. This week, I want to talk about planning. First off, it’s the best part of this part of winter (the crappy, cold, damp, windy part). You get to huddle near the fireplace and look through seed catalogs (on or offline, your choice), and dream. Dreams are seeds of the mind, after all. Stage one of growing food is literally dreaming about it.
Make a rough map of your yard. This is important because there are several issues that you need to address:
- Where in your yard gets full sun? partial sun? no sun at all?
- What’s the type of soil you have (sandy, rich, damp, clay, etc)? You may have to amend your soil to grow anything, so you need to know this in advance.
- What kind of garden do you want to try (raised beds? containers? little pots? big pots? half an acre plowed by hand?), and how can you do it to best utilize the sun you get?
- What is your Plant Hardiness Zone? Find out on the USDA website. As an example, I’m 5b, which means something. More on that later.
- How much time do you want to spend on your garden? Remember it’s not just planting. You also have to factor in weeding, watering, fertilizing in some cases, weeding, helping plants with frames or structures, weeding…
- What will you eat? Don’t bother growing something you know your family won’t eat unless you have a very good reason for doing so. Plant what you’ll eat.
When you pick out your best spot (with 6+ hours of sunlight a day, if at all possible), you’ll want to sketch it out in a notebook or using a computer program. I can’t draw a straight line to save my life so I use programs online. There are several:
- The Old Farmer’s Almanac Garden Planner (7 day free trial)
- GrowVeg (this is the one I used when we had a big garden)
- myGarden Planner (okay, free, not as intuitive to use)
- VegPlotter (nice, limited free option, inexpensive if you decide to use it)
There are books out there, too, but I think you get the idea.
If this is your first time gardening, or it’s been a long time since your last one, I highly recommend starting with a raised bed of some kind, or a container garden. This limits the amount of work, and allows you to plan more effectively. However, you can go as large as you want. One of the best planting guides out there, in my very strong opinion, is the Victory Garden guide (it’s a PDF, so don’t be surprised). There’s a printable one available (scroll down, you’ll see it) as well. These guides may be old, and you may have to adjust for the planting zone you’re in, but they were meant to help patriotic Americans keep their families in food during a rough war. They hold up well.
Let’s start with a very simple garden, and I’ll show you the basic planning process. We’re going to have two garden beds, each being three feet wide by ten feet long. Why that size? Well, three feet wide is just wide enough that you can reach the middle from either side, and ten feet is a good base number to figure out amounts from. You can make these beds any way you like. I have traditional raised beds (wood and stone sides, filled with good quality soil, amended every couple of years), nontraditional raised beds (two giant tractor tires that I got for free, sawzall’d the sidewall off of one side, and filled with good soil… and several regular sized tires, one sidewall removed, filled with soil), and containers (I use old plastic bins that are cracked or otherwise damaged and no good for storing things anymore, “fixed up” with duct tape as needed and with holes in the bottom for drainage). You can make a garden bed out of anything that holds soil. I have friends who took an old wooden bed frame, stuck it in the ground, and now use it as a garden bed (yes, that is funny, and yes, you may laugh).
Some of the easiest things to grow are the yummiest. My family loves cherry tomatoes, green beans, peas, cabbage, spinach, zucchini, carrots, and radishes. Let’s see how to lay these out in two 3×10 beds (remember, that’s 60 square feet of garden, which is small to my way of thinking and huge to most hobby gardeners).
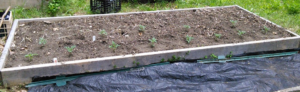
That’s an image of one of my 3×10 beds. I have a variety of things in it. Think of each foot across as being a foot wide, so you have three rows to fill. Using my list above, I would probably put one row of cherry tomato plants down the center (because they get bushy but start out small), and that row would have ten plants at most, and most likely more like eight. I would put cabbage down half of an outer row (4 plants, as they get big, on the side that gets less sun), spinach in the other half of that row (which would be as many seeds as I could sprinkle in there, because spinach is one of those crops you grow and pluck as it comes up), and then zucchini plants down the other outer row, 6 plants (again, they get big, but you can toss in flowers or radishes or loose leaf lettuce in between them).
In the second bed, I’d plant the carrots mixed with radishes down one side row. Carrots germinate very slowly and need space. Radishes germinate, grow, and are harvested fairly quickly (about 30 to 45 days tops, beginning to end), and they will push the carrot seeds around so they have the room they need. Wherever you plant root crops, you need to make sure the soil is loose and as free of rocks as possible down as far as whatever you’re planting will grow. I usually grow “Danvers Half Long” carrots, because they are “big” carrots but they’re short, so you get a lot of flavor but only have to worry about four inches of soil depth. The center of the second bed would be my peas and green beans, half the row in one and half in the other. In the very center I’d put up a bit of chicken wire or fencing, or even just sticks at either end with strings pulled taut between, so that the pea and bean vines can cling to them and grow up. You plant peas and (bush) beans every inch or so, and they’ll crawl up the wire. If you want, you can plant garlic or onions or scallions or any number of other things down the other outer row.
As you can see, you can pack a lot into a smallish space. However, when you do that, you must pay attention to your plants. In huge fields, there’s a lot of space between plants and they don’t have to compete with one another. When you do a kitchen garden like this, with limited space, you need to be sure to get out there and weed a minimum of three to five times a week, and it’s best if you do it every single day. Weeds have this habit of taking over ridiculously quickly. You will also need to watch your plants for any number of odd things, like blight, scale, powdery mildew, leaf spot, and a bunch of other things. Most of the diseases that will hit your garden are fairly easy to deal with, especially if you’re paying attention.
Then there are the predators. Whether it’s a bug, a neighbor’s dog, a possum, a field mouse… stuff will want your garden. It’s yummy, after all! What you do in regards to predators will depend largely on where you are in the world, and what predators are most bothersome. Slugs, for instance, can be taken out by putting out a small low bowl of beer. They go in for a drink, get drunk, and drown. Deer, rabbits, and mice seem to be repelled by Irish Spring soap. Simply get some old stockings or socks, and cut up bars of the stuff into six pieces. Add one piece per stocking, and hang them in amongst your vegetables. I will usually put three down the center of each 3×10 bed. You can also cover your plants with row covers, if you like, but they have to be opened each day for sun during the summer, so you may not be able to do that.
Next week we’ll talk about garden beds and indoor seed sprouting.
My wife was an avid gardener, and absolutely brilliant at planning her spaces. We had abundant vegetables from limited space for many years.
3’x10′ is a good size for raised beds, it’s a nice round number, and construction is easy: boards come in 10-foot sections so there’s not much cutting. 3’x8′ or 4’x8′ (if you don’t mind reaching a bit to get to the middle) is good, too, for the same reasons.
For trellising, we purchased a few rebar panels from the Big Box Home Improvement stores (usually ~4’x8′ in size), wired two together along one side, and stood it up like an A-frame, using tent stakes to hold down the corners from the wind. Wire the long ends for an 8-foot-long frame that stands about 3.5′ tall, or the short ends for ~4-foot-long frame that stands about 7.5′ tall, depending on how high the plants climb. Sweet peas and snap peas do well on the shorter frames, but climbing/runner beans get TALL and need the higher trellis. We would also take a single panel and attach it to a couple T-posts. The nice thing about the A-frame, though, is that at the end of the season, we could clear off the panels, pull the stakes, fold the frames flat, and store them until next year, without having to pull T-posts.
Planning is 100% essential, not only with laying out the space, but with figuring out which plants can share a bed and which can’t. Some will feed certain nutrients back into the soil that other plants need, and so they all benefit — Native Americans called corn, beans, and squash “The Three Sisters” because they do so well when planted together. Other combinations compete over limited resources and don’t do well together.
It’s also possible to start the garden a couple weeks early by using low tunnels. Some 1/2″ PVC pipes, each end pushed into the ground to make hoops over the plants, and covered in “clear” (translucent, not really clear) plastic drop cloth, will absorb sunlight and help keep some heat in. It’s not a “set it and forget it” thing though; it’s absolutely essential that you take the plastic off on warm, sunny days or it will get too hot.
Pest control is necessary, and there are a LOT of options. We preferred to avoid chemical pesticides whenever possible, but even then there are several things to try. The low bowl of beer does indeed work for slugs. Planting marigolds nearby helps; a lot of bugs don’t like them. Diatomaceous earth sprinkled on the surface of the ground will keep ground insects like ants and beetles under control. And we would purchase praying mantis and/or ladybug egg sacs, which after they hatch will hunt aphids.
Depending on where you live, spiders can be a help or a curse. Where we were, the dangerous ones mostly stayed low, on or near the ground, so the diatomaceous earth kept them at bay along with the ants. The helpful ones built their webs off the ground, so we just let them be.
It’s a lot to learn, and as mentioned, a very steep learning curve, but it’s an extremely valuable skill set.
I had to laugh about the bed size… We went with 10×3 because I am basically a human version of a T-Rex. I have teeny arms. I can’t reach the middle of a 10×4 LOL!
There are lots of trellising ideas, and I’m actually going to do an entire post on how to deal with taking care of the fruit of your labors. I like using the big green fence posts, with chicken wire or string between it, for stuff like beans and peas. String has the happy option of “you can rip it all off in September and burn it” while the chicken wire is reusable. 😉
We did a 3 sisters garden at the Fort this year, and while the squash didn’t do well, the corn and beans did remarkably well for such a tiny plot. But yes, planning is essential.
Thanks for the feedback!